- Agents
- HSM
- HubSpot
- Assignment
Contact visibility for agents
In the agents tab you can configure which contacts each agent can view on the platform.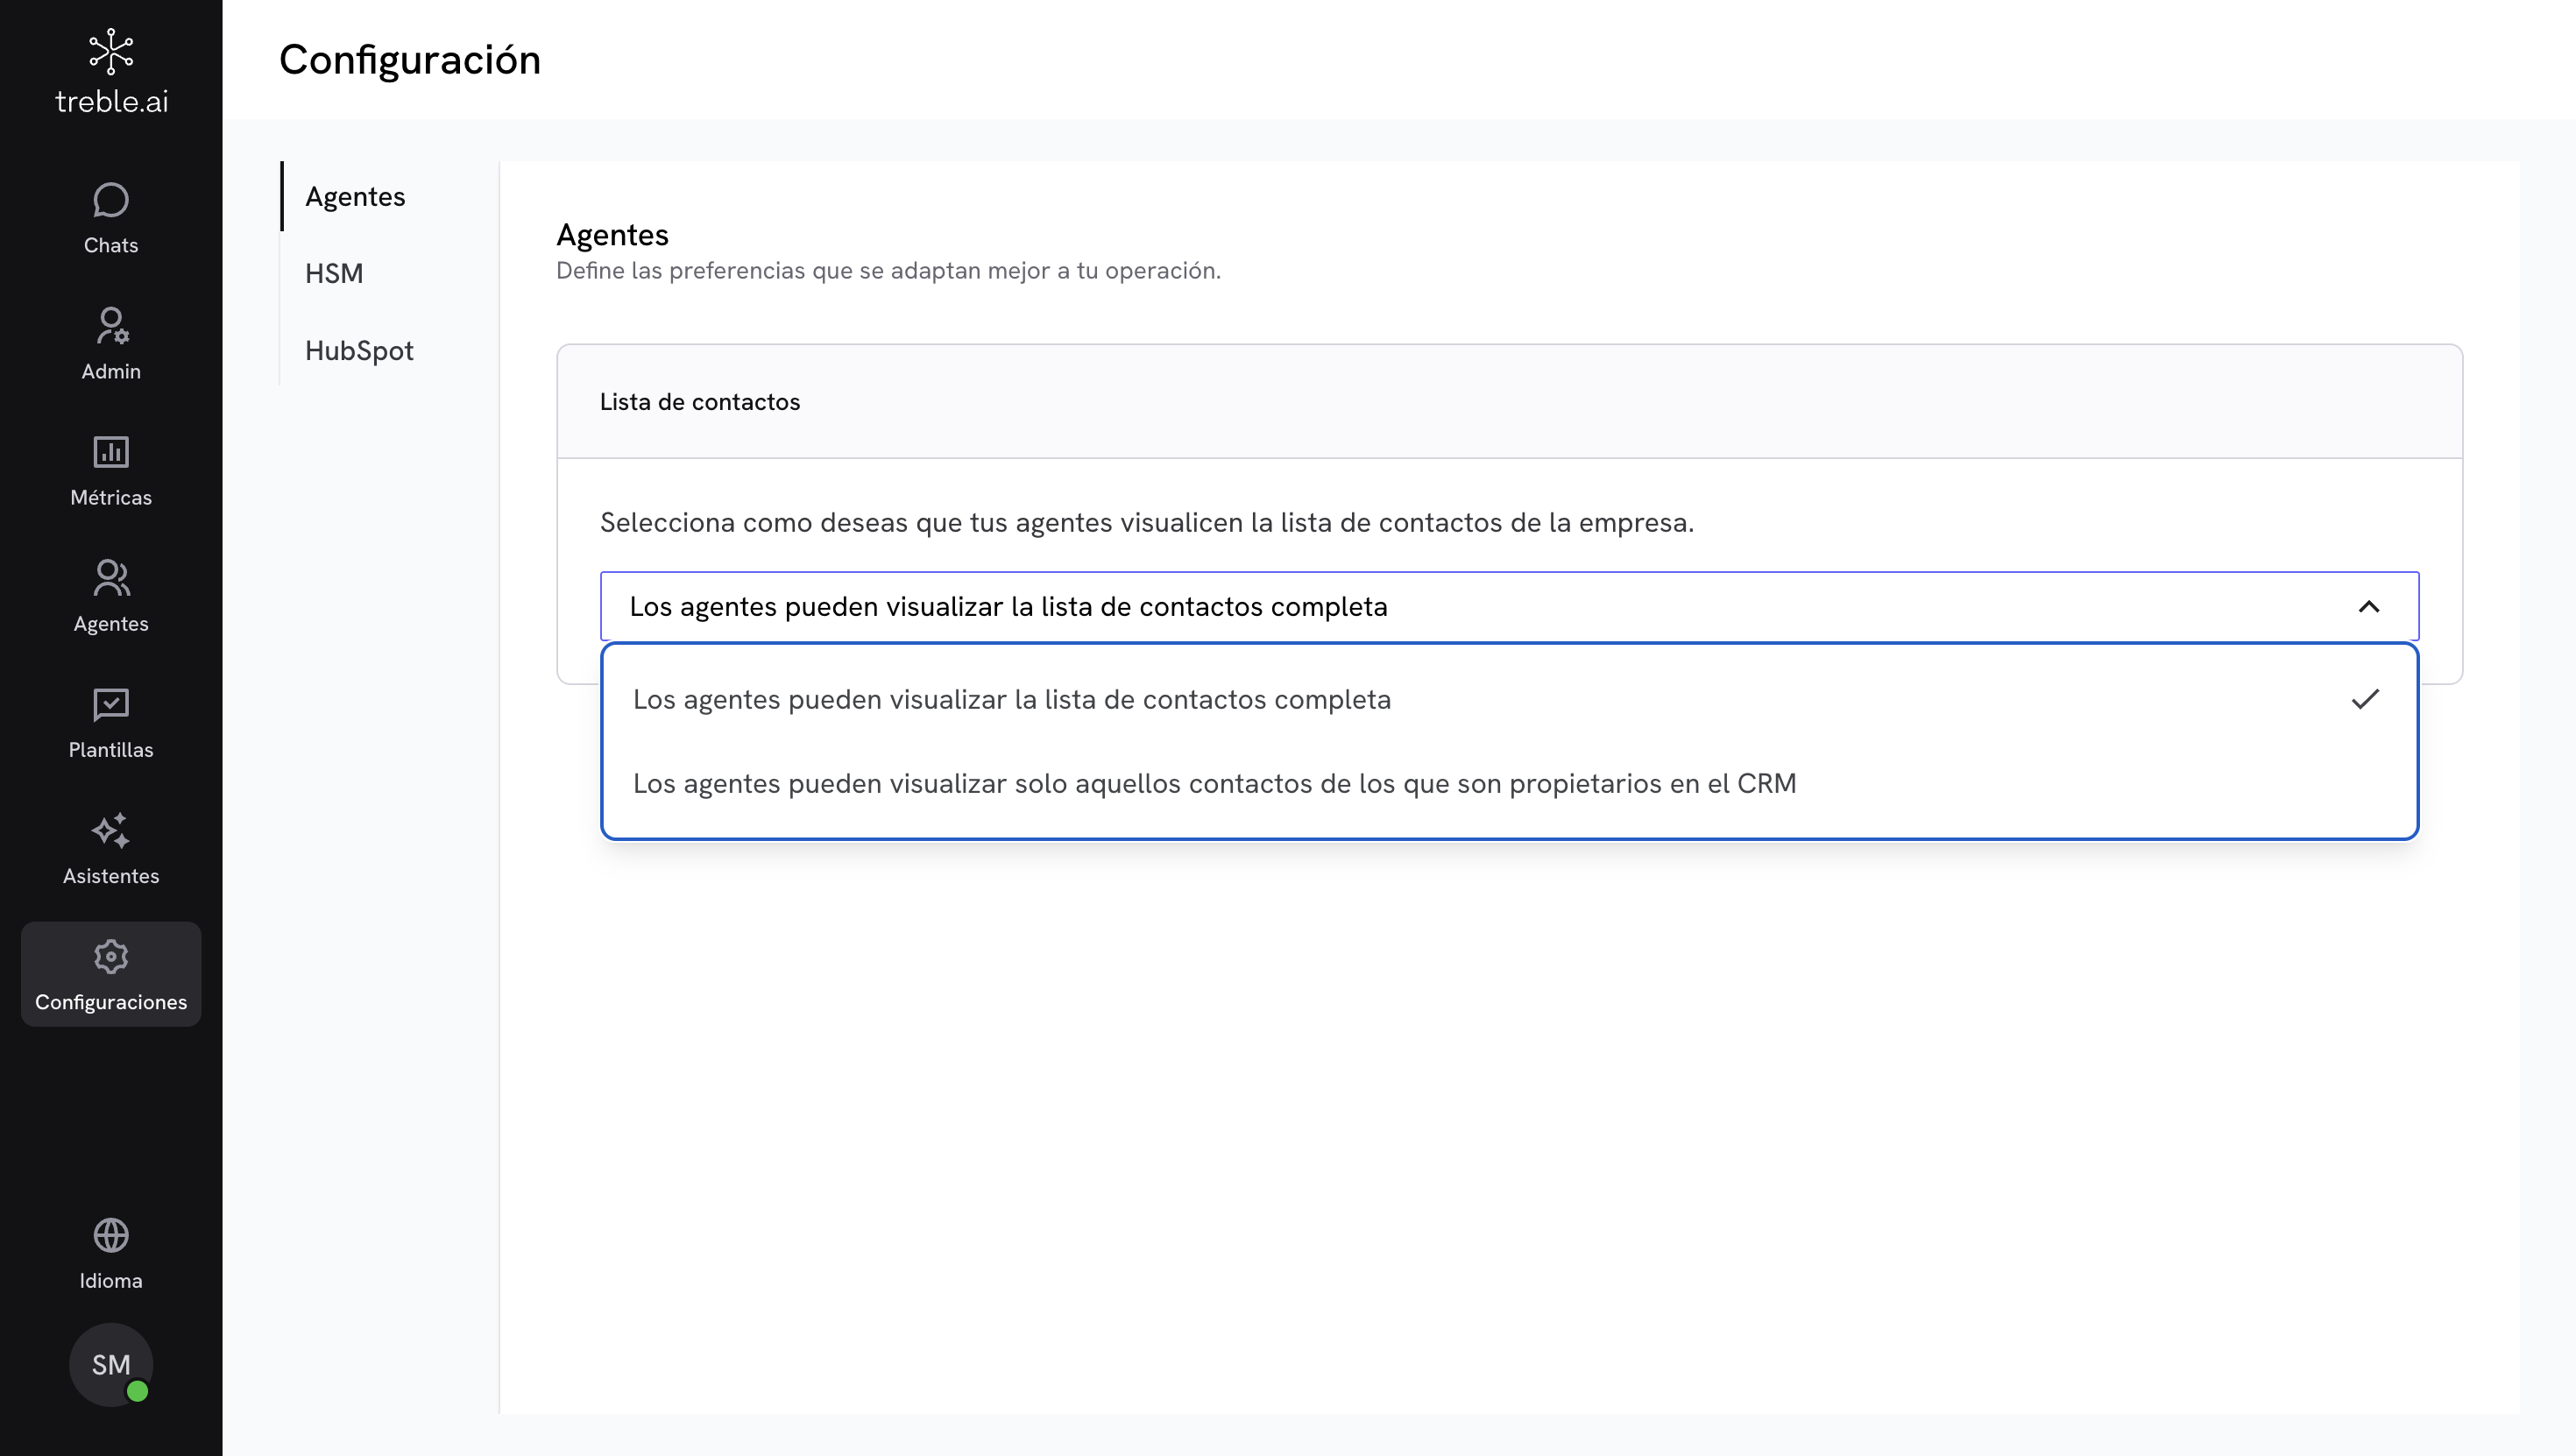
Why is it useful?
This configuration allows you to adapt contact access according to your team’s structure and operation. It’s especially useful if:- Each agent manages their own portfolio.
- You need to limit access by campaign or segment.
- You want to maintain information confidentiality.
Step by step to configure contact visibility
Option 1: Complete contact list
All agents see the account’s contact database, regardless of the CRM property.
Recommended for teams that work collaboratively on the same portfolio.
Option 2: Only assigned contacts
Each agent sees only the contacts assigned to them.
Useful for operations segmented by agent, campaign, or region.
Remember that you can adjust this configuration at any time to adapt to changes in your team or strategy.
HSM template visibility
Here you can define which teams can access and use each HSM template available on the platform, helping to maintain organization and control over the messages that are sent.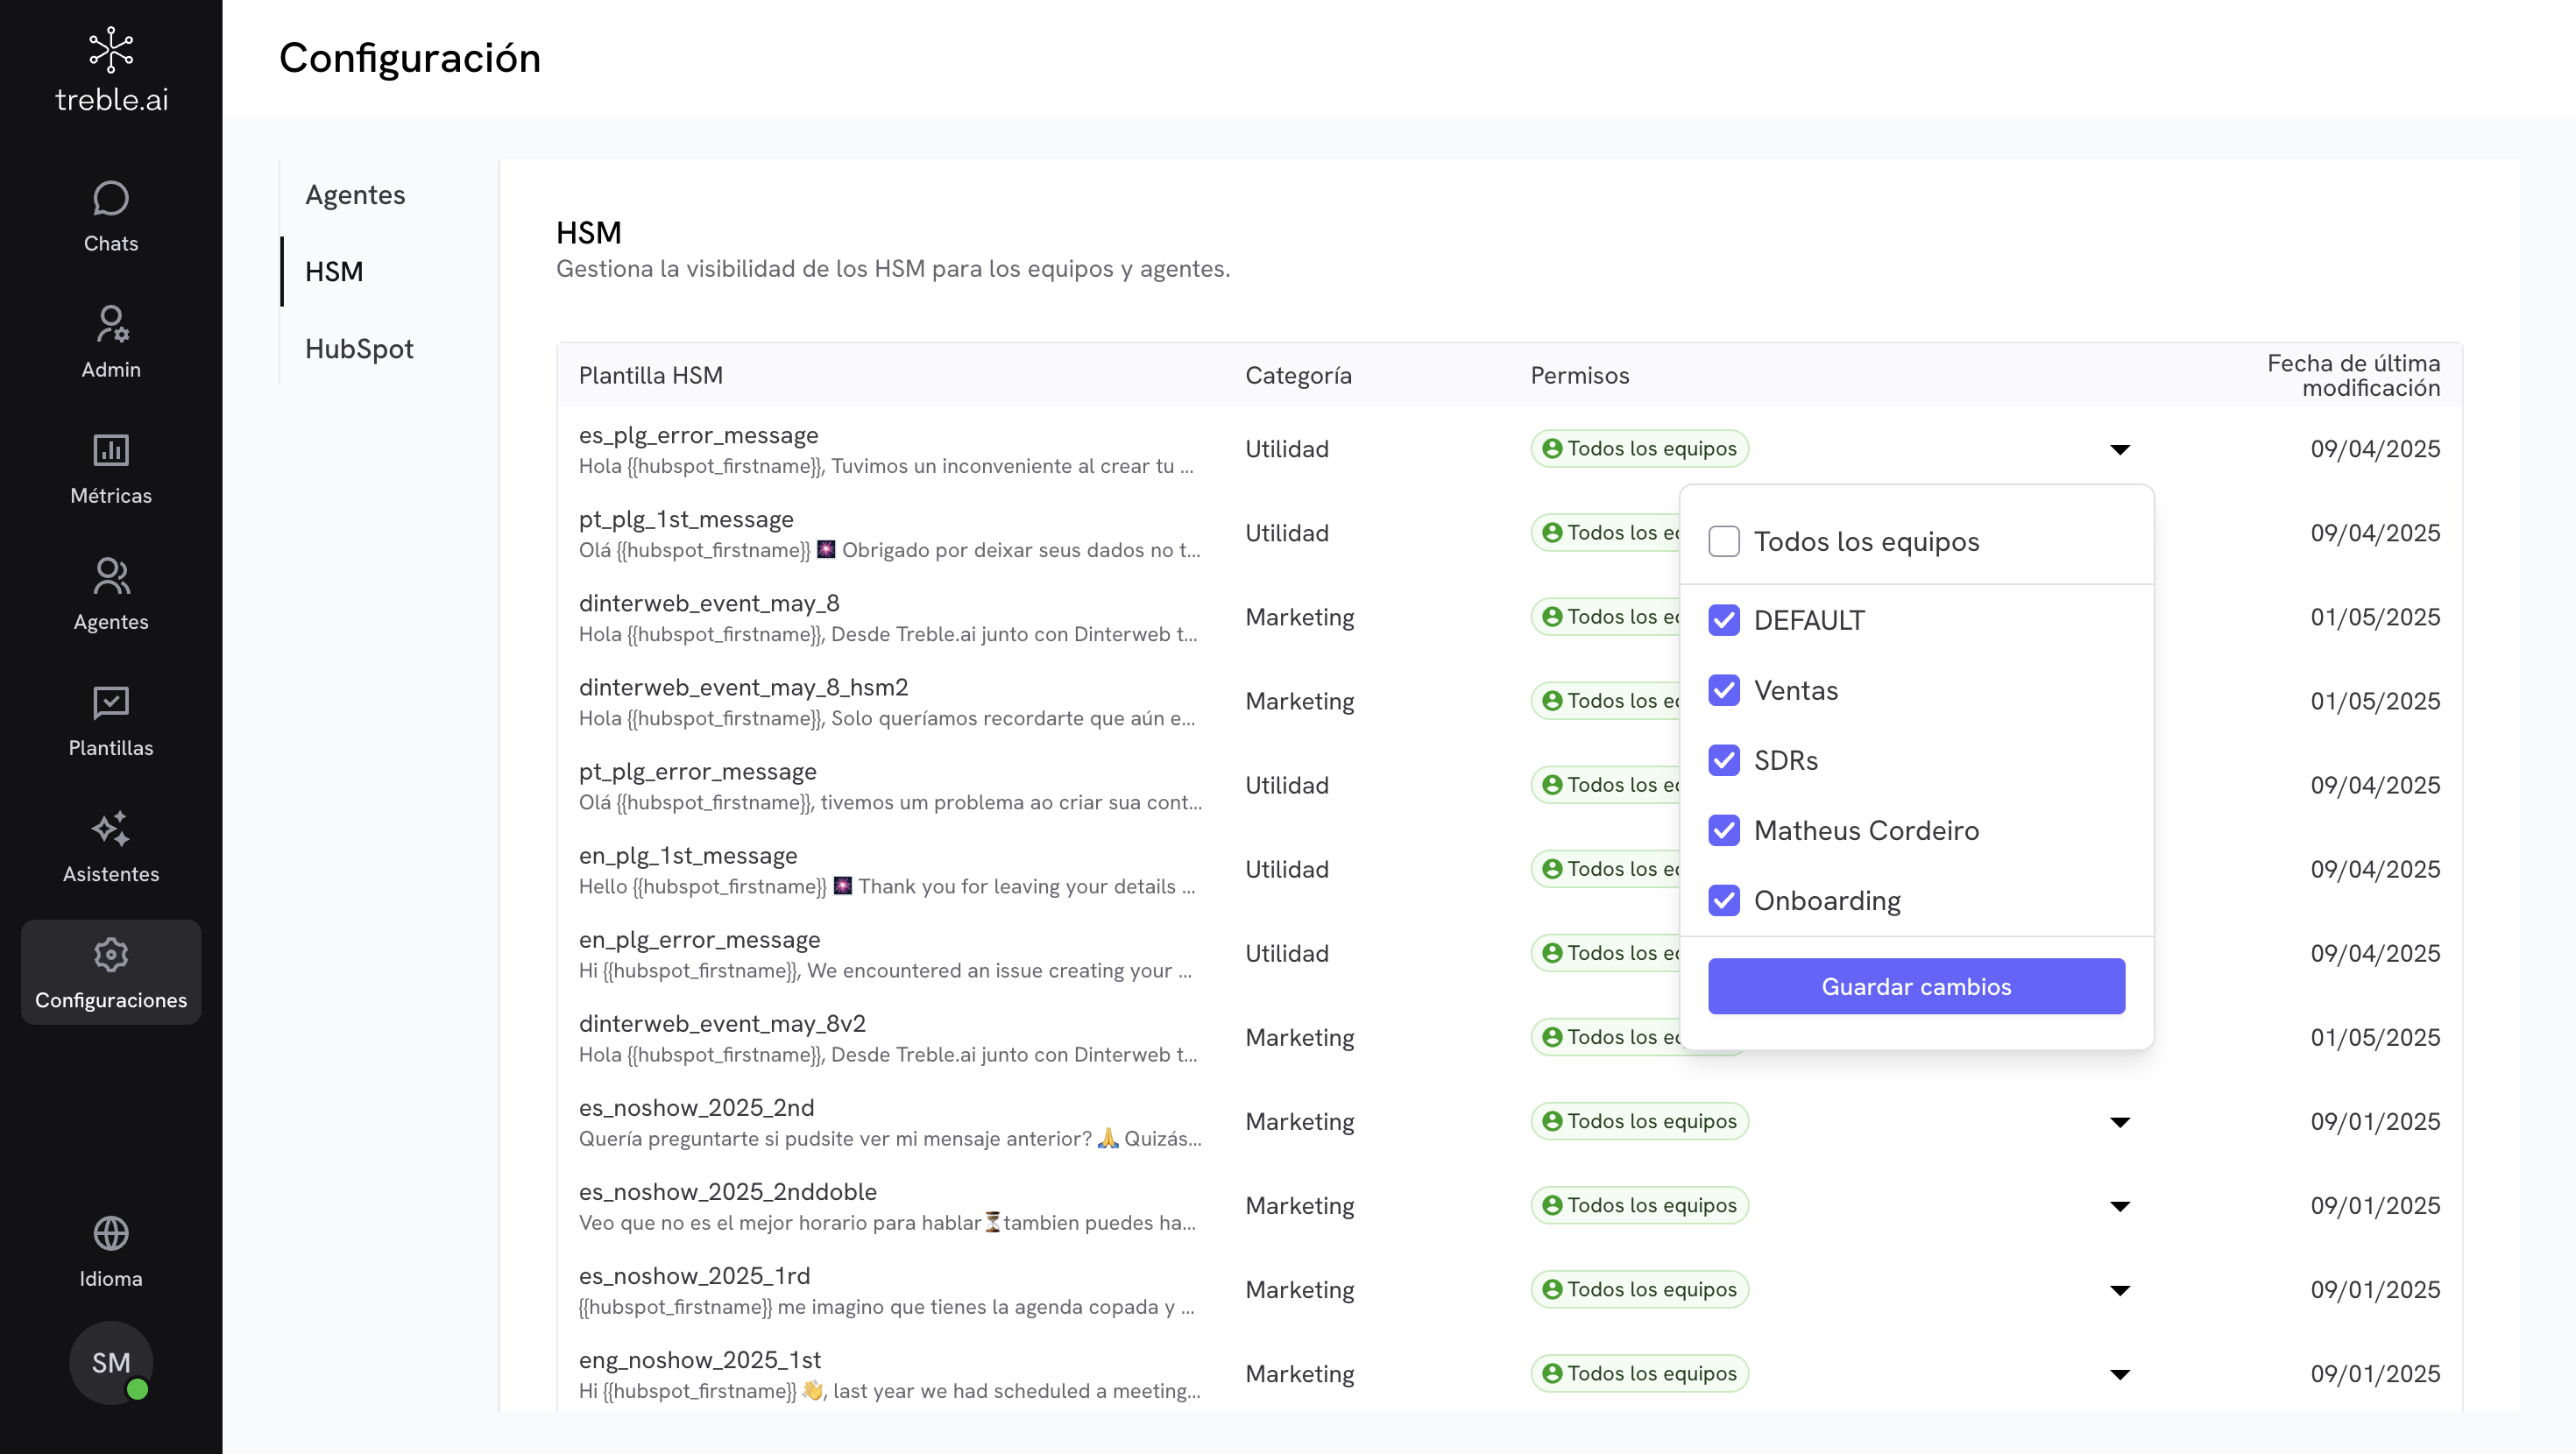
Why is it useful?
This functionality allows you to keep operations organized when working with multiple teams (sales, support, collection, etc.). Assigning permissions by team helps to:- Avoid incorrect use of templates.
- Show only relevant messages for each team.
- Facilitate administration and control of sent messages.
Tip: If you have duplicate or unused templates, consider cleaning them up before adjusting permissions.
Step by step to manage template visibility
Access HSM configuration
Go to Configuration > HSM to see all available templates and modify their usage permissions.In the template table you will see:
- HSM Template: Name and message fragment.
- Category: Assigned classification (for example, “Marketing” or “Support”).
- Permissions: Teams with access to the template.
- Last modification date: Last time the template was edited
Select the teams that can use the template
Click on the Permissions column of the template you want to modify and check or uncheck teams as appropriate. You can also select All teams to enable global use of the template.
If a template appears as “None of the teams”, it will not be available to any agent.
HubSpot contact properties customization (beta)
Control which HubSpot properties are displayed in the agents’ chat side panel, and define whether they can edit them or not.
Why is it useful?
This panel is designed to offer quick context about the contact and allow updating information without leaving the chat.It’s especially useful if:- Your agents need to consult key CRM data while conversing.
- You want to keep information updated without opening HubSpot.
- You’re looking to improve operational efficiency and data quality.
This functionality is in beta phase. Currently not all properties are compatible.
Step by step to customize the contact panel
Access HubSpot configuration
Go to Configuration > HubSpot to customize which properties will be displayed in the contact panel.
Search for the property you want to display
Use the search bar to find the specific property you want to add to the panel.
Activate the property
Check the corresponding box so that the selected property is displayed in the contact panel.
Define if the property is editable
Use the switch in the “Editable property?” column to allow or prevent its editing by the agent.
Reorder properties
Drag and drop properties in your preferred order. The preview on the right will show you how it will look in the chat.
Some properties like date types are not available. If you can’t find a property, it’s probably not supported by the current panel.
Chat assignment configuration
Define how chats are assigned to agents and how many conversations they can handle at the same time.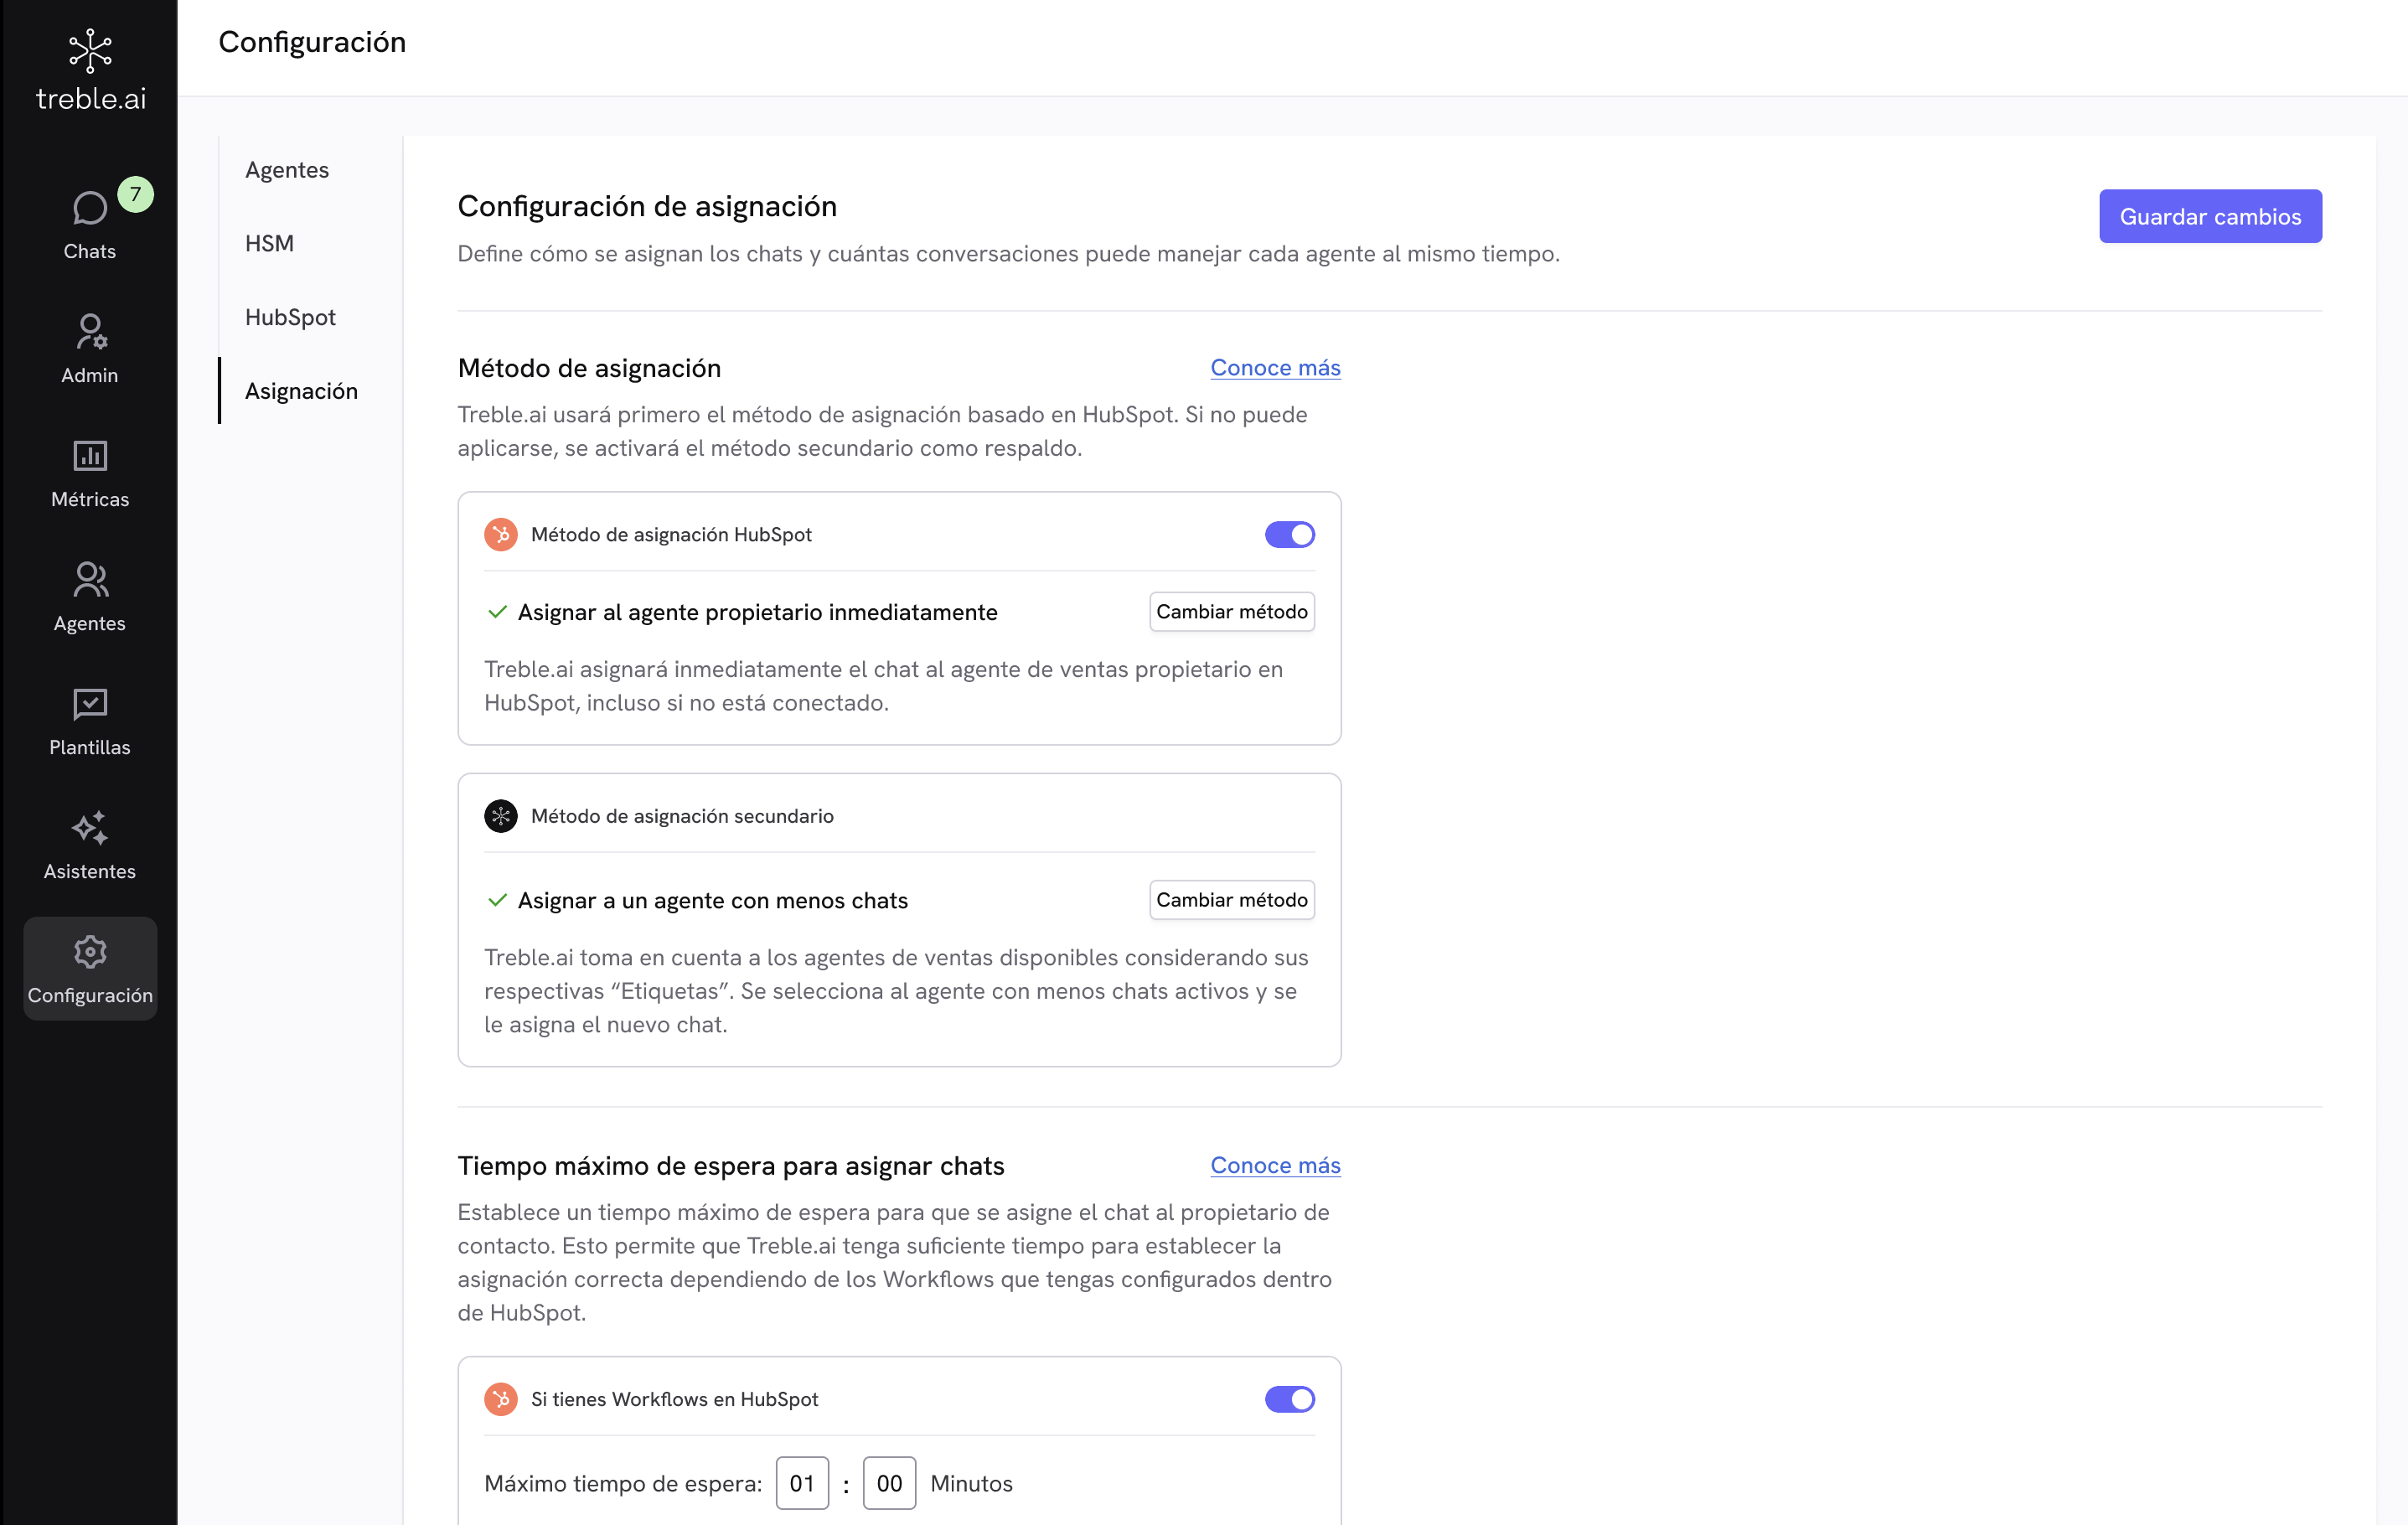
Why is it useful?
A clear assignment configuration:- Prevents chats from being left unattended.
- Reduces agent overload.
- Aligns operations with the assignment logic defined in HubSpot (if applicable).
Assignment configuration: two key elements
Chat assignment consists of two main elements that you can configure according to your operation’s needs:- Assignment method
- Maximum chats per agent
1. Assignment method
What is it?The assignment method defines how it’s decided which agent gets assigned each new chat.There are two chat assignment methods: a primary method (available for clients with HubSpot or Salesforce integration) and a secondary method (Treble’s own).
Instructions if you are a HubSpot or Salesforce user
Instructions if you are a HubSpot or Salesforce user
You can activate or deactivate the primary method according to your needs; if you deactivate it, only the secondary method will be used to assign chats.
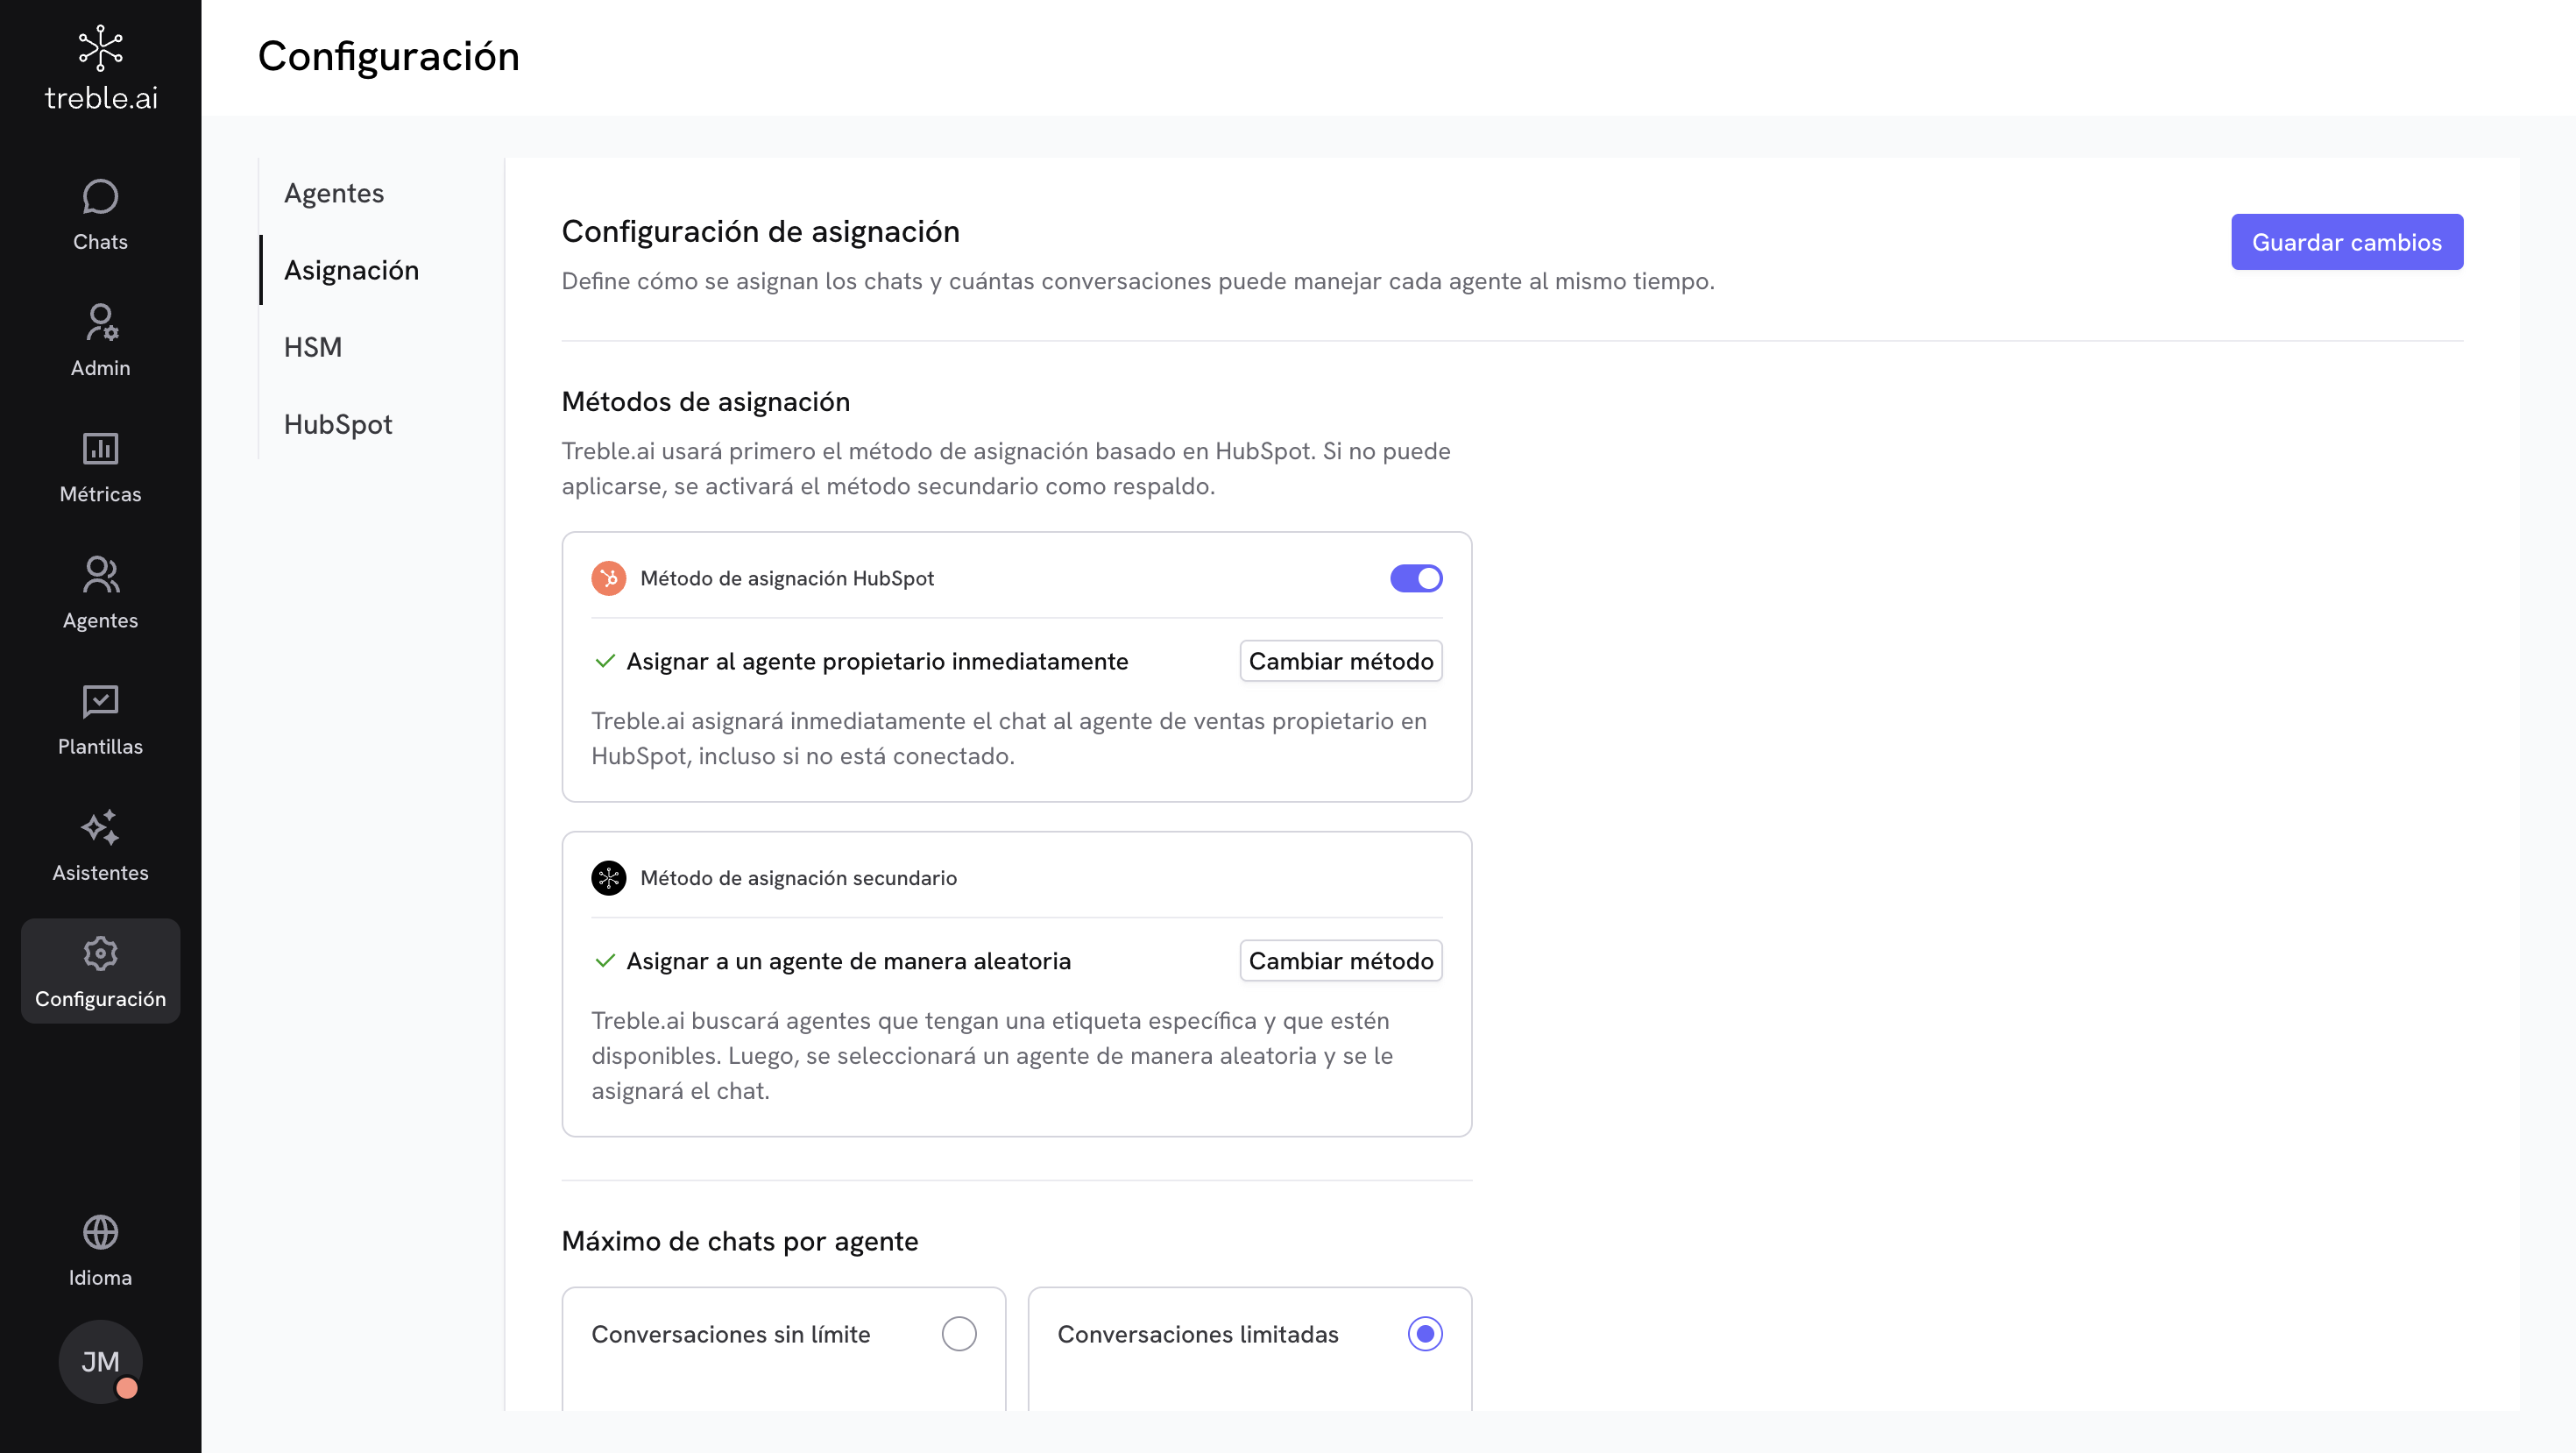
Primary method (HubSpot or Salesforce integration)
If you have integration, you can choose for the chat to be automatically assigned to the owner agent defined in your CRM. There are three ways to do this and you can choose them by clicking the Change method button:Assign immediately to owner
The chat is assigned immediately to the owner agent, whether they are connected or not. It’s the fastest and most direct option.
Wait for a time limit
Wait a defined time for the owner agent to be available. If they’re not, after that time the alternative method is applied.
Only if connected
The chat is only assigned if the owner agent is connected; if not, it remains pending until they connect.
What happens if the primary method cannot be applied?
If the owner agent is not available (for example, not active, doesn’t exist, or the waiting time is exceeded), the system can leave the chat in the waiting queue or automatically move to the secondary method to ensure the chat is attended.Secondary method (automatic fallback)
When the primary method is not possible, Treble looks for an alternative agent filtering available agents by tag and then applying one of the following algorithms.Assign to agent with fewer chats
The chat is assigned to the available agent who has fewer active chats at that moment, helping to balance the workload. Only agents with the corresponding tag are considered.
Assign randomly
The chat is assigned randomly among available agents with the appropriate tag, always respecting configured segmentations.
When no agent is found within the selected tag, the system will search within the company’s default tag.
Instructions if you don't use integrations
Instructions if you don't use integrations
If you don’t use any integration, you’ll find Treble’s assignment method available. To choose the alternative that best fits your operation, just click the Change method button and choose an option.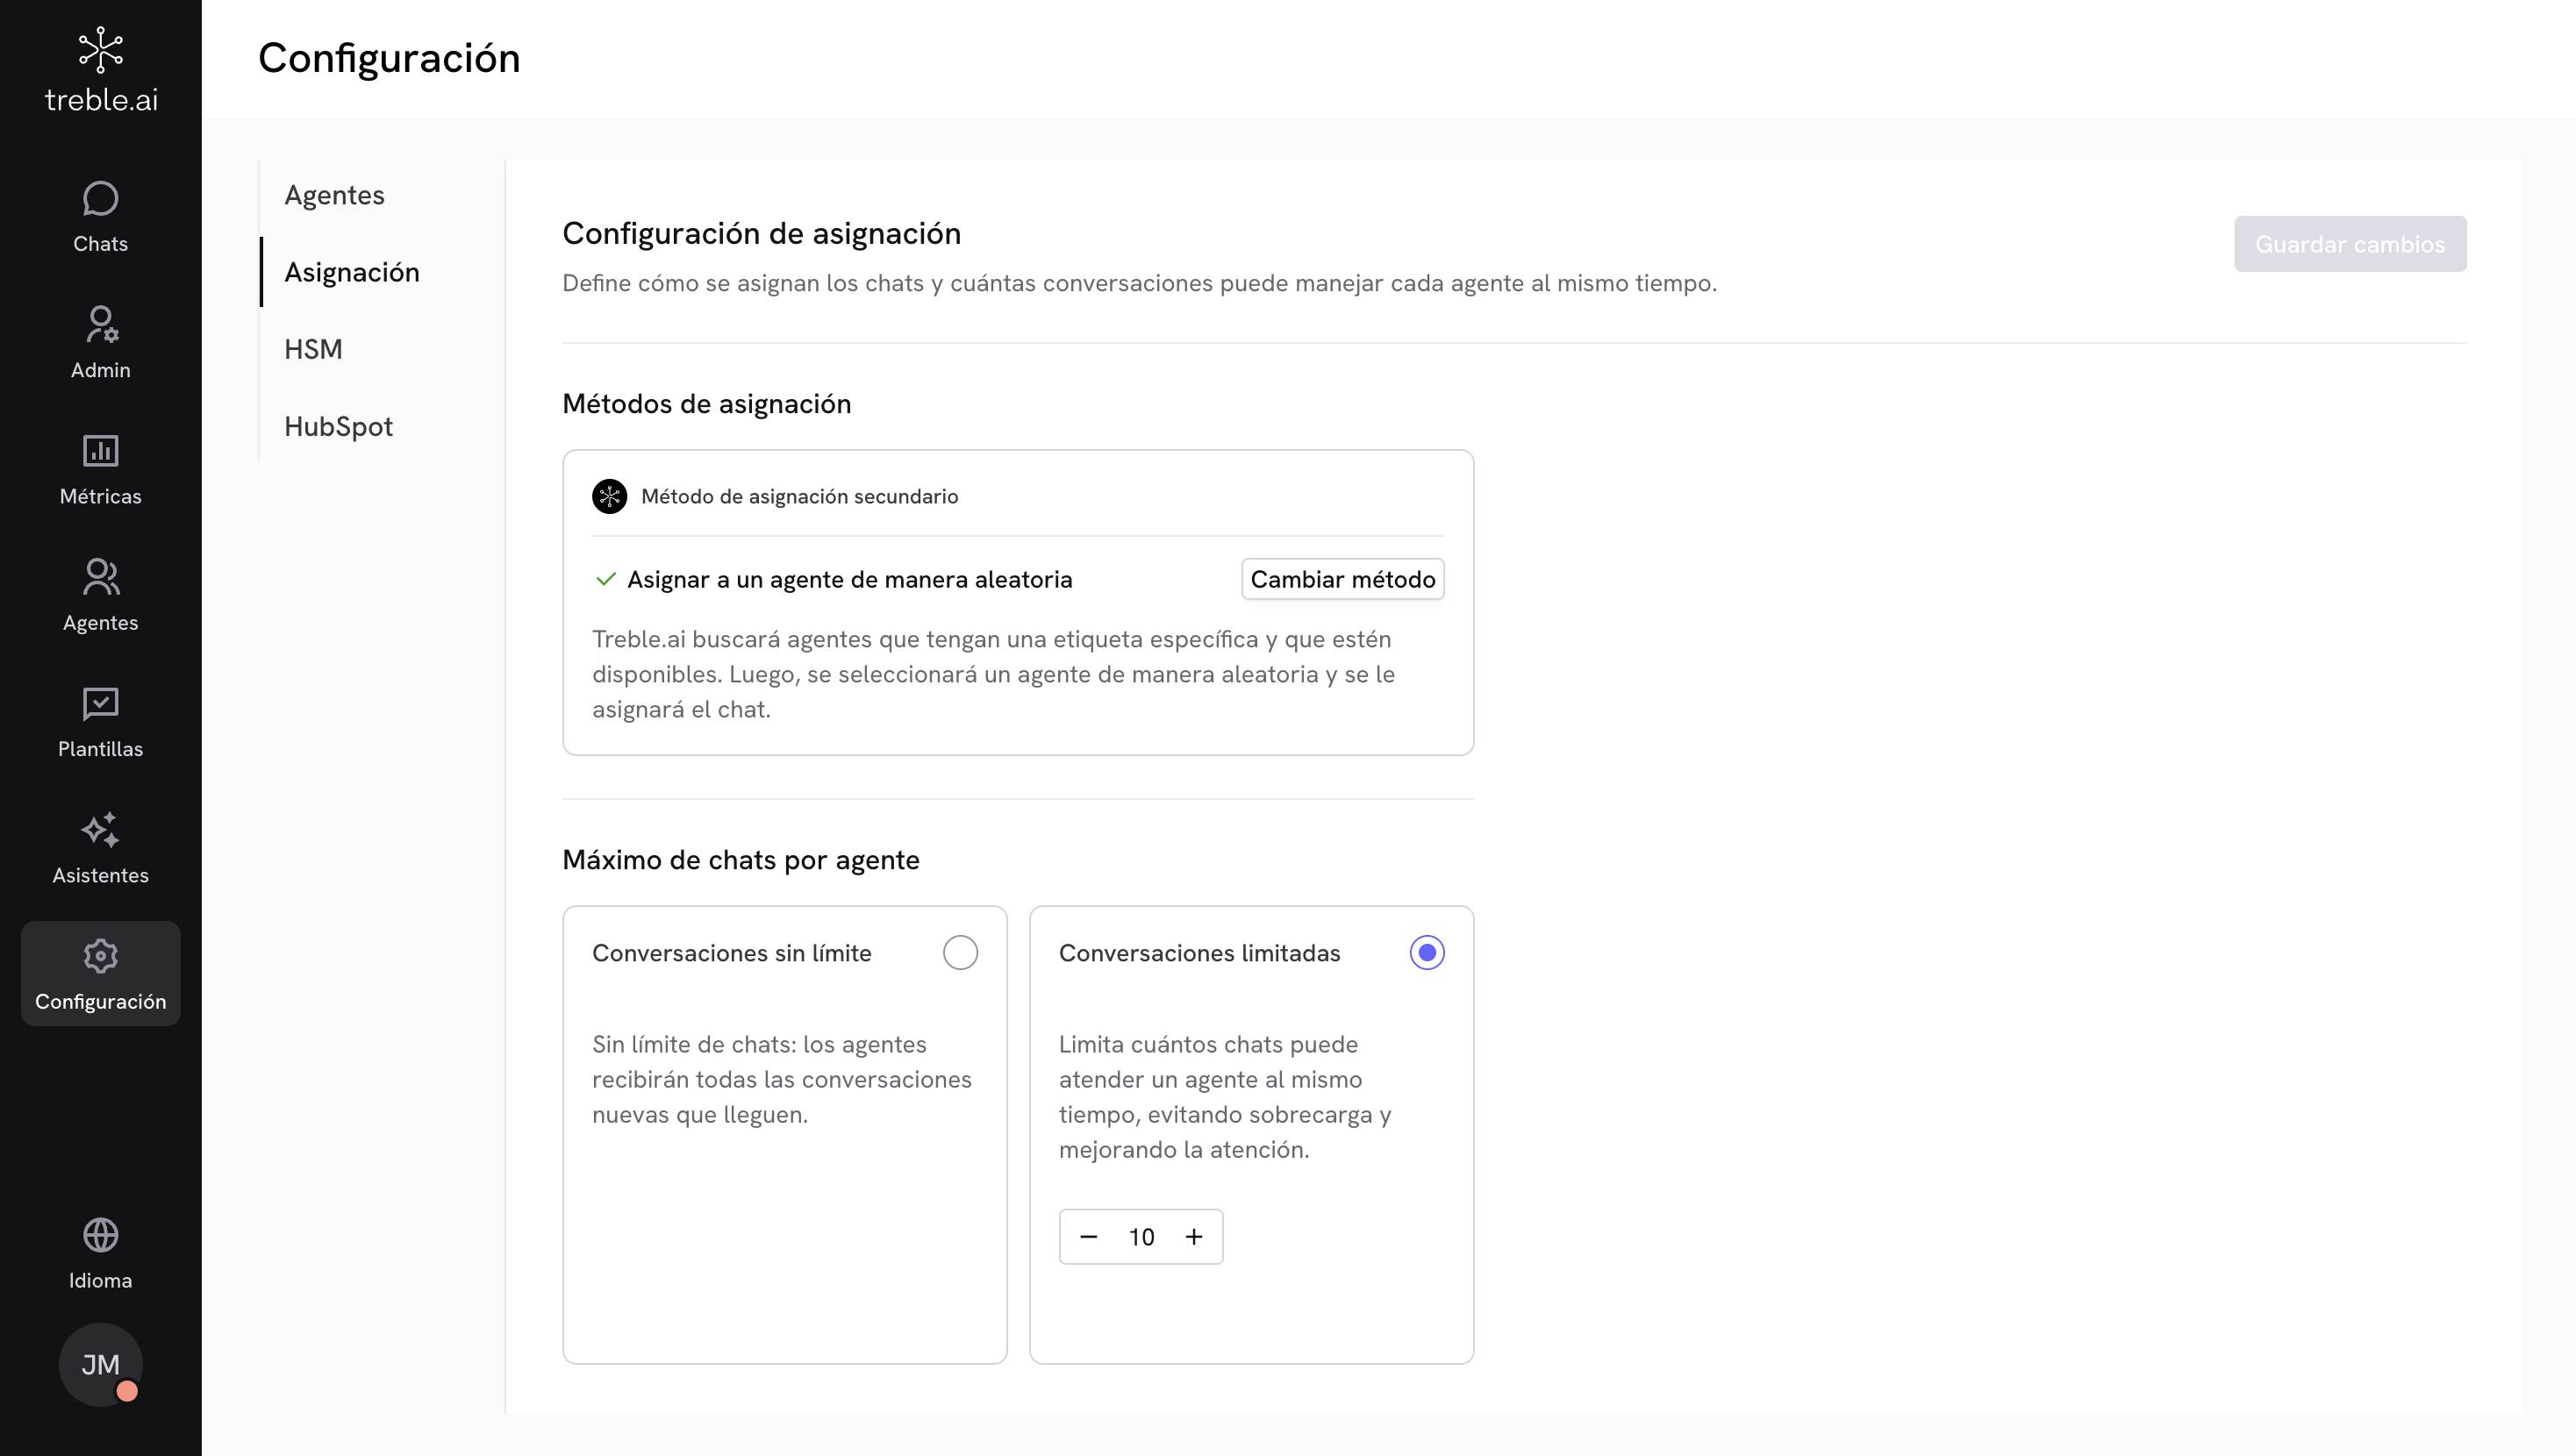
Assign to agent with fewer chats
The chat is assigned to the available agent who has fewer active chats at that moment, helping to balance the workload. Only agents with the corresponding tag are considered.
Assign randomly
The chat is assigned randomly among available agents with the appropriate tag, always respecting configured segmentations.
When no agent is found within the selected tag, the system will search within the company’s default tag.
2. Maximum chats per agent
What is it?Allows you to define how many chats each agent can handle at the same time.Options:
Unlimited conversations
Agents will receive all new conversations that arrive, without quantity restriction.
Limited conversations
You can define a maximum number of chats per agent, ideal for avoiding overload and improving attention.
If you configure assignment properly, your team will be able to handle chats more efficiently and balanced, ensuring that no customer is left without a response.
Frequently asked questions
What happens if the owner agent in HubSpot is not available?
What happens if the owner agent in HubSpot is not available?
It depends on the chosen method. You can wait for a time, use the secondary method, or take it to a queue where it will be pending assignment.
How does Treble define which agent has fewer chats?
How does Treble define which agent has fewer chats?
Only active chats are counted in real time, respecting configured tags.
Can I use these methods without HubSpot?
Can I use these methods without HubSpot?
Yes. The secondary method is available for all accounts.
Can chats be assigned to offline agents?
Can chats be assigned to offline agents?
Yes, if you choose the “assign immediately” or “assign even if not connected” method.