This functionality is key for:
- Reducing abandonment rates when collecting data in multiple steps.
- Improving the quality and format of your data, as it validates that responses correspond to the requested data type
- Increasing conversion rates at various stages of the funnel.
Create a WhatsApp Flow in WhatsApp Business Manager
WhatsApp Flows are an ideal way to interact with your audience and collect information without leaving WhatsApp. They allow you to automate interactions and simplify data collection, all from a single interface. You can create your Flows directly from WhatsApp Business Manager, where Meta offers an easy-to-use interface, allowing anyone to create a Flow quickly, regardless of their technical experience. Whether it’s to collect opinions, conduct surveys, or capture data from potential clients, WhatsApp Flows is a very useful tool. Below, we guide you step by step to create a Flow using the no-code interface of WhatsApp Business Manager.Steps to create a WhatsApp Flow
Access WhatsApp Business Manager
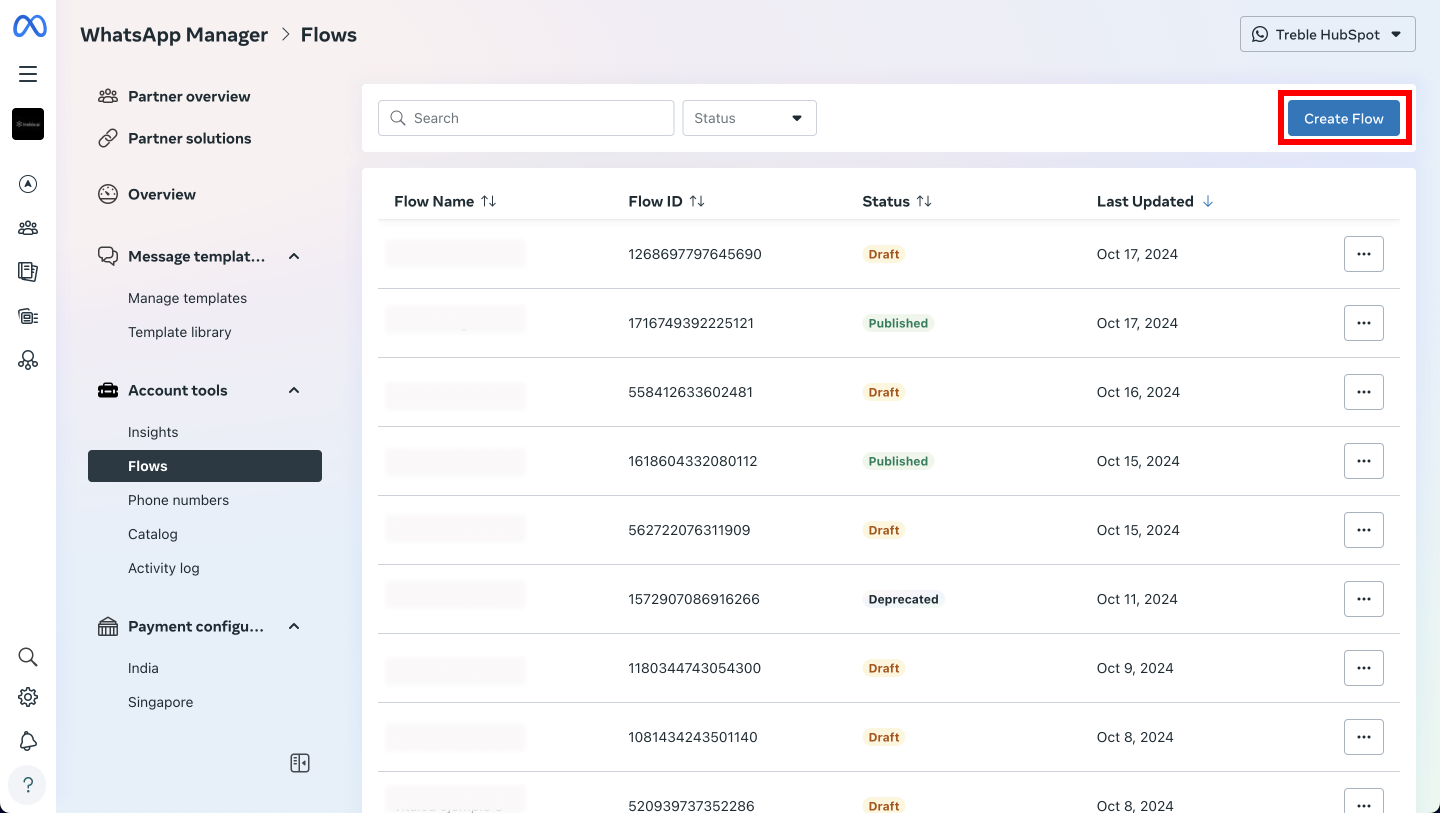
Go to 'Account tools' and select 'Flows'
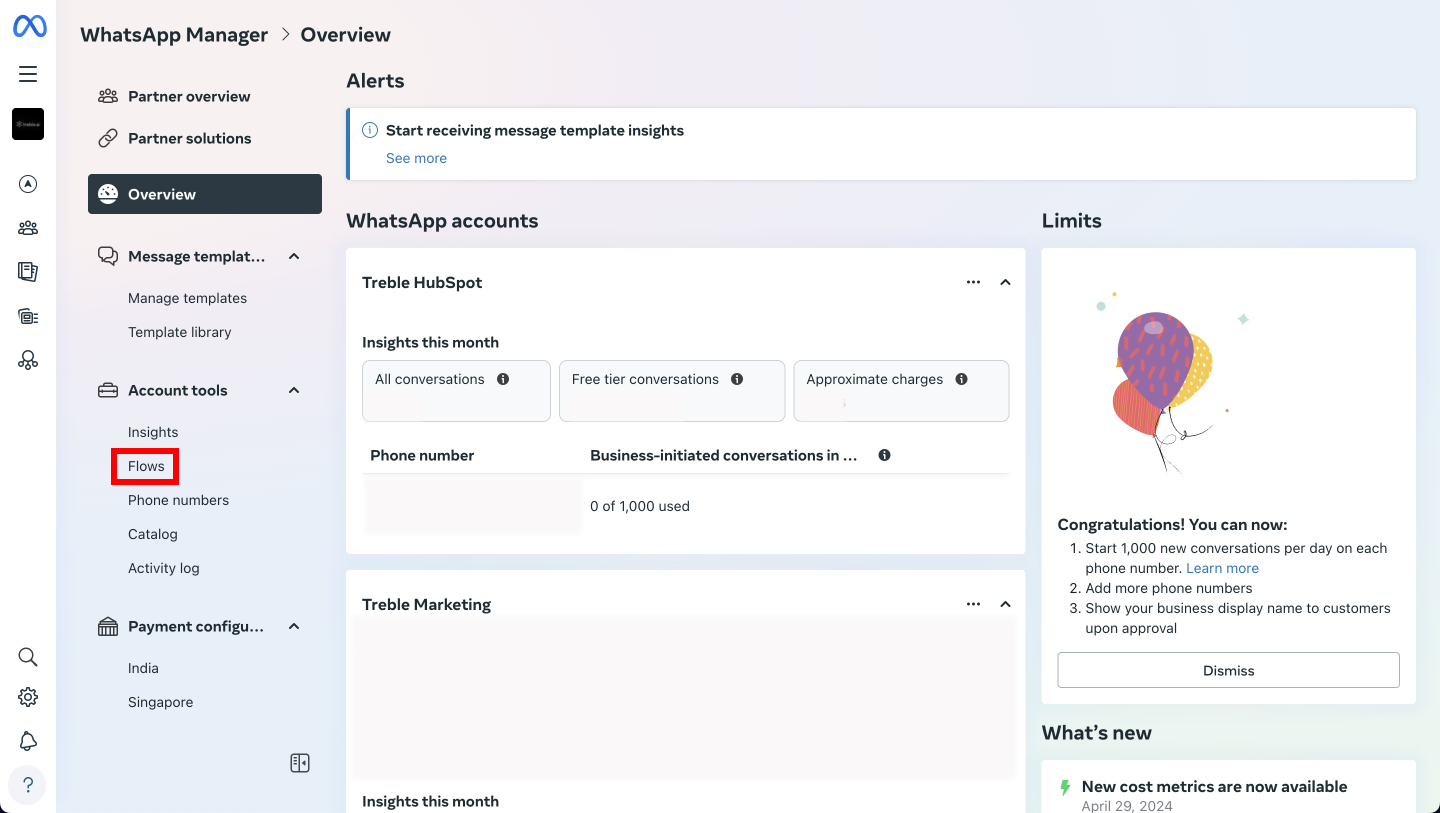
Create a new Flow
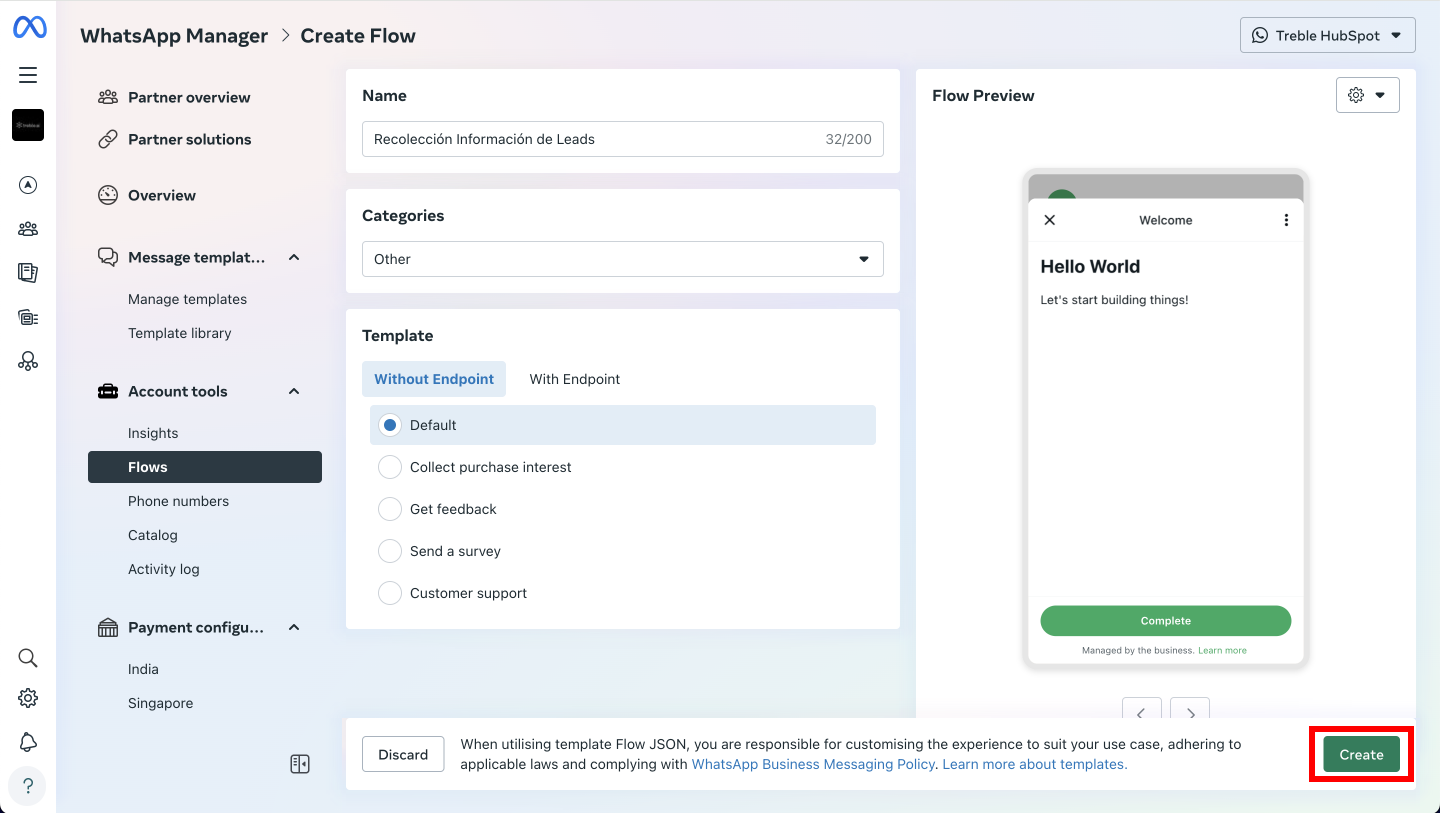
Name the Flow and select a category
Leave the default method without an endpoint
Create the Flow
Use the Meta Playground
How to use the Meta Playground to create your WhatsApp Flows?
How to use the Meta Playground to create your WhatsApp Flows?
Add a New Screen
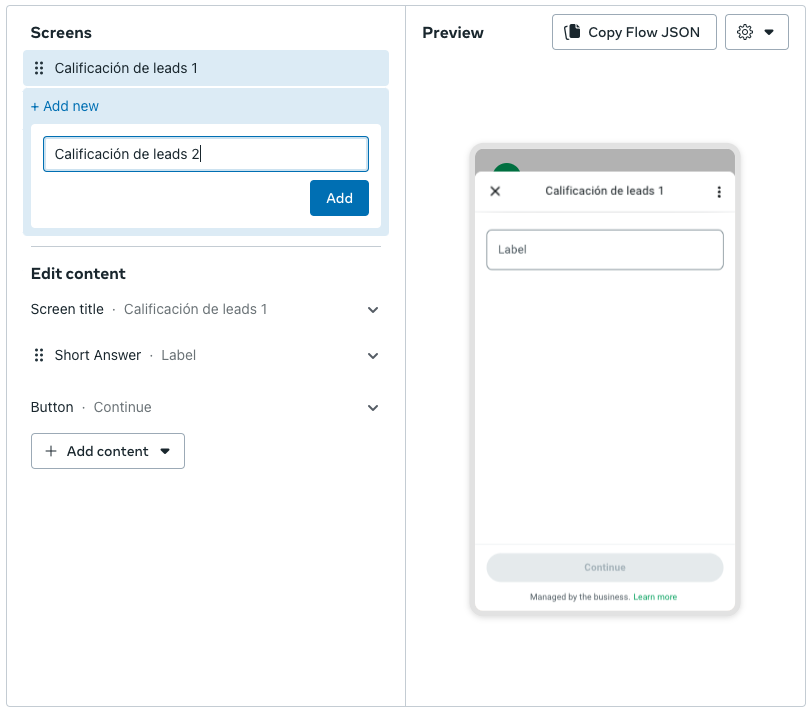
Add Components to Your Screen
- Title or Subtitle: Provides context to the user, such as “We want to know more about your needs”.
- Text Response - Short Answer: Captures data like name and email.
- Single Choice: Question like “Does your company have more than 50 employees?” with options “Yes” or “No”.
- Checkbox Group: Question about interests, such as “What services interest you?”.
-
Button: Use a button labeled “Continue” to guide users to the next screen.
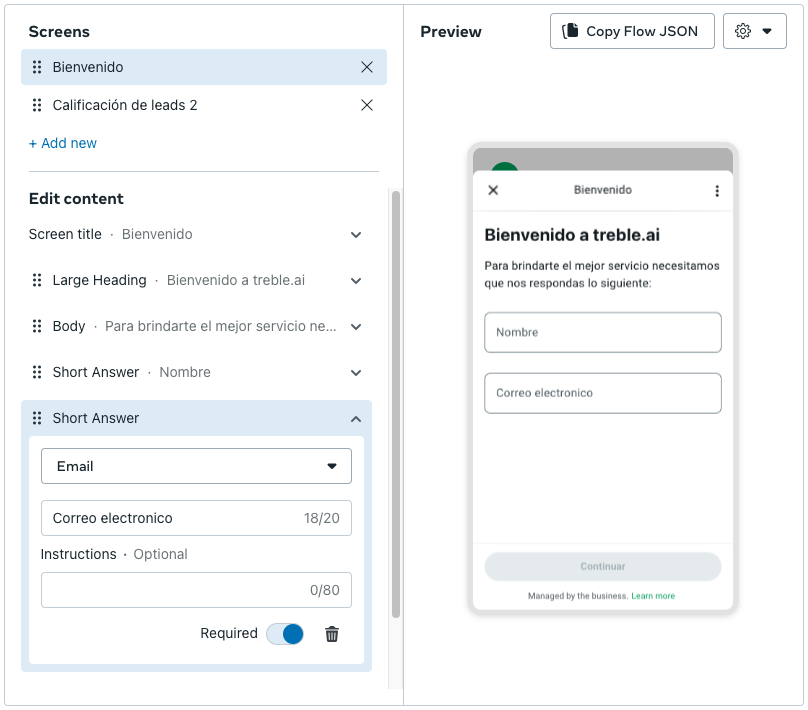
Preview and Customize
Export the Flow as JSON
Adjust the variable values
What is the payload?
What is the payload?
Why is it important to change the payload?
Why is it important to change the payload?
- Clarity: Using clear and descriptive names will allow you to understand what information you’re capturing.
- Ease of use: If the names are easy to read, it will be easier to make changes or adjustments in the future.
Steps to change payload values using field labels
Steps to change payload values using field labels
Identify the field that is collecting information
Replace the value in the payload with the field label name
Repeat the process on each screen where these values are used
Prompt for ChatGPT
Prompt for ChatGPT
Run the Flow
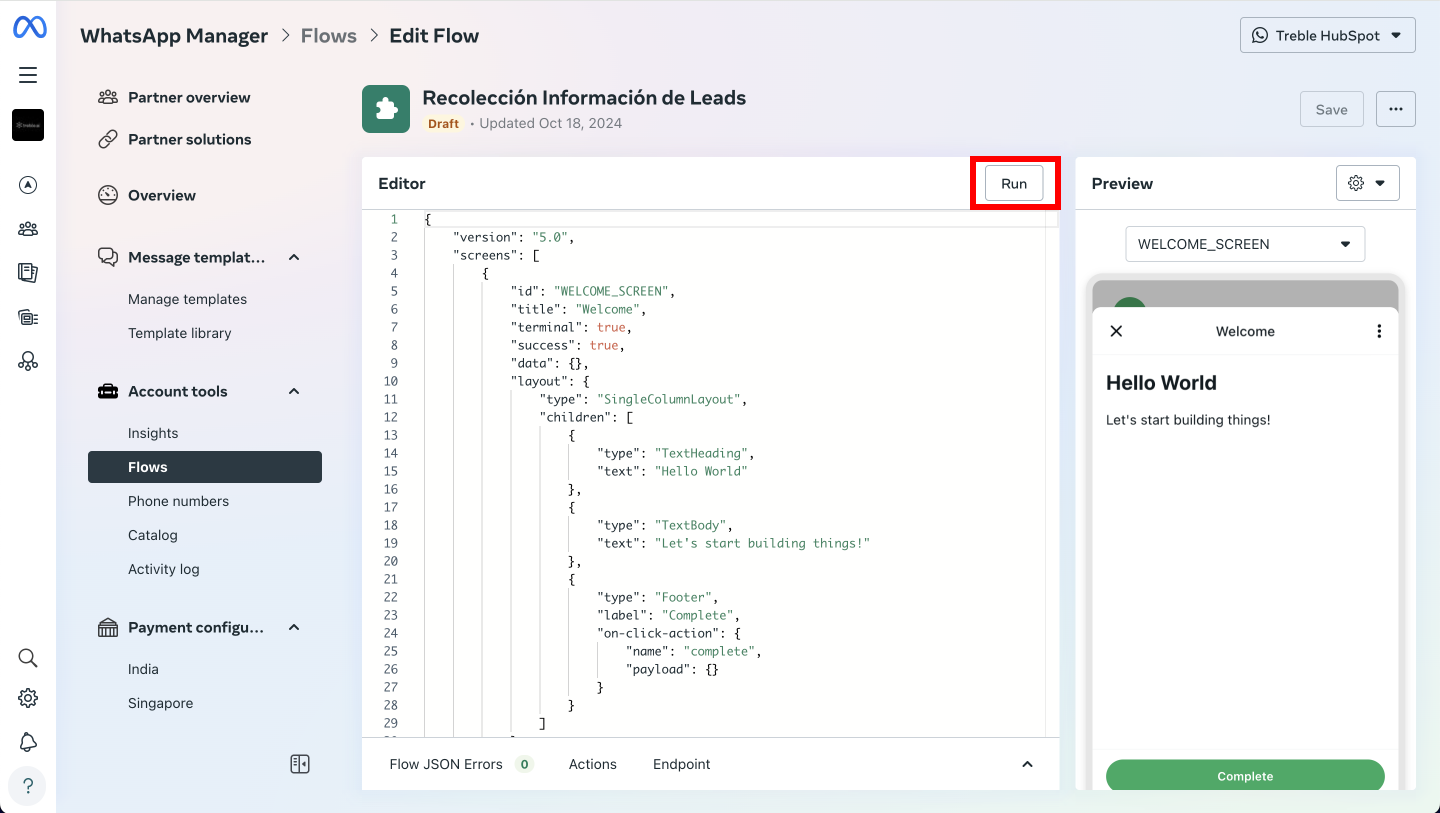
Test the Flow
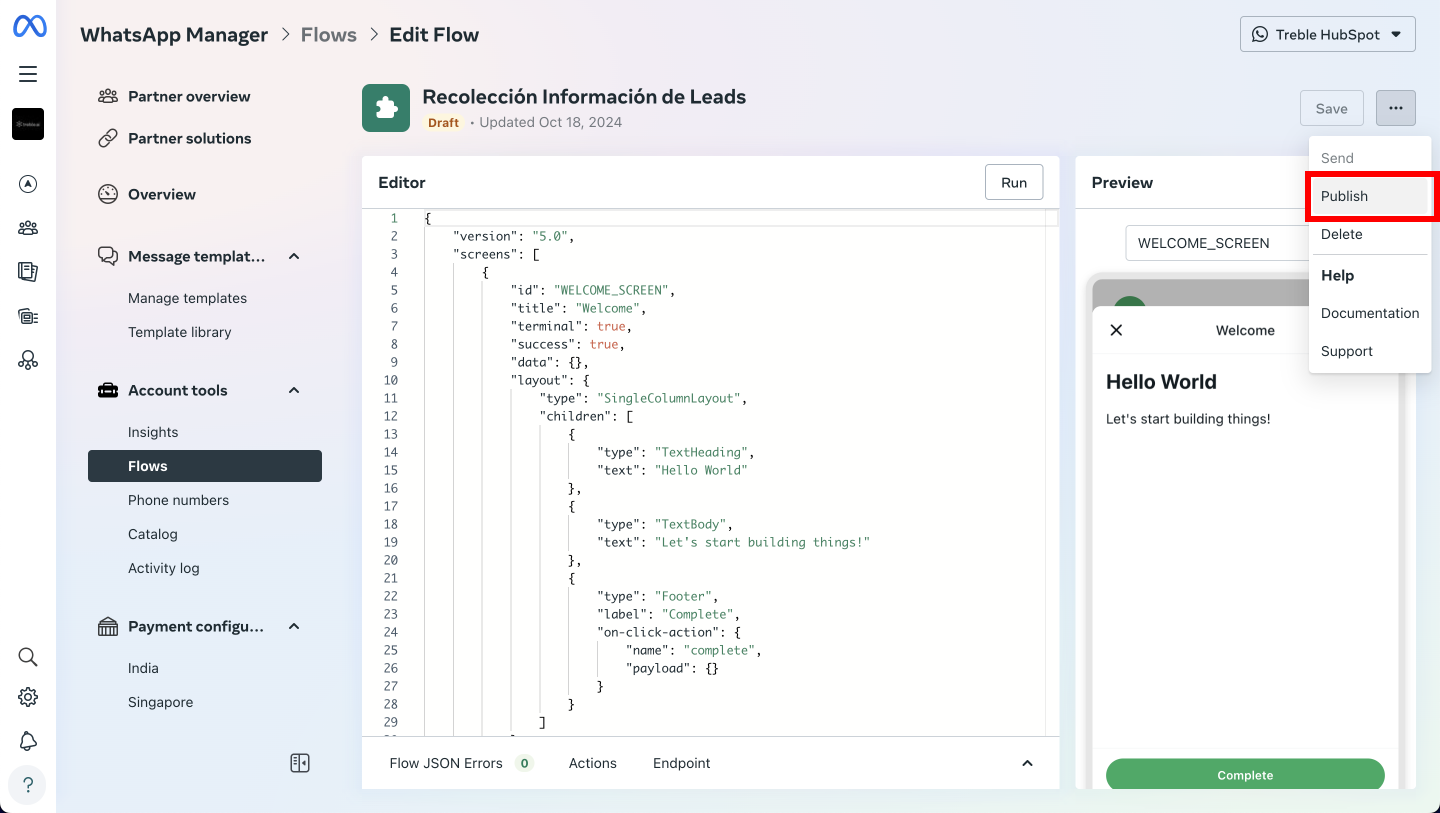
Publish the Flow
Configure the Flow in Treble
How to integrate a WhatsApp Flow in Treble
How to integrate a WhatsApp Flow in Treble
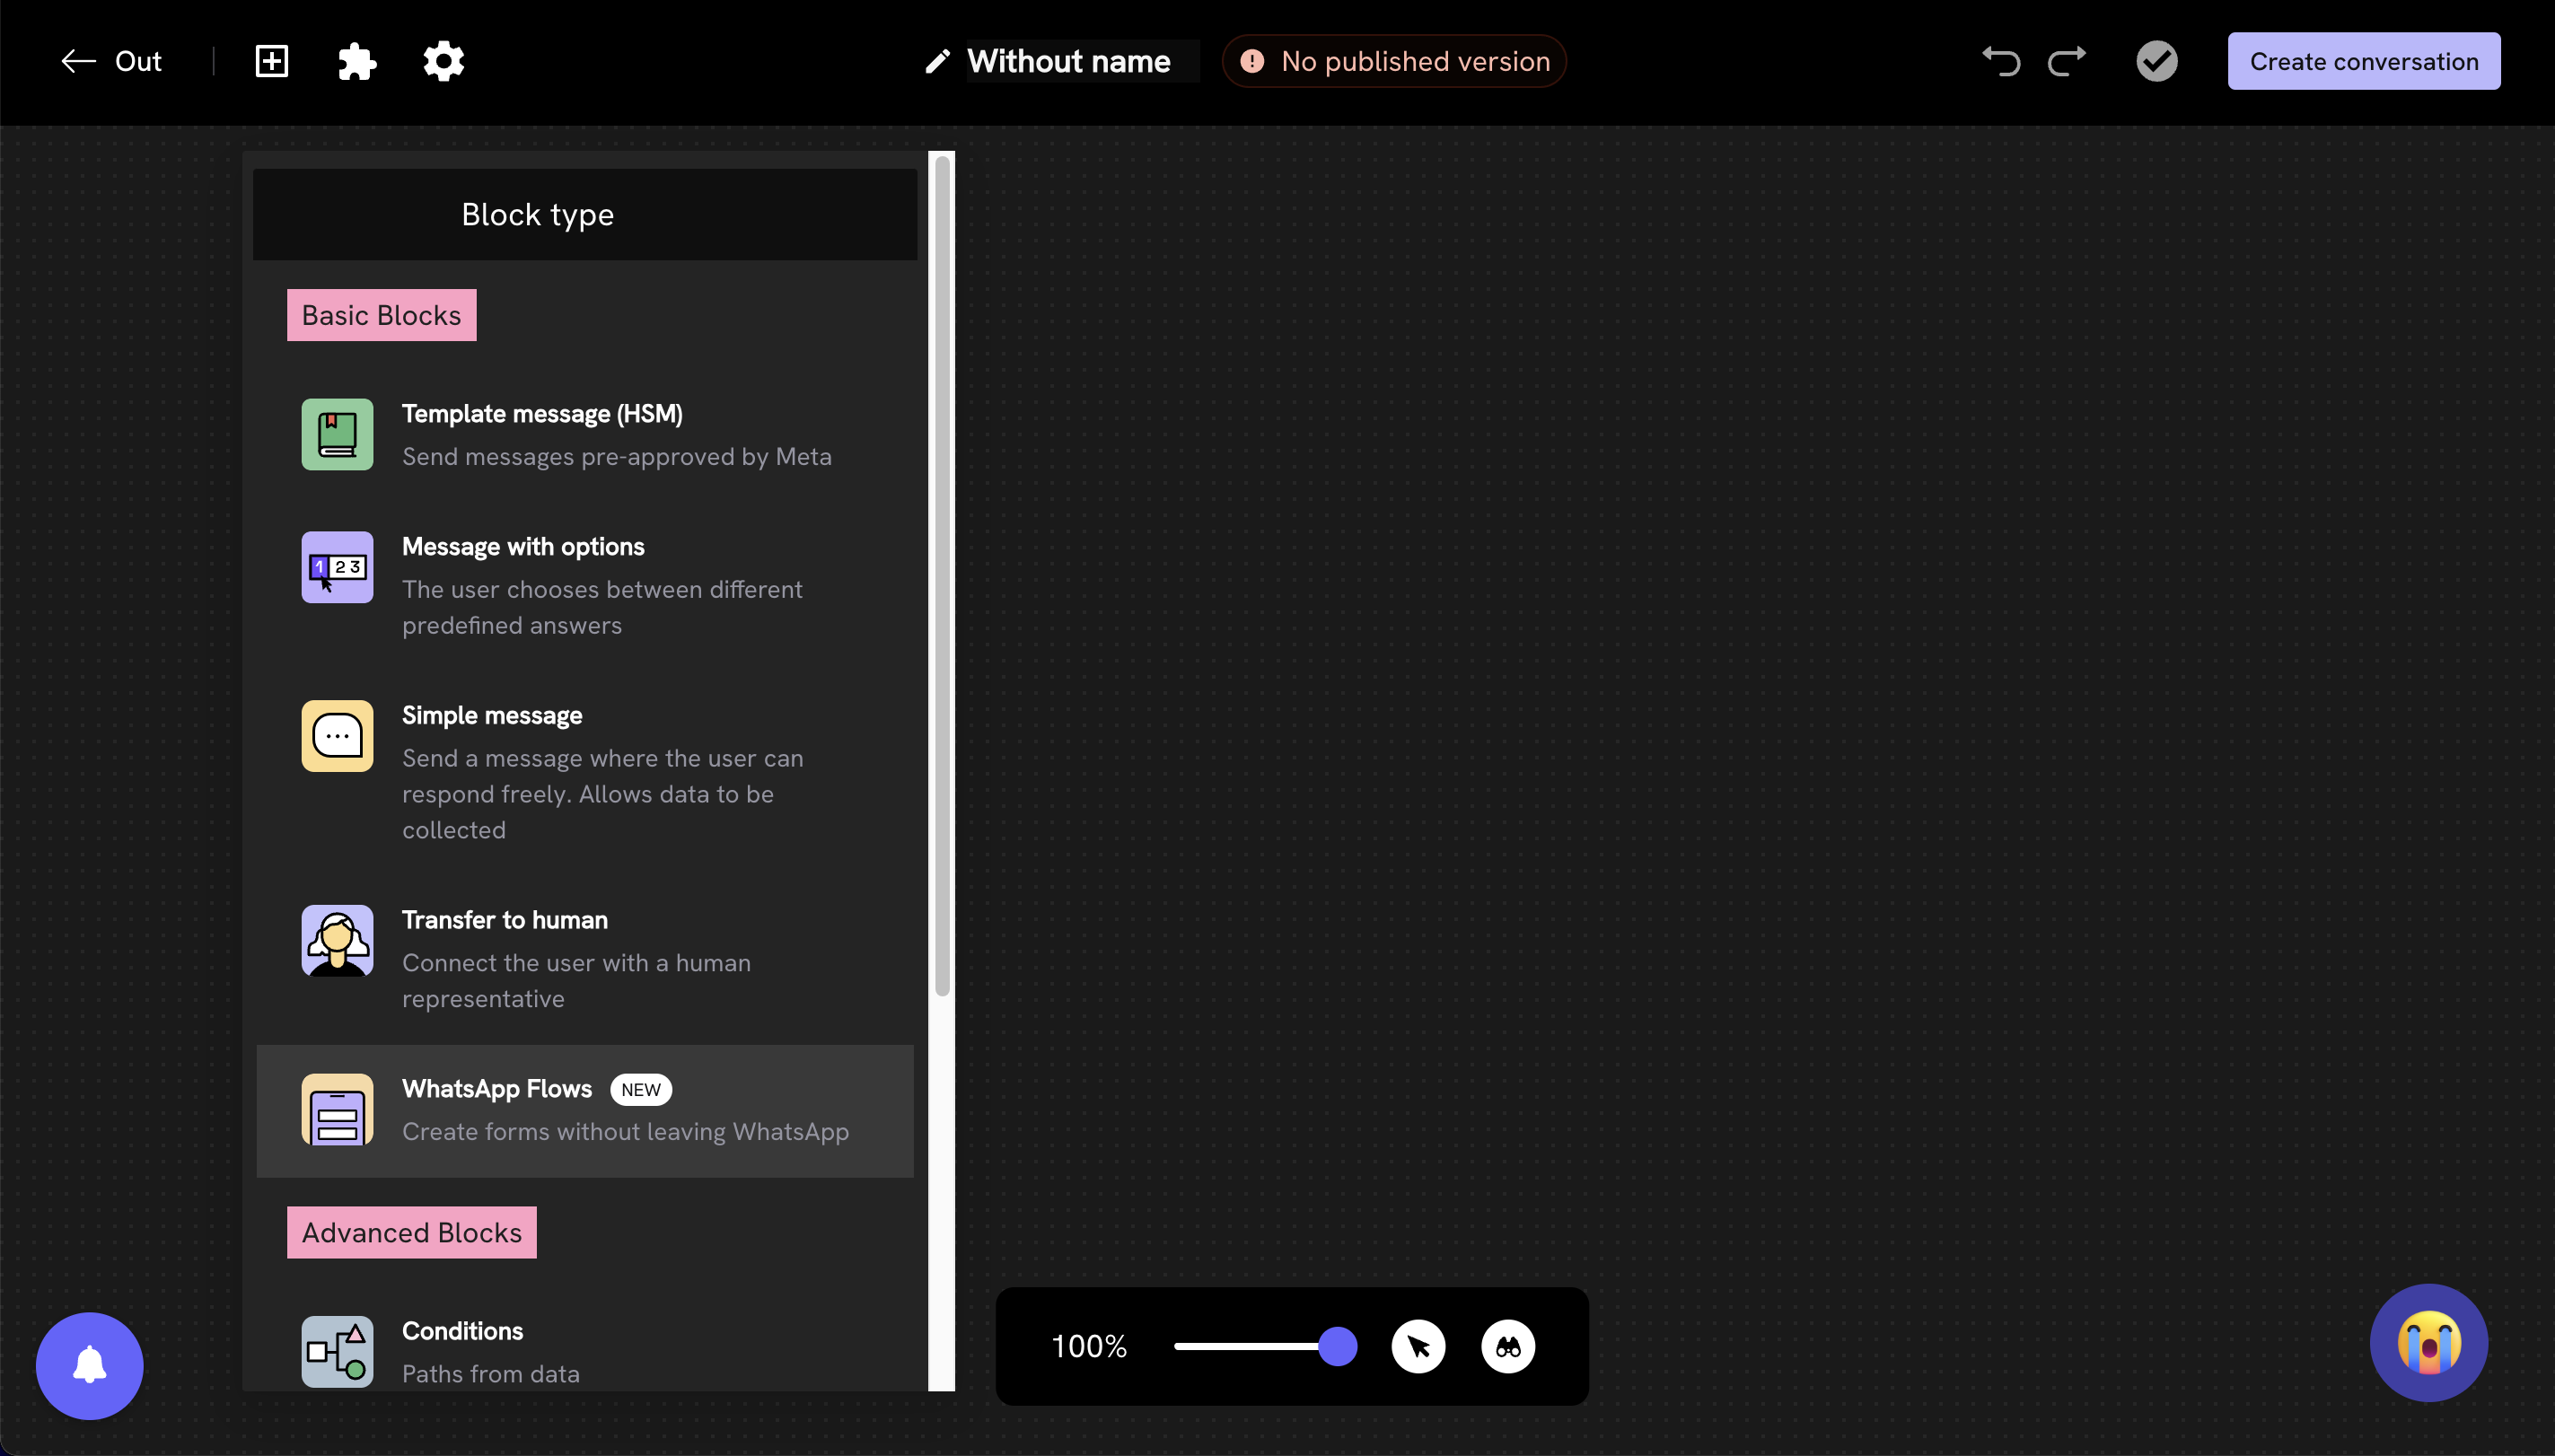
Create a new conversation in Treble
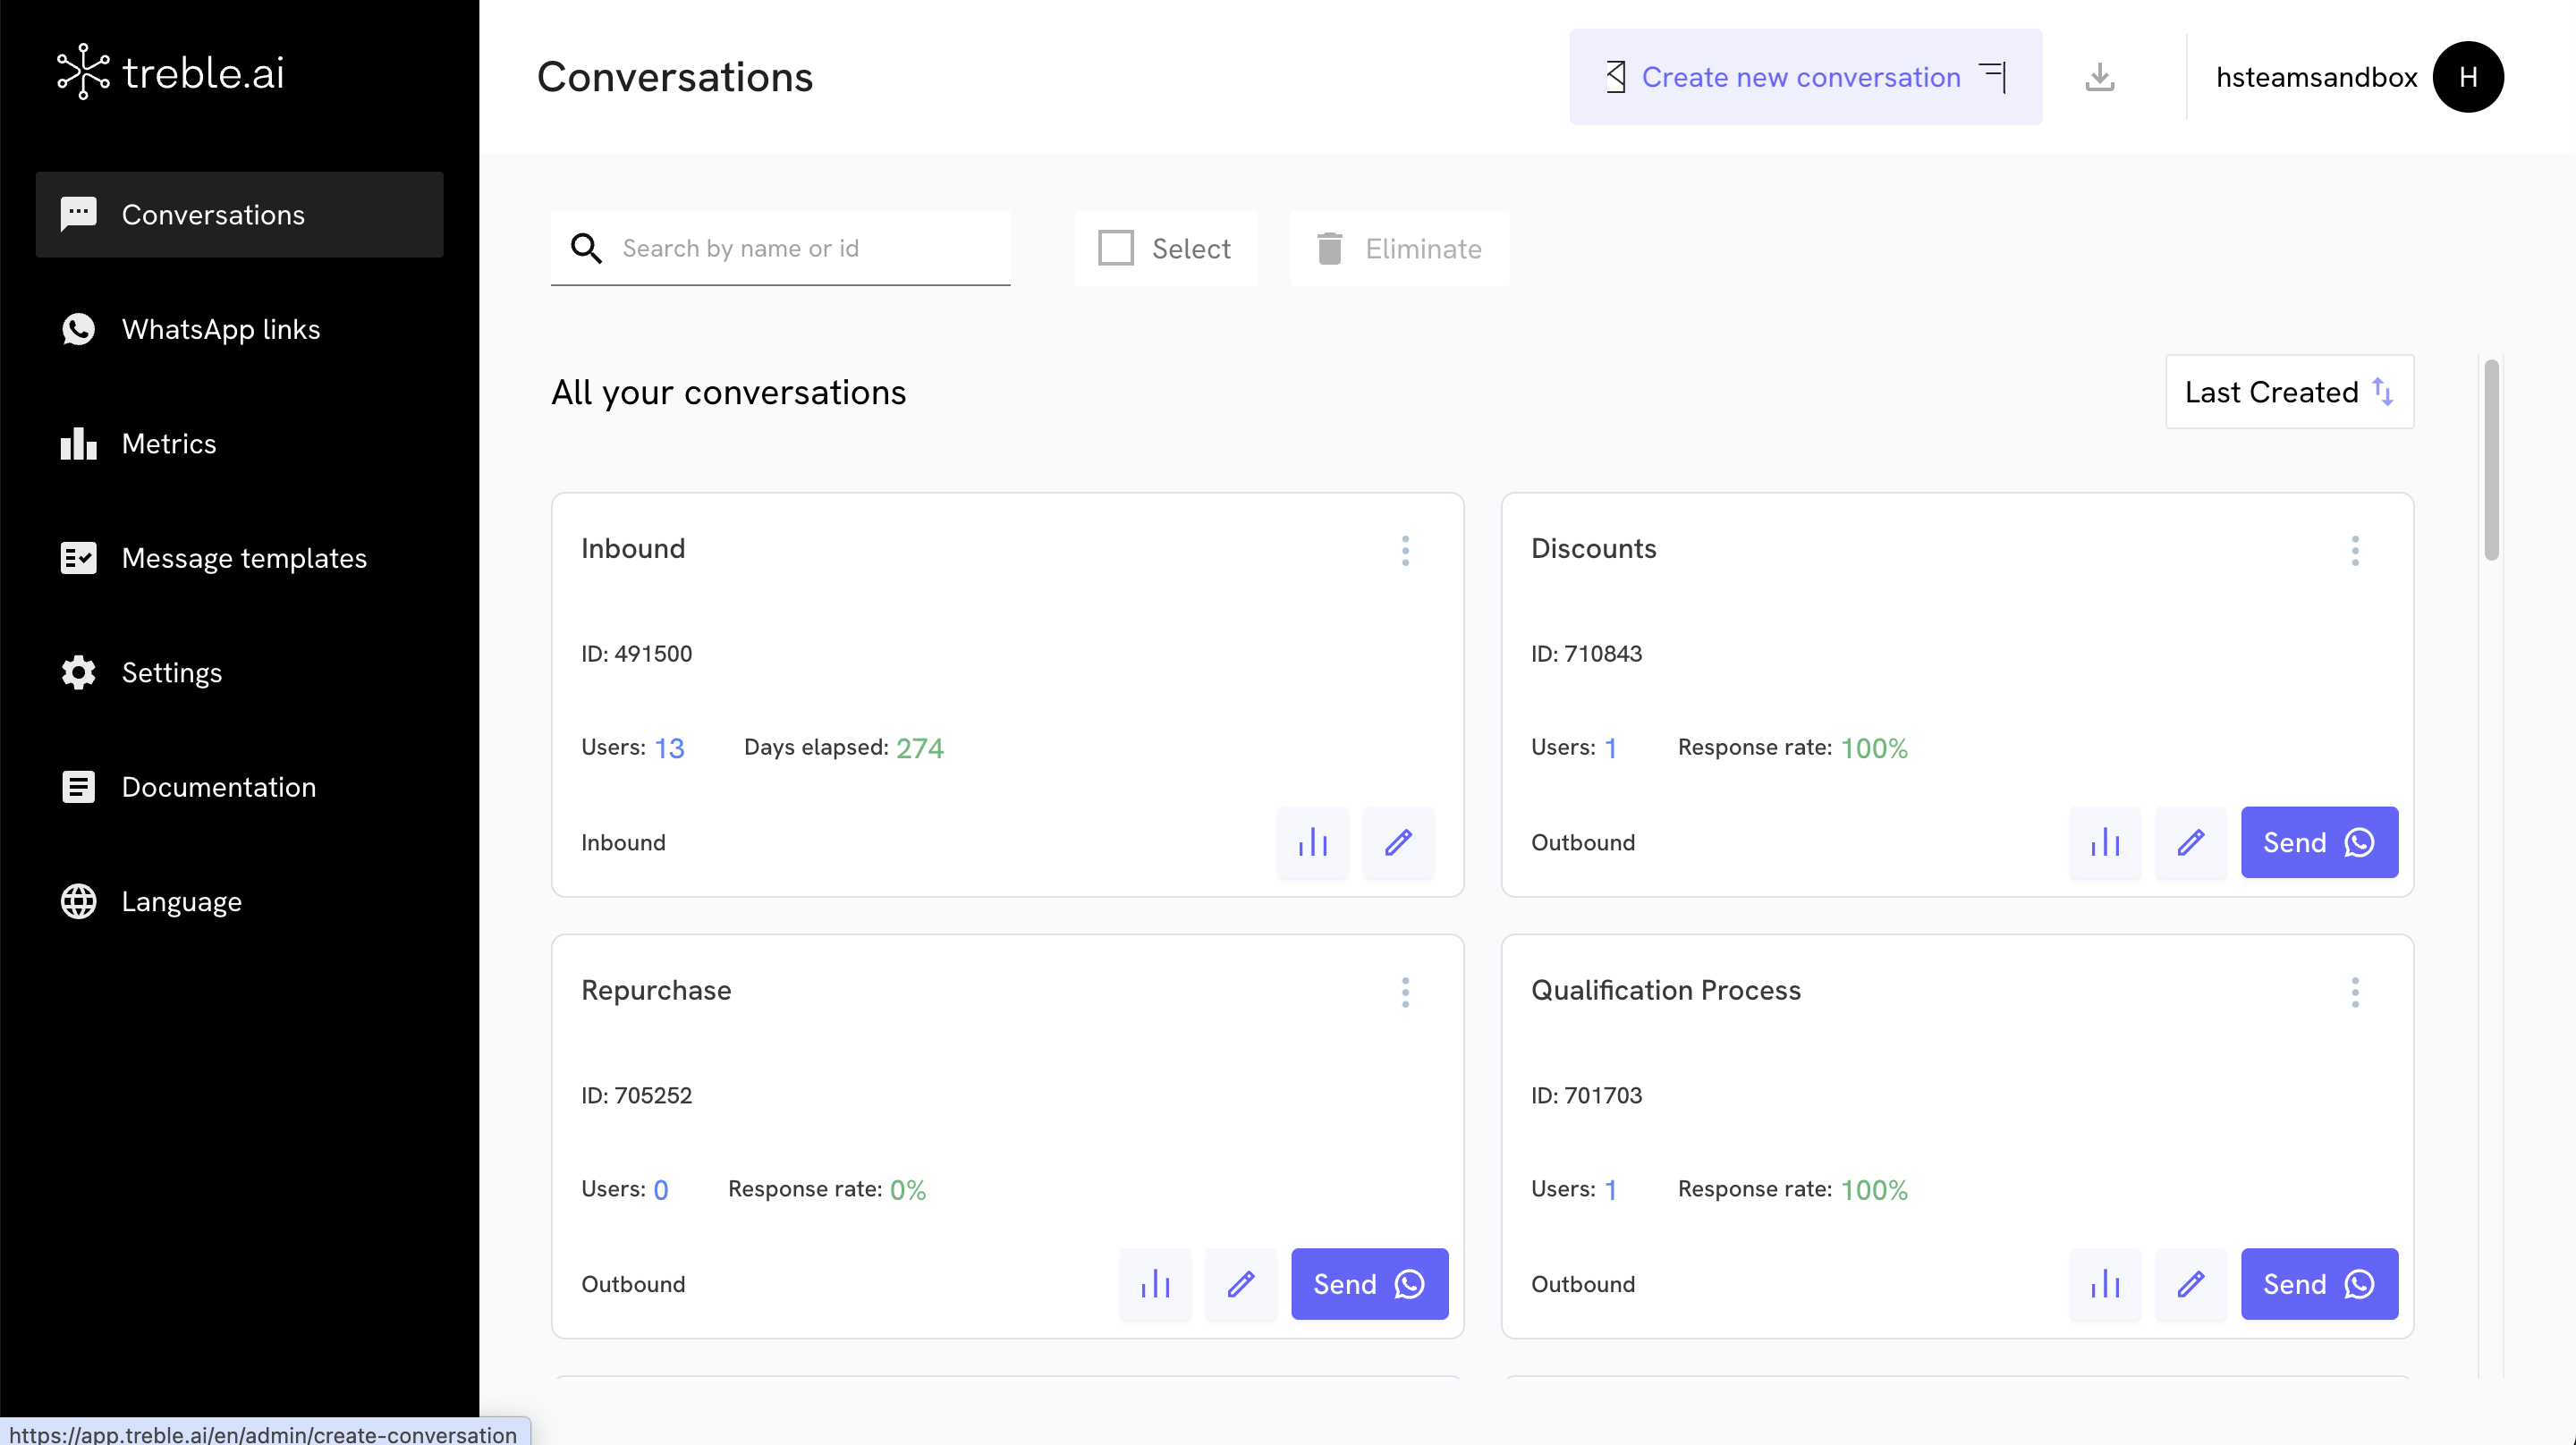
Use the specialized block for WhatsApp Flows
Configure the Flow in three stages
The 3 stages
The 3 stages
Select the flow
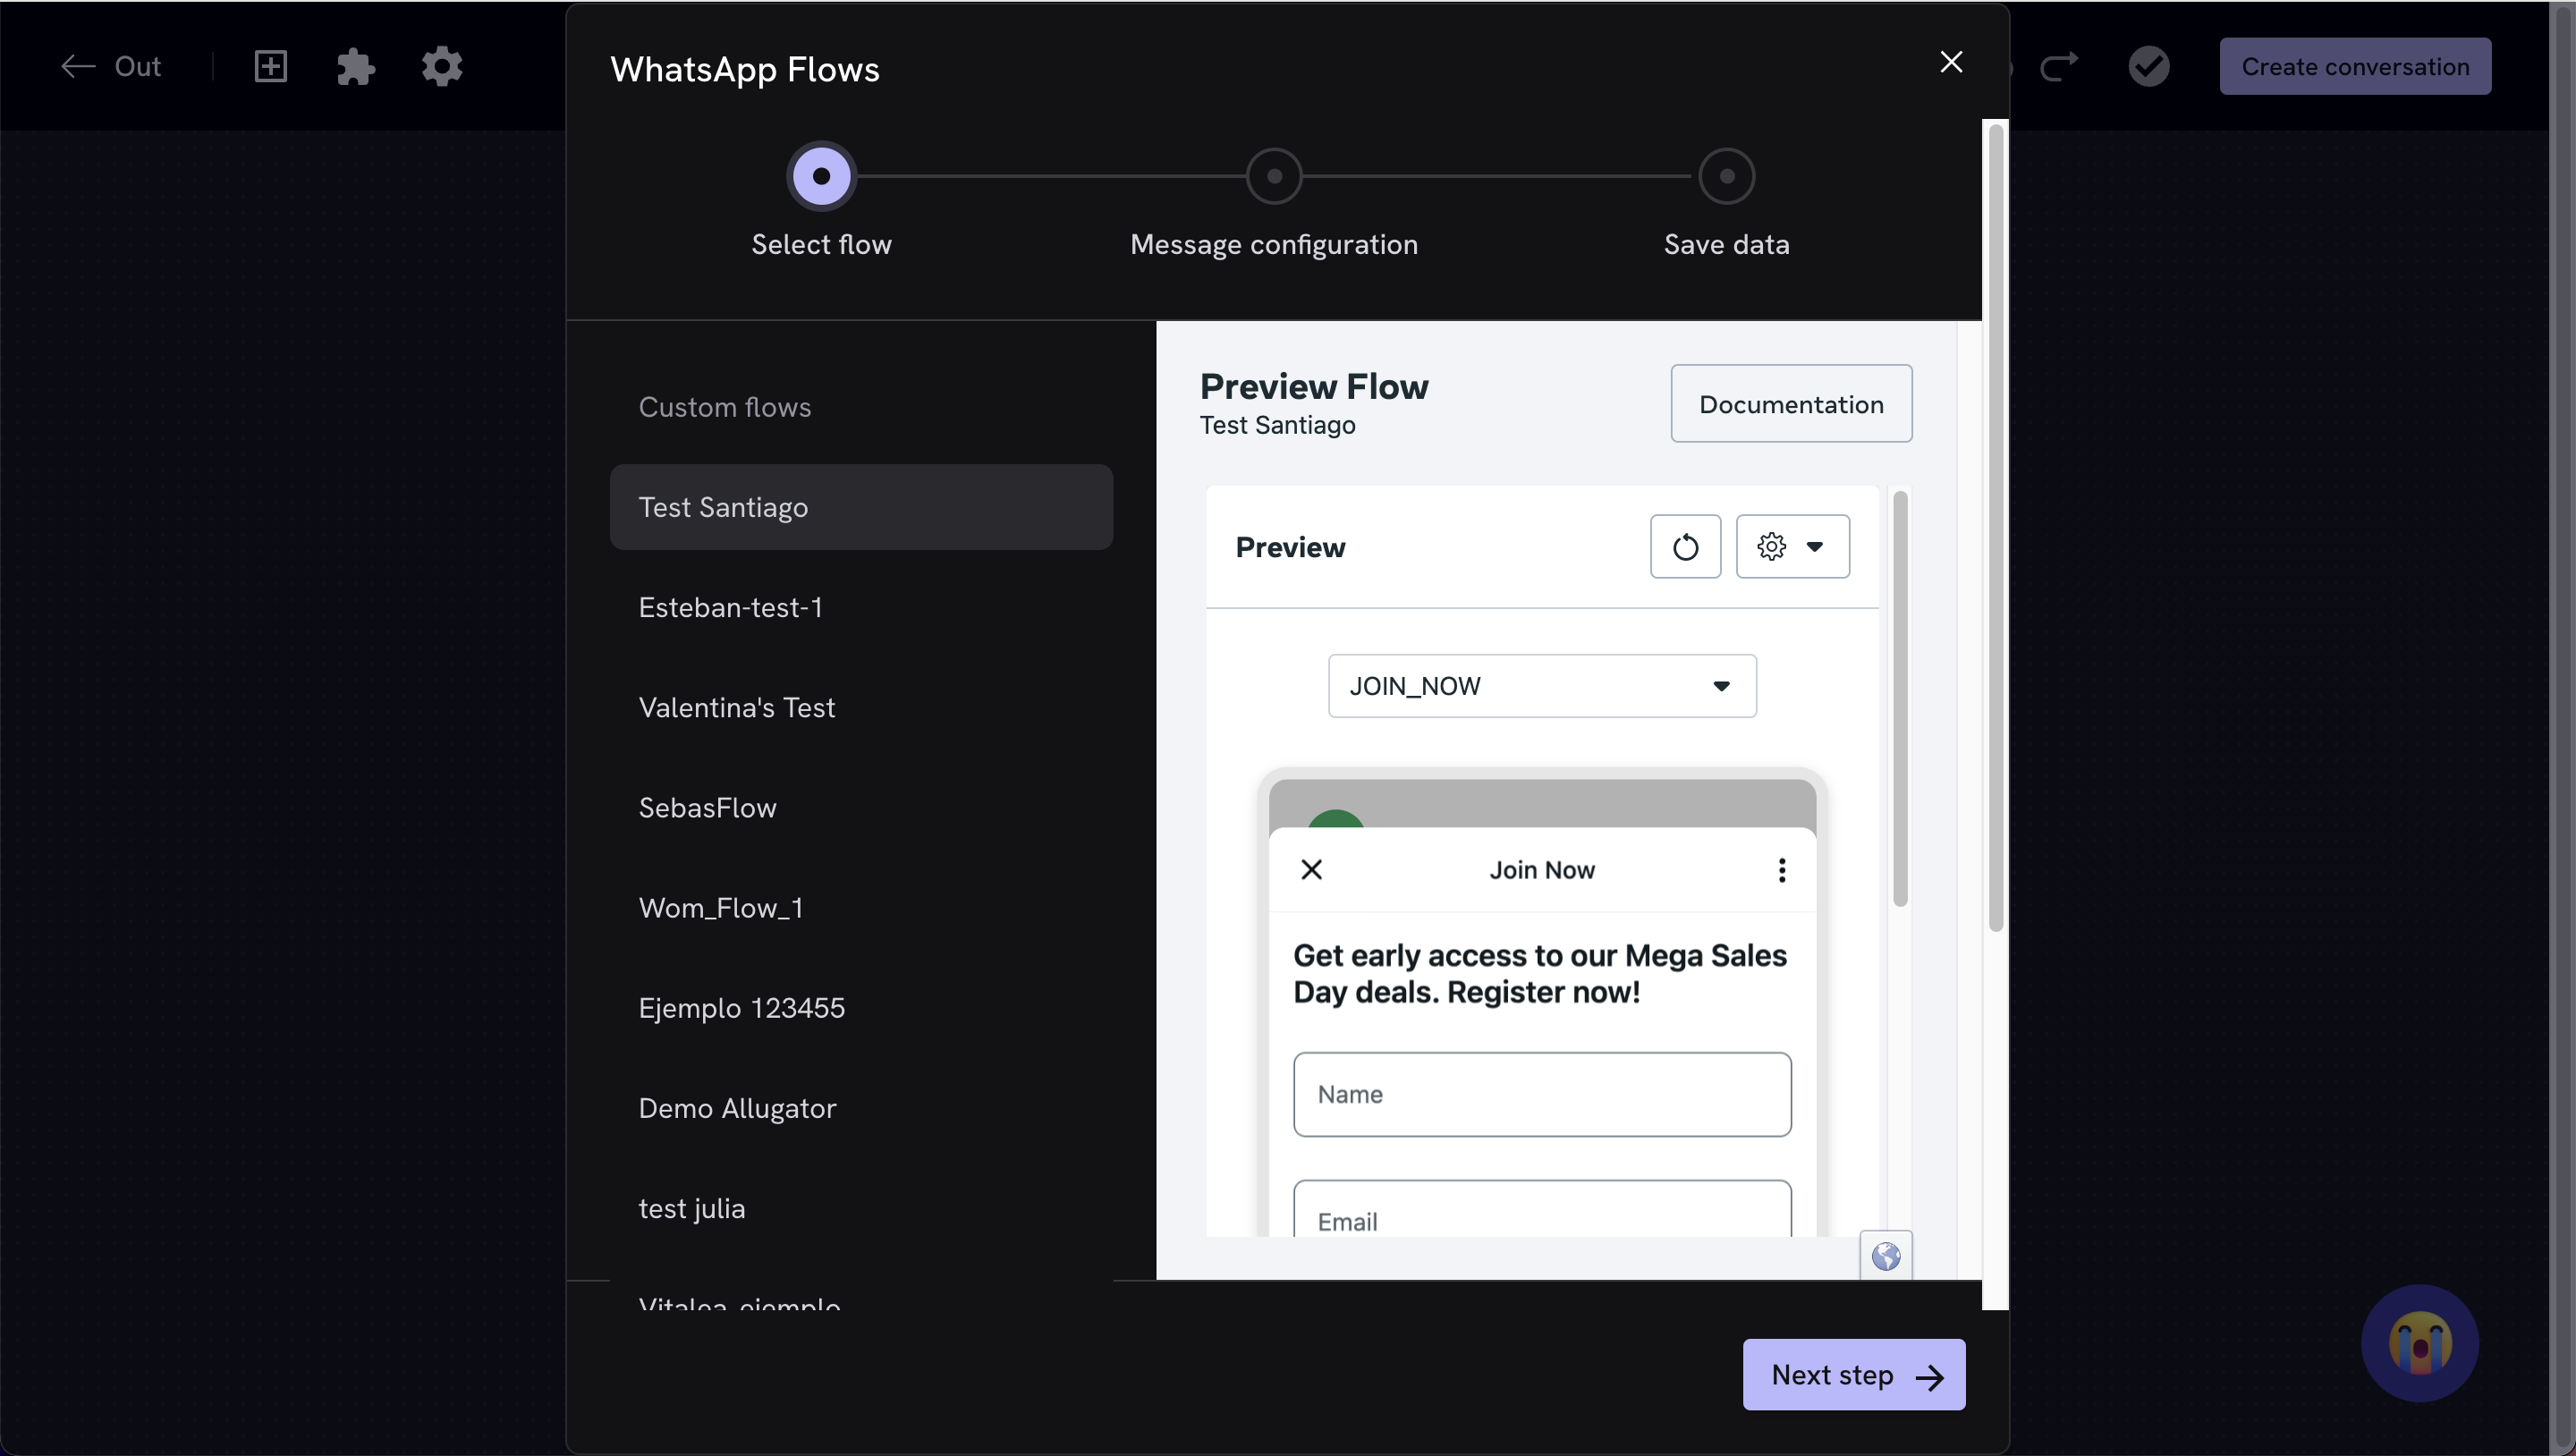
Configure the initial message
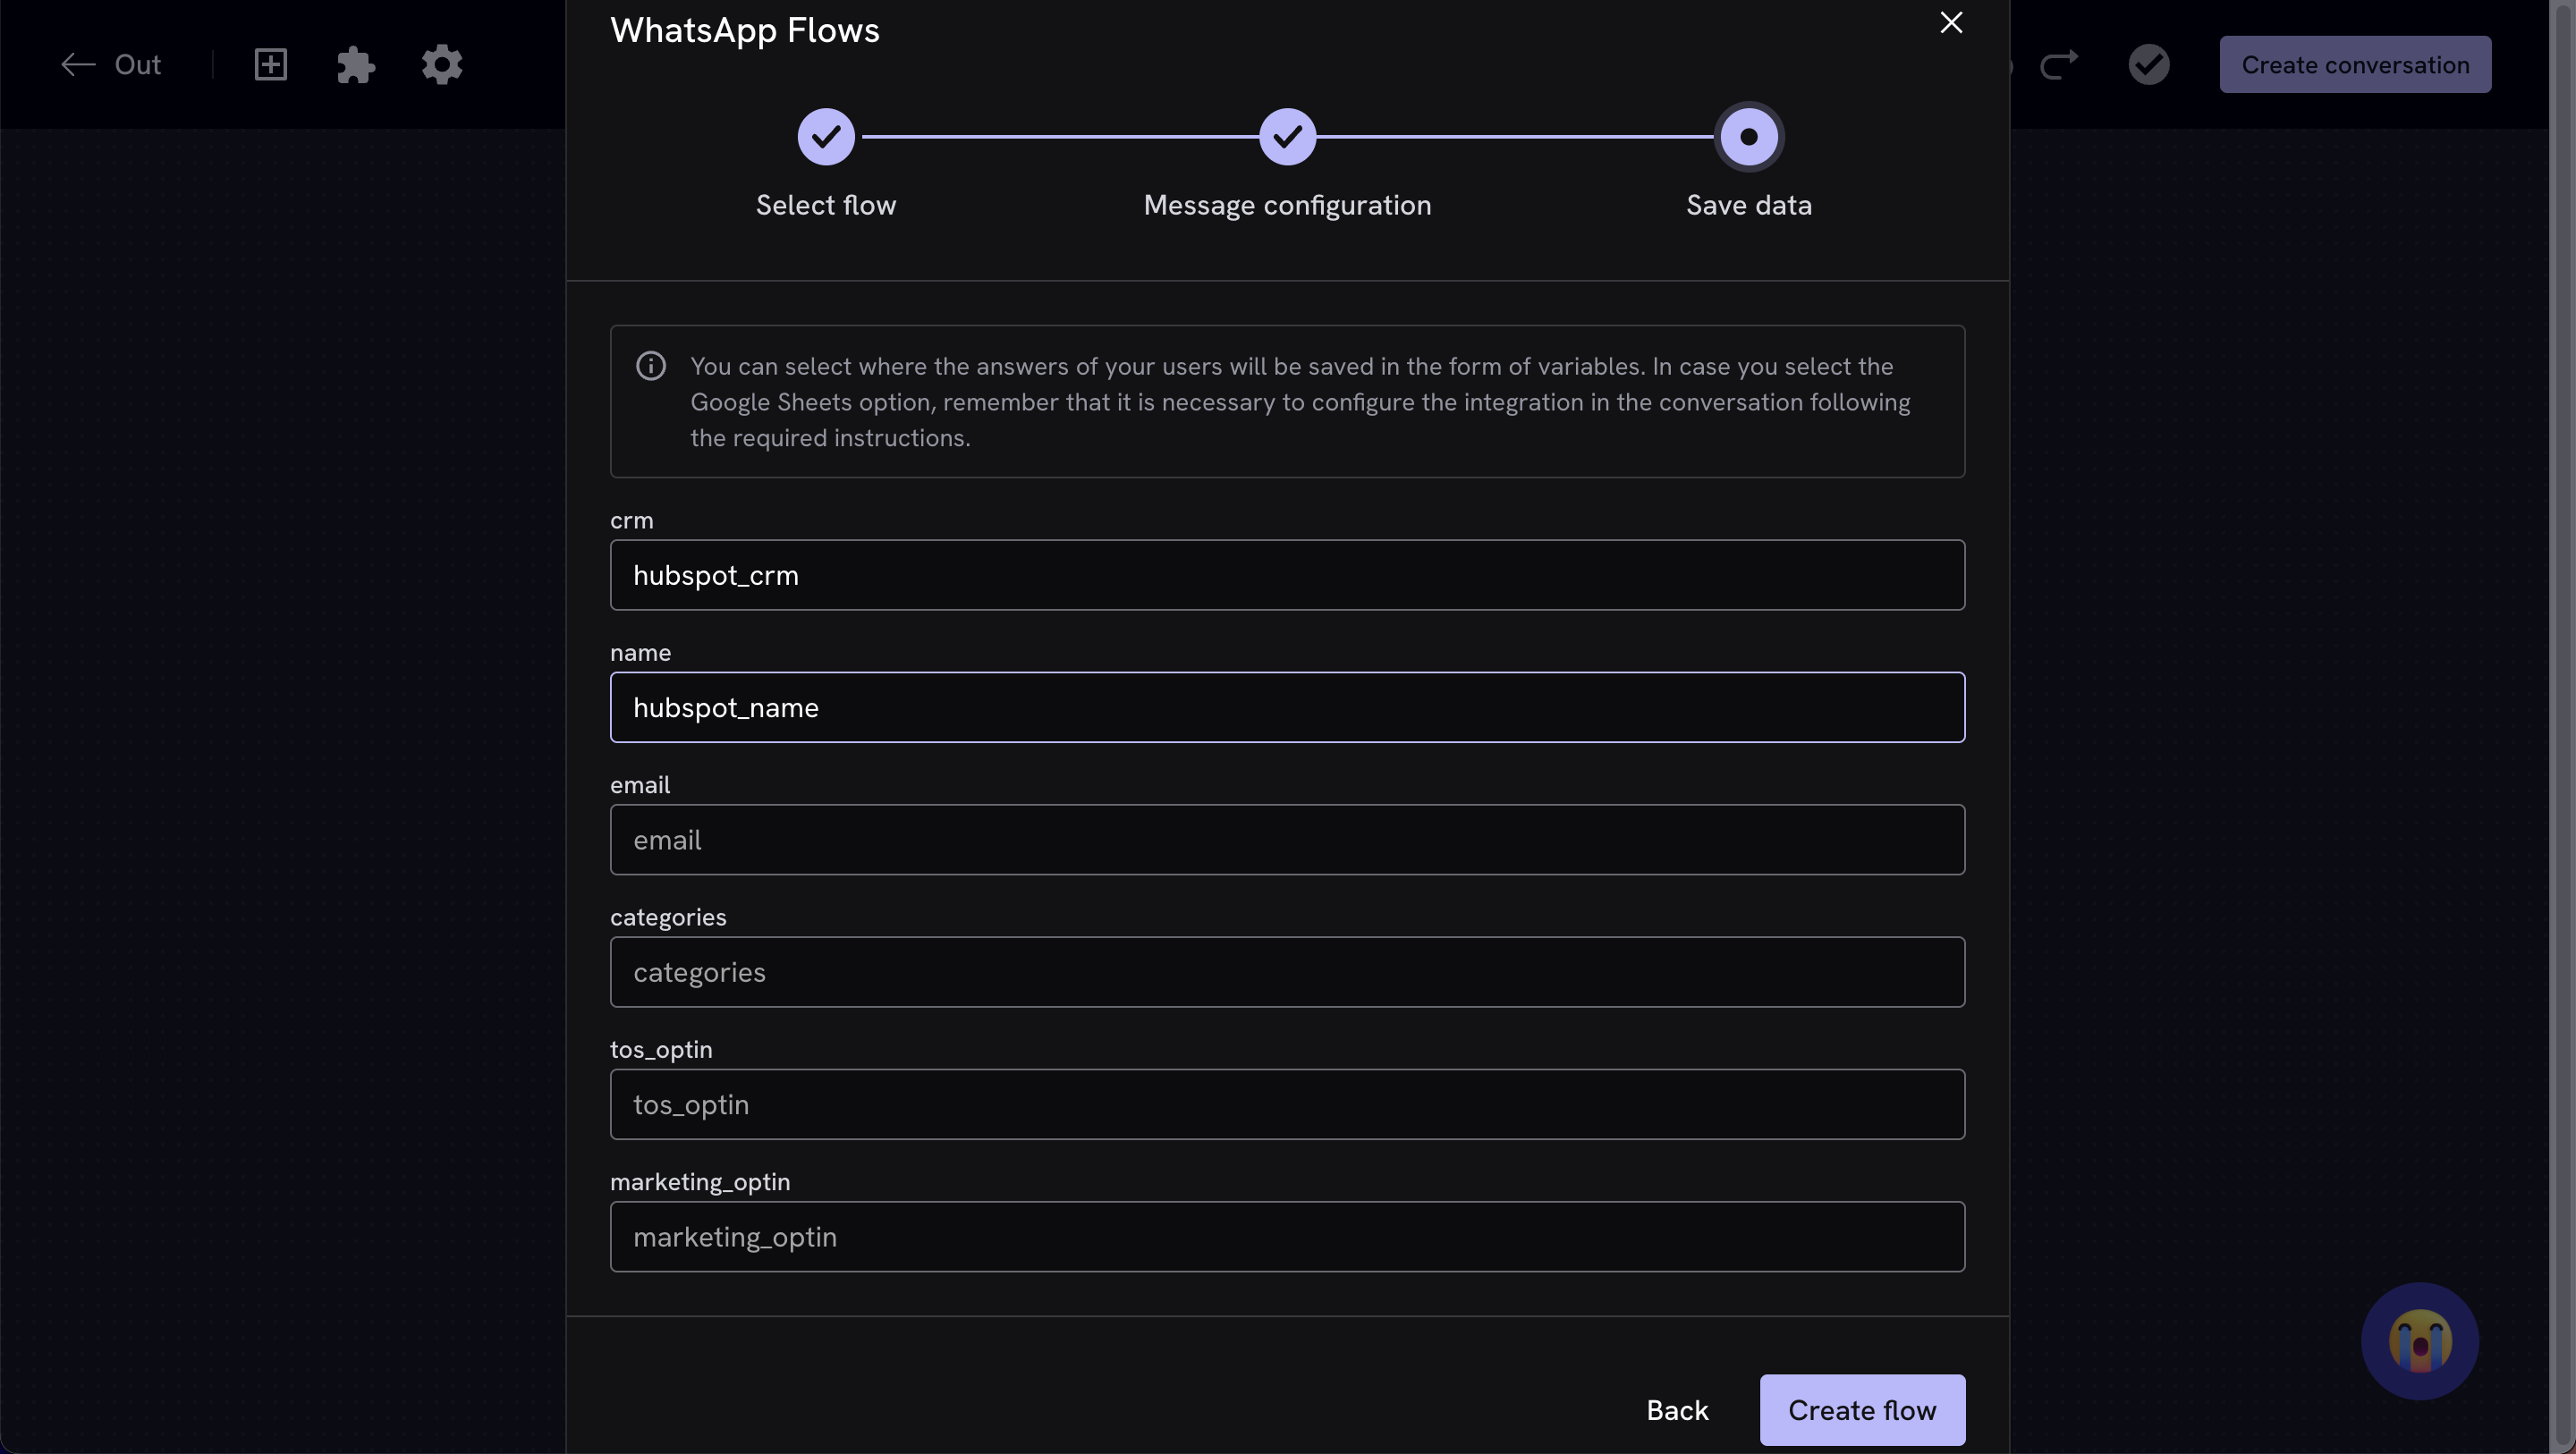
Configure the variables
- Get the payload value: Identify the property value within the Flow’s payload.
- Define the name and storage of variables: Assign a name that allows saving this value within Treble or in the CRM that you have integrated. If you want to store variables in external integrations such as HubSpot or Google Sheets, use the following nomenclature:
- For HubSpot: “hubspot_variablename”. For example, if you have a variable called “name”, you could save it as “hubspot_name”.
-
For Google Sheets: “sheets_variablename”. For example, if you have a variable called “email”, you could save it as “sheets_email”.
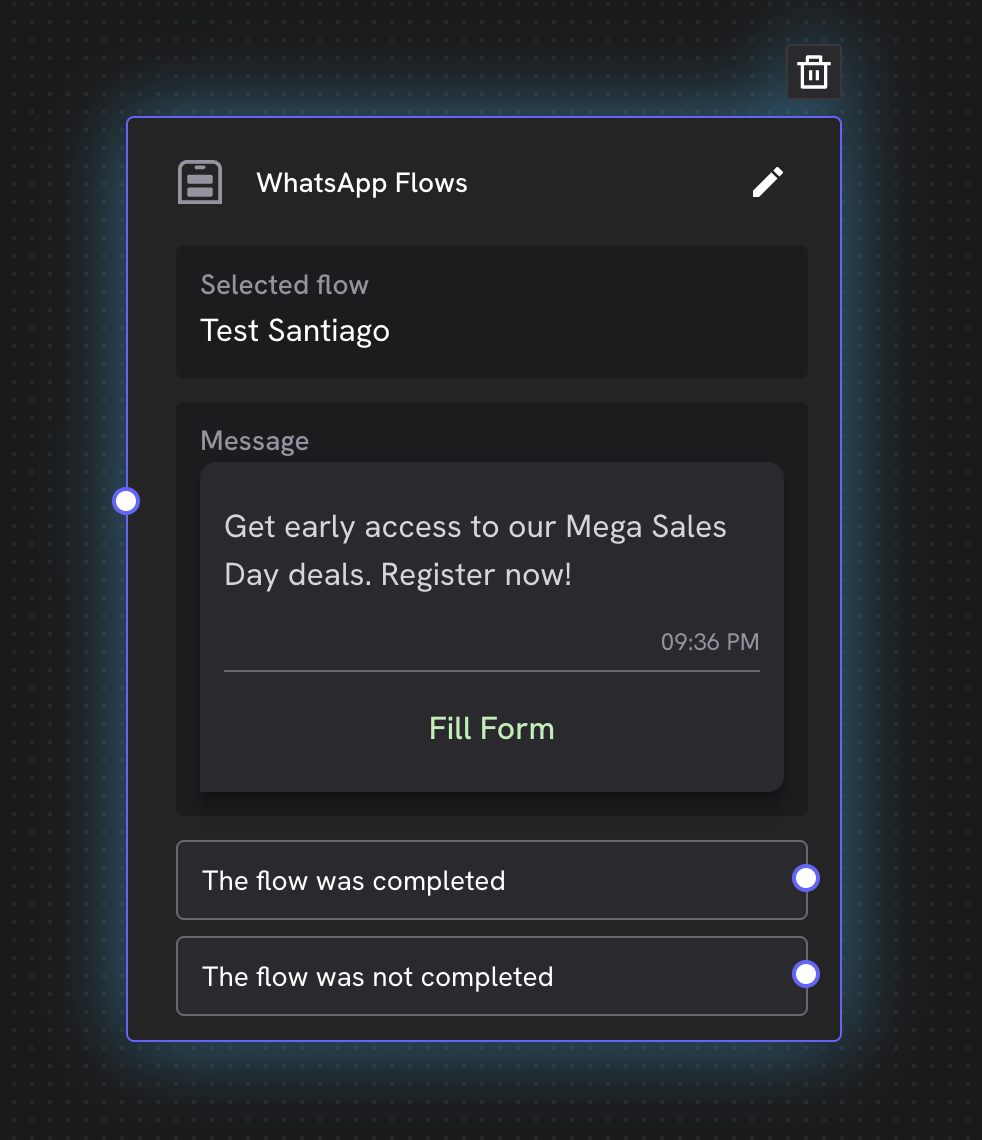
Connect the nodes in the chatbot
- Completed flow: You can configure an action for when the Flow is successfully completed, such as sending a thank you message to users.
-
Incomplete flow: You can also define what happens if the Flow is not completed. In this case, you can send a follow-up message and invite the user to try the Flow again or provide another option.
Save and send the conversation
6 Best Practices for WhatsApp Flows
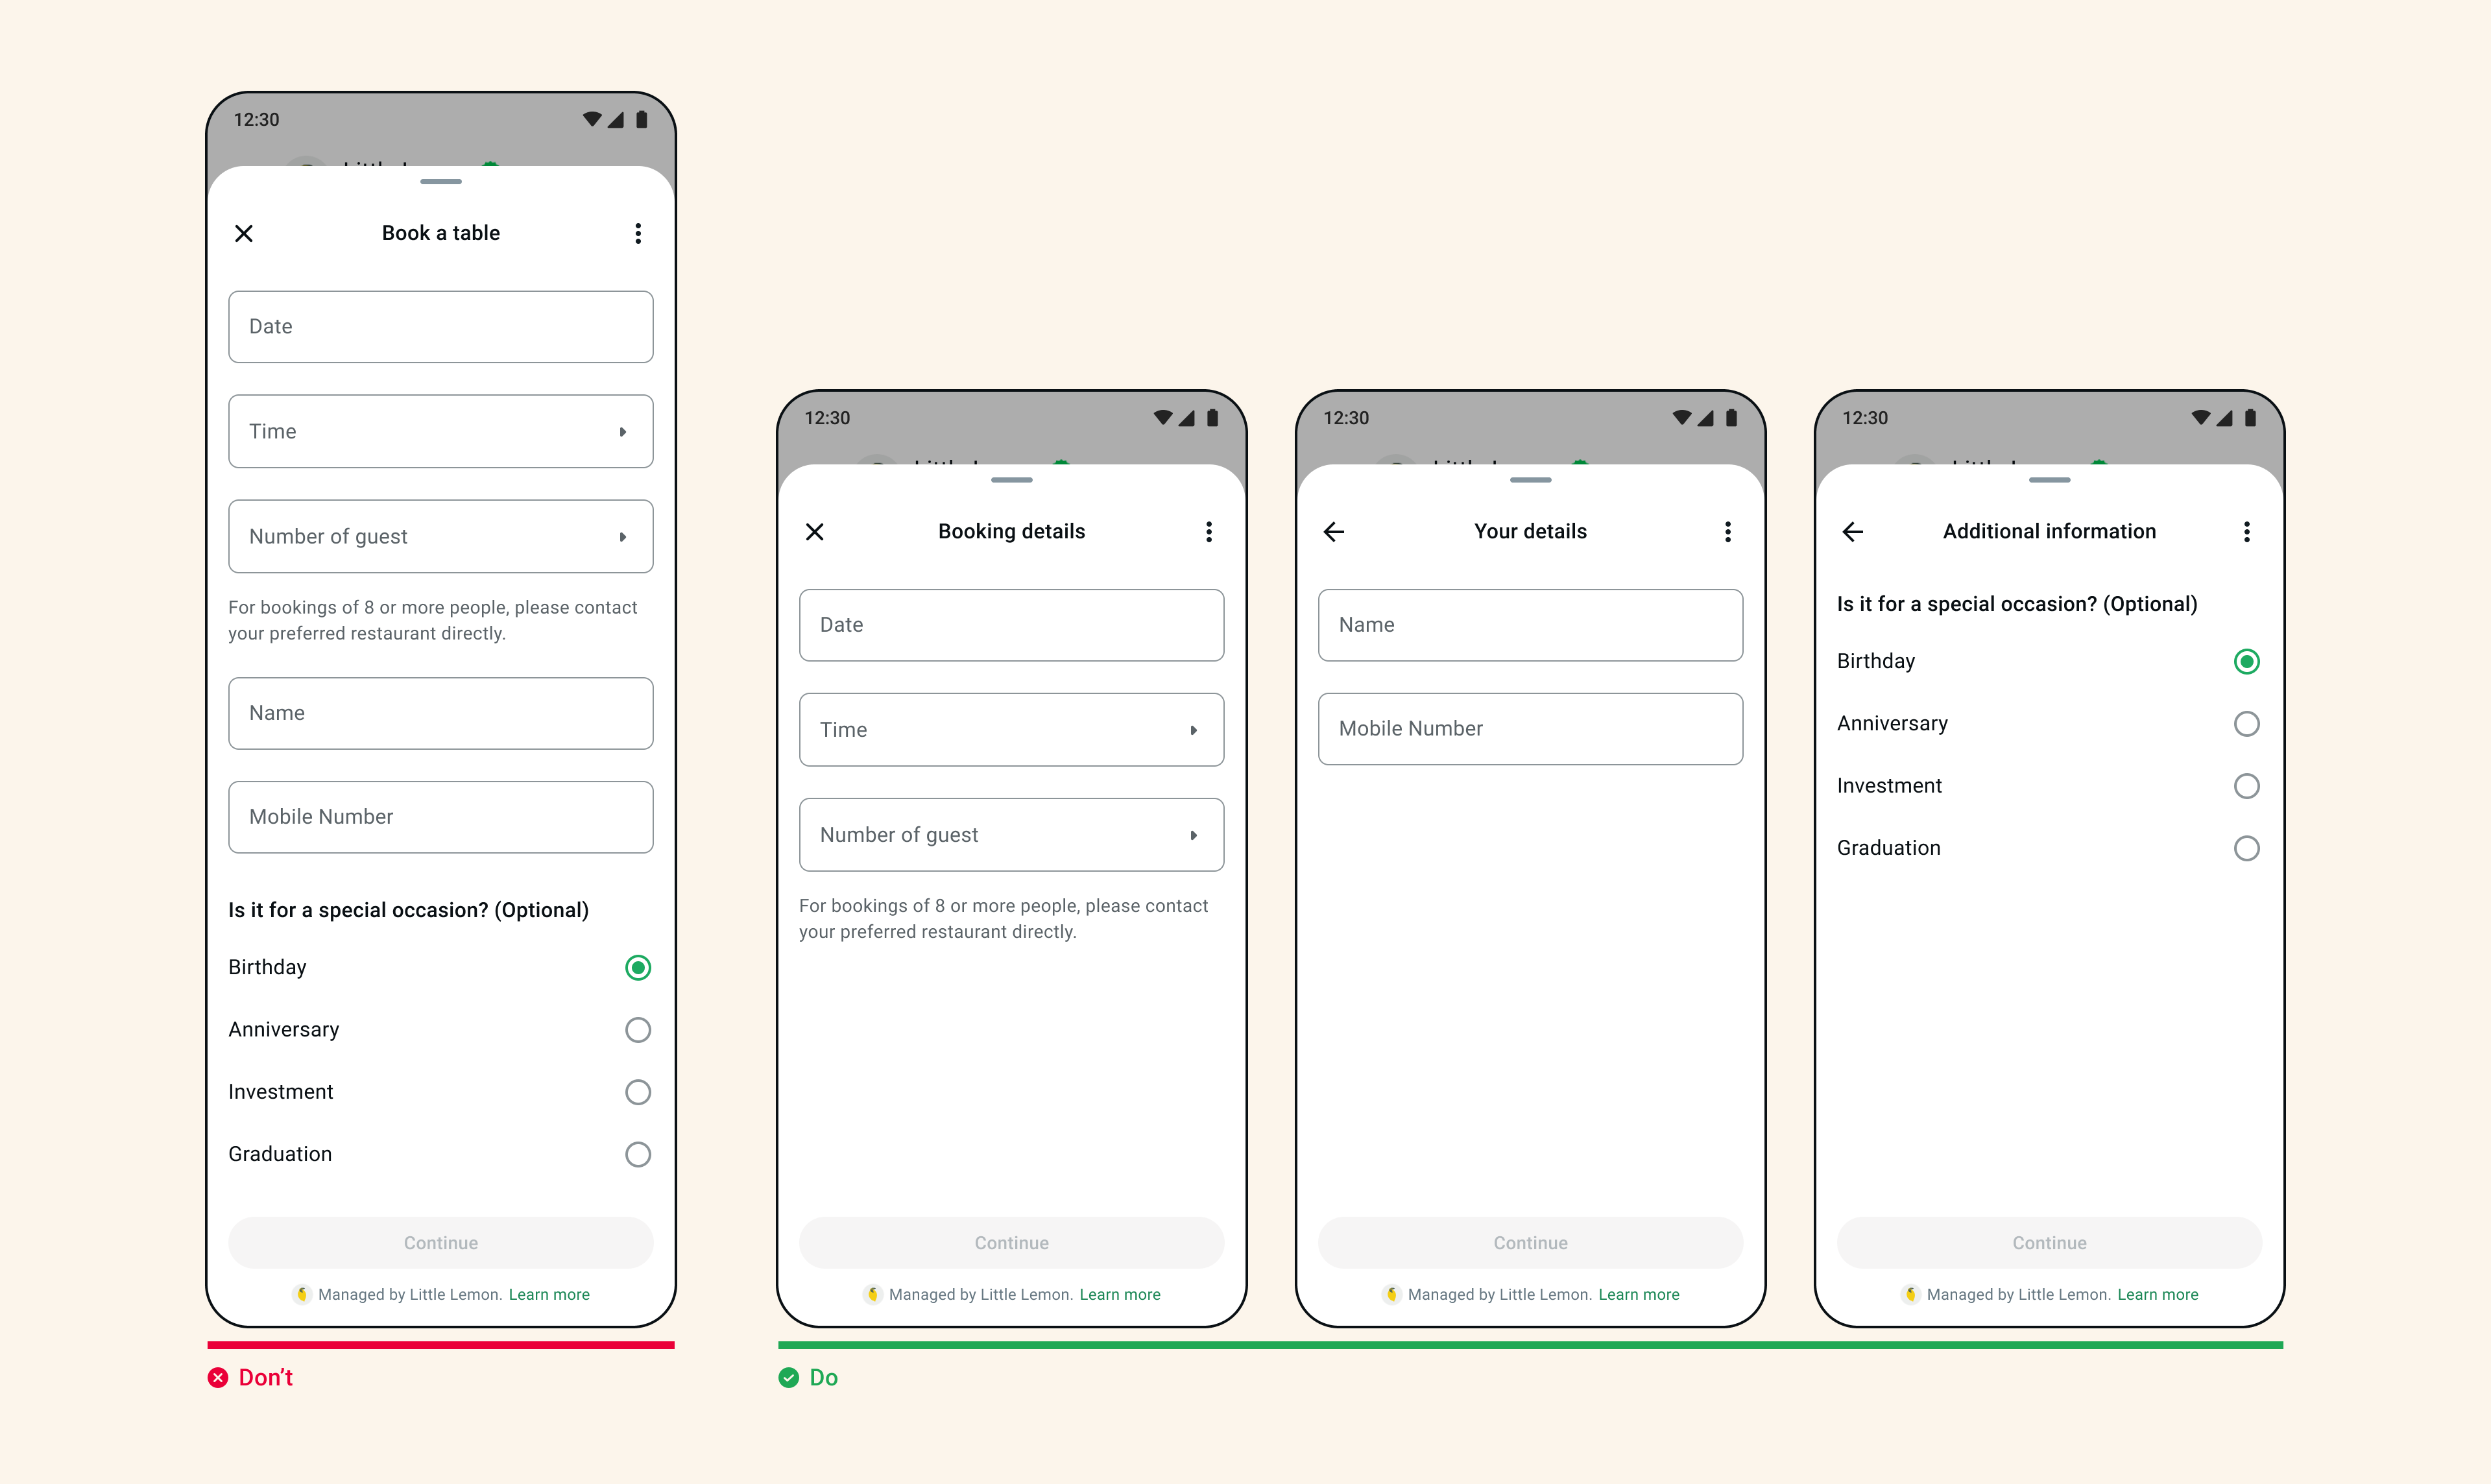
WhatsApp Flows is a powerful tool that can help your company optimize its conversion funnel through WhatsApp. By following best practices, you can improve the customer experience, reduce abandonment, and increase conversion. This guide is based on best practices proposed by Meta and our experience validating the tool to optimize interactions with your customers.Keep Flows Short and Focused
Recommendations to Keep Flows Concise:
- Limit Tasks per Screen: Include only one task per screen to avoid overwhelming the customer. This makes the experience clearer and easier to follow.
-
Minimize Components: Avoid using too many components on a single screen, as it can saturate the interface and slow down loading times. If you need several components, distribute them across multiple screens.
Design and Content Considerations
Best Practices for Design and Content:
-
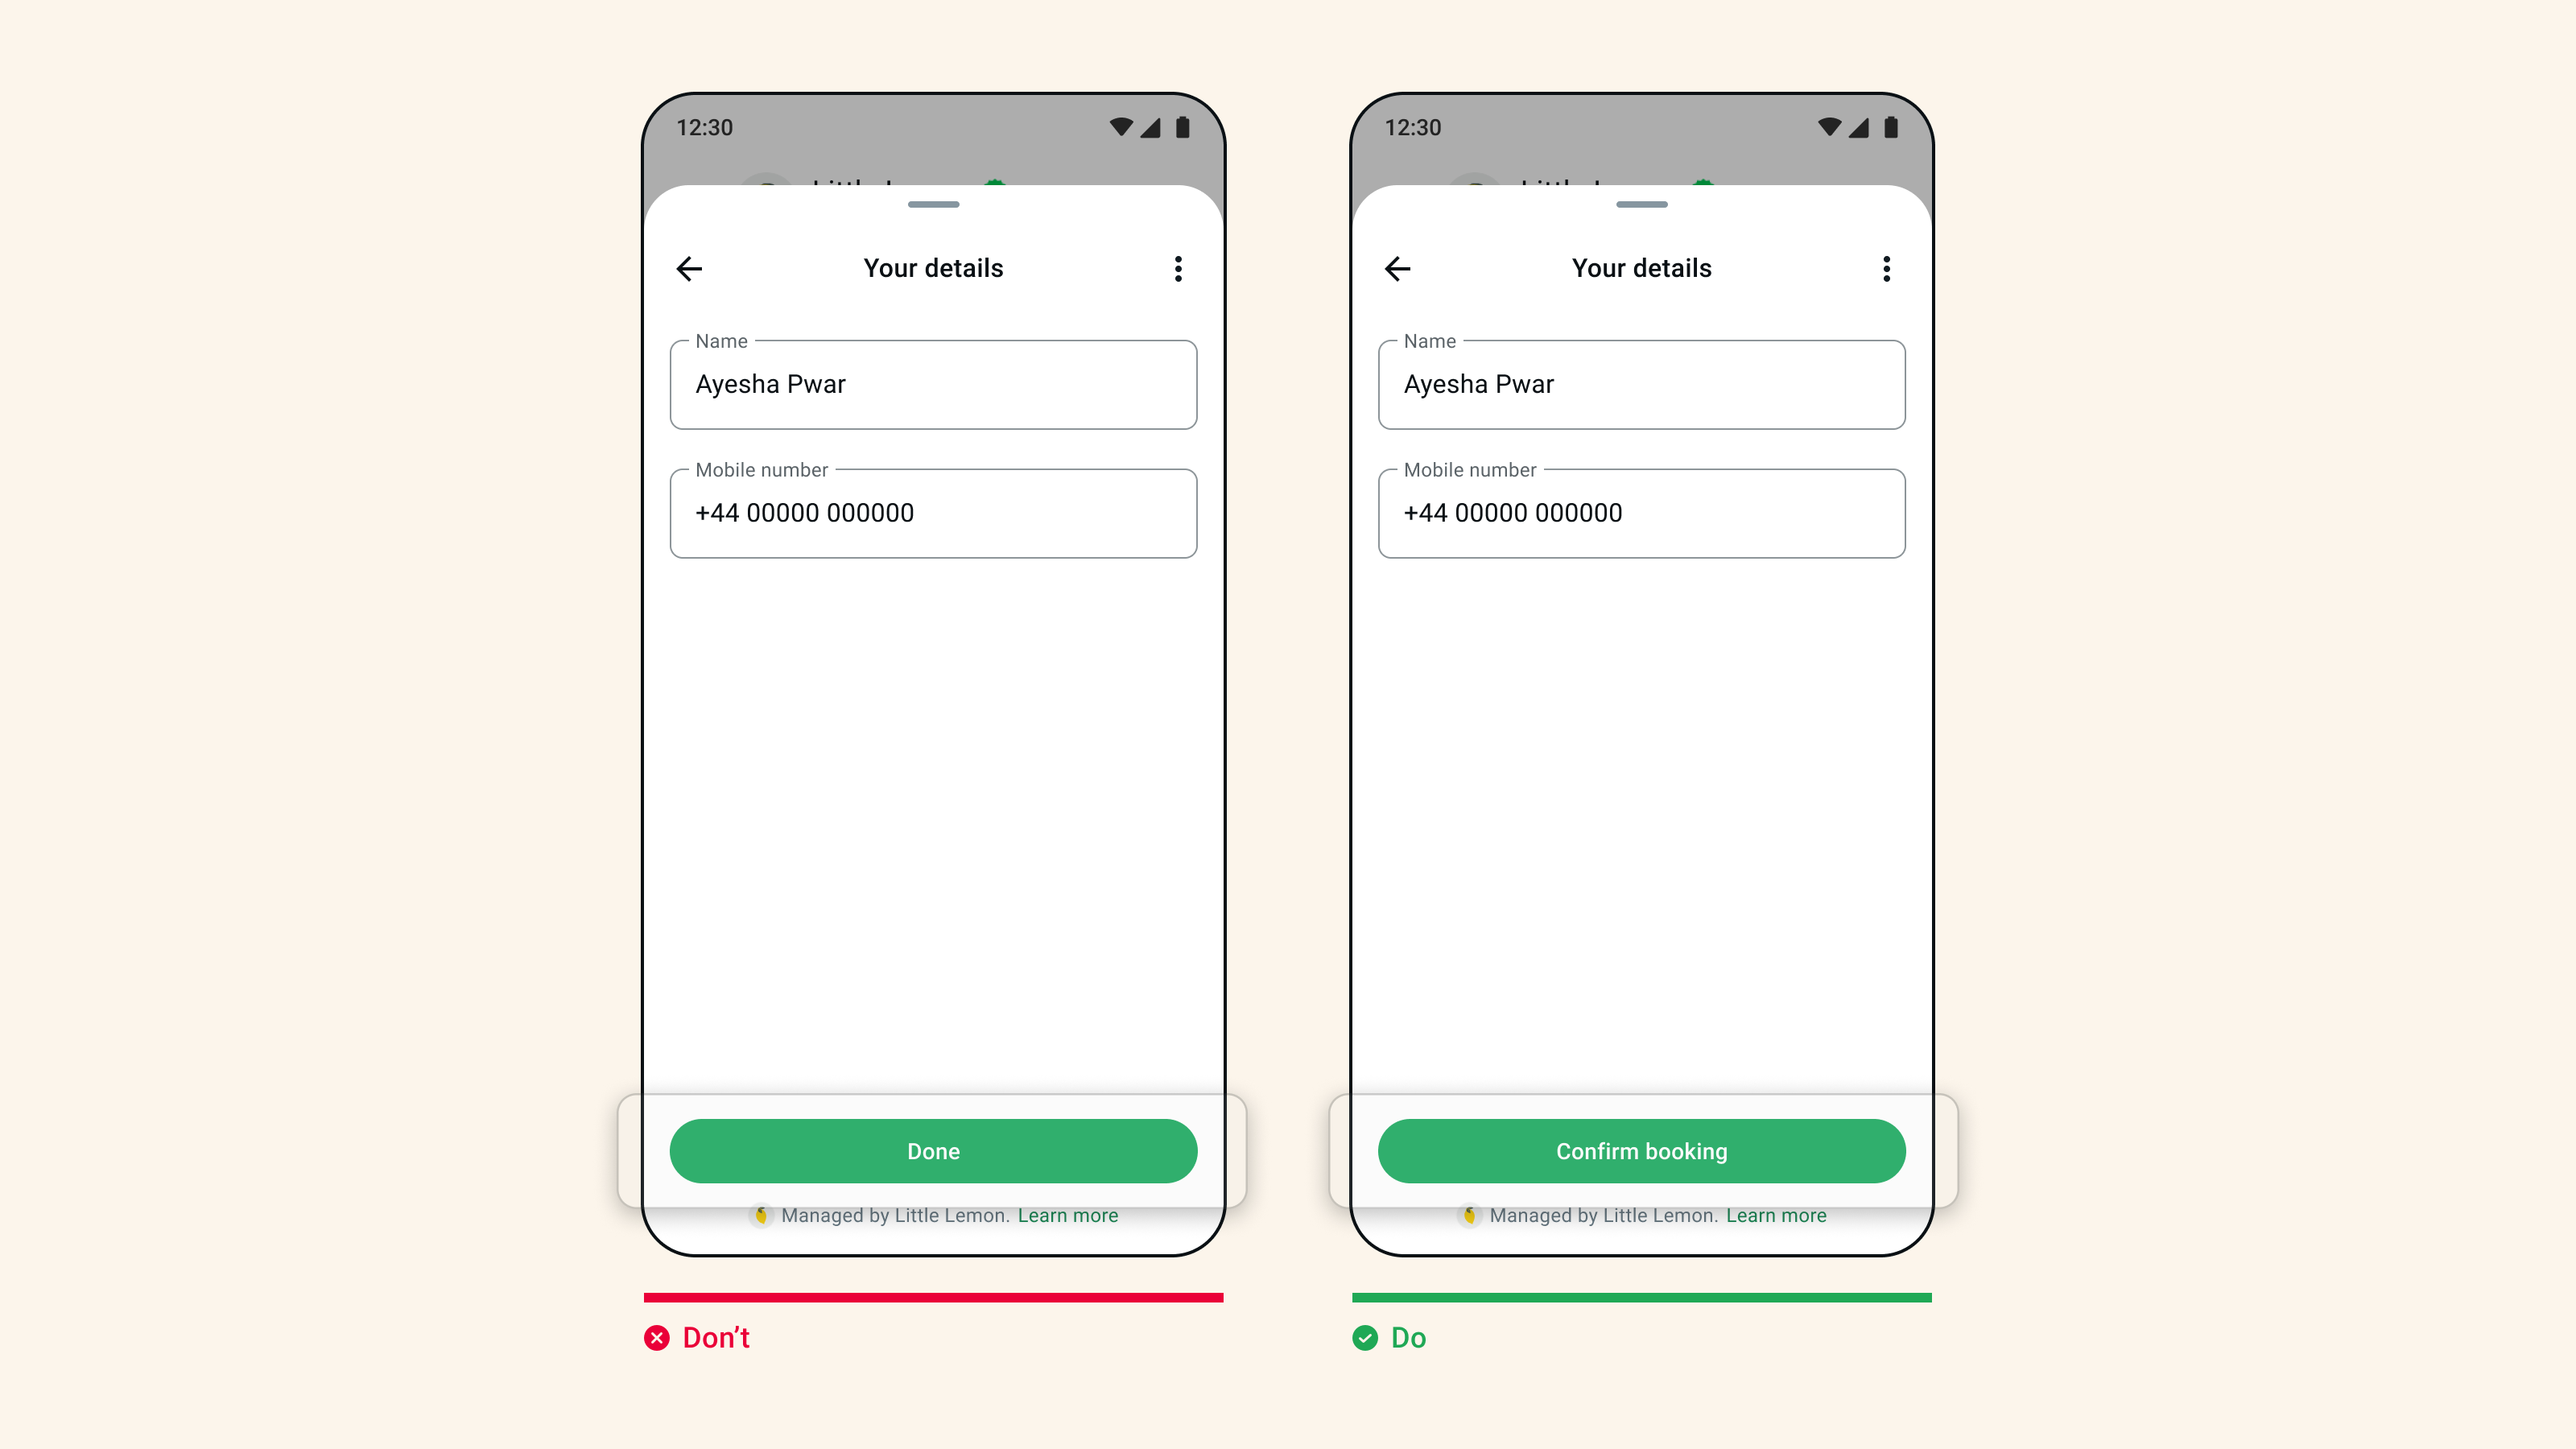
Effective Calls to Action (CTAs): The CTA should clearly indicate what will happen next. For example, use phrases like “Confirm booking” so the customer knows exactly what action they’re taking.
-
Capitalization and Grammar: Use capitals at the beginning of titles and CTAs, maintain consistent capitalization, and always review content to correct grammar and spelling errors. This ensures a professional and consistent experience for the customer.

- Emojis: Use emojis in moderation and consider the context. Make sure they align with your brand and add value to the message rather than distract.
-
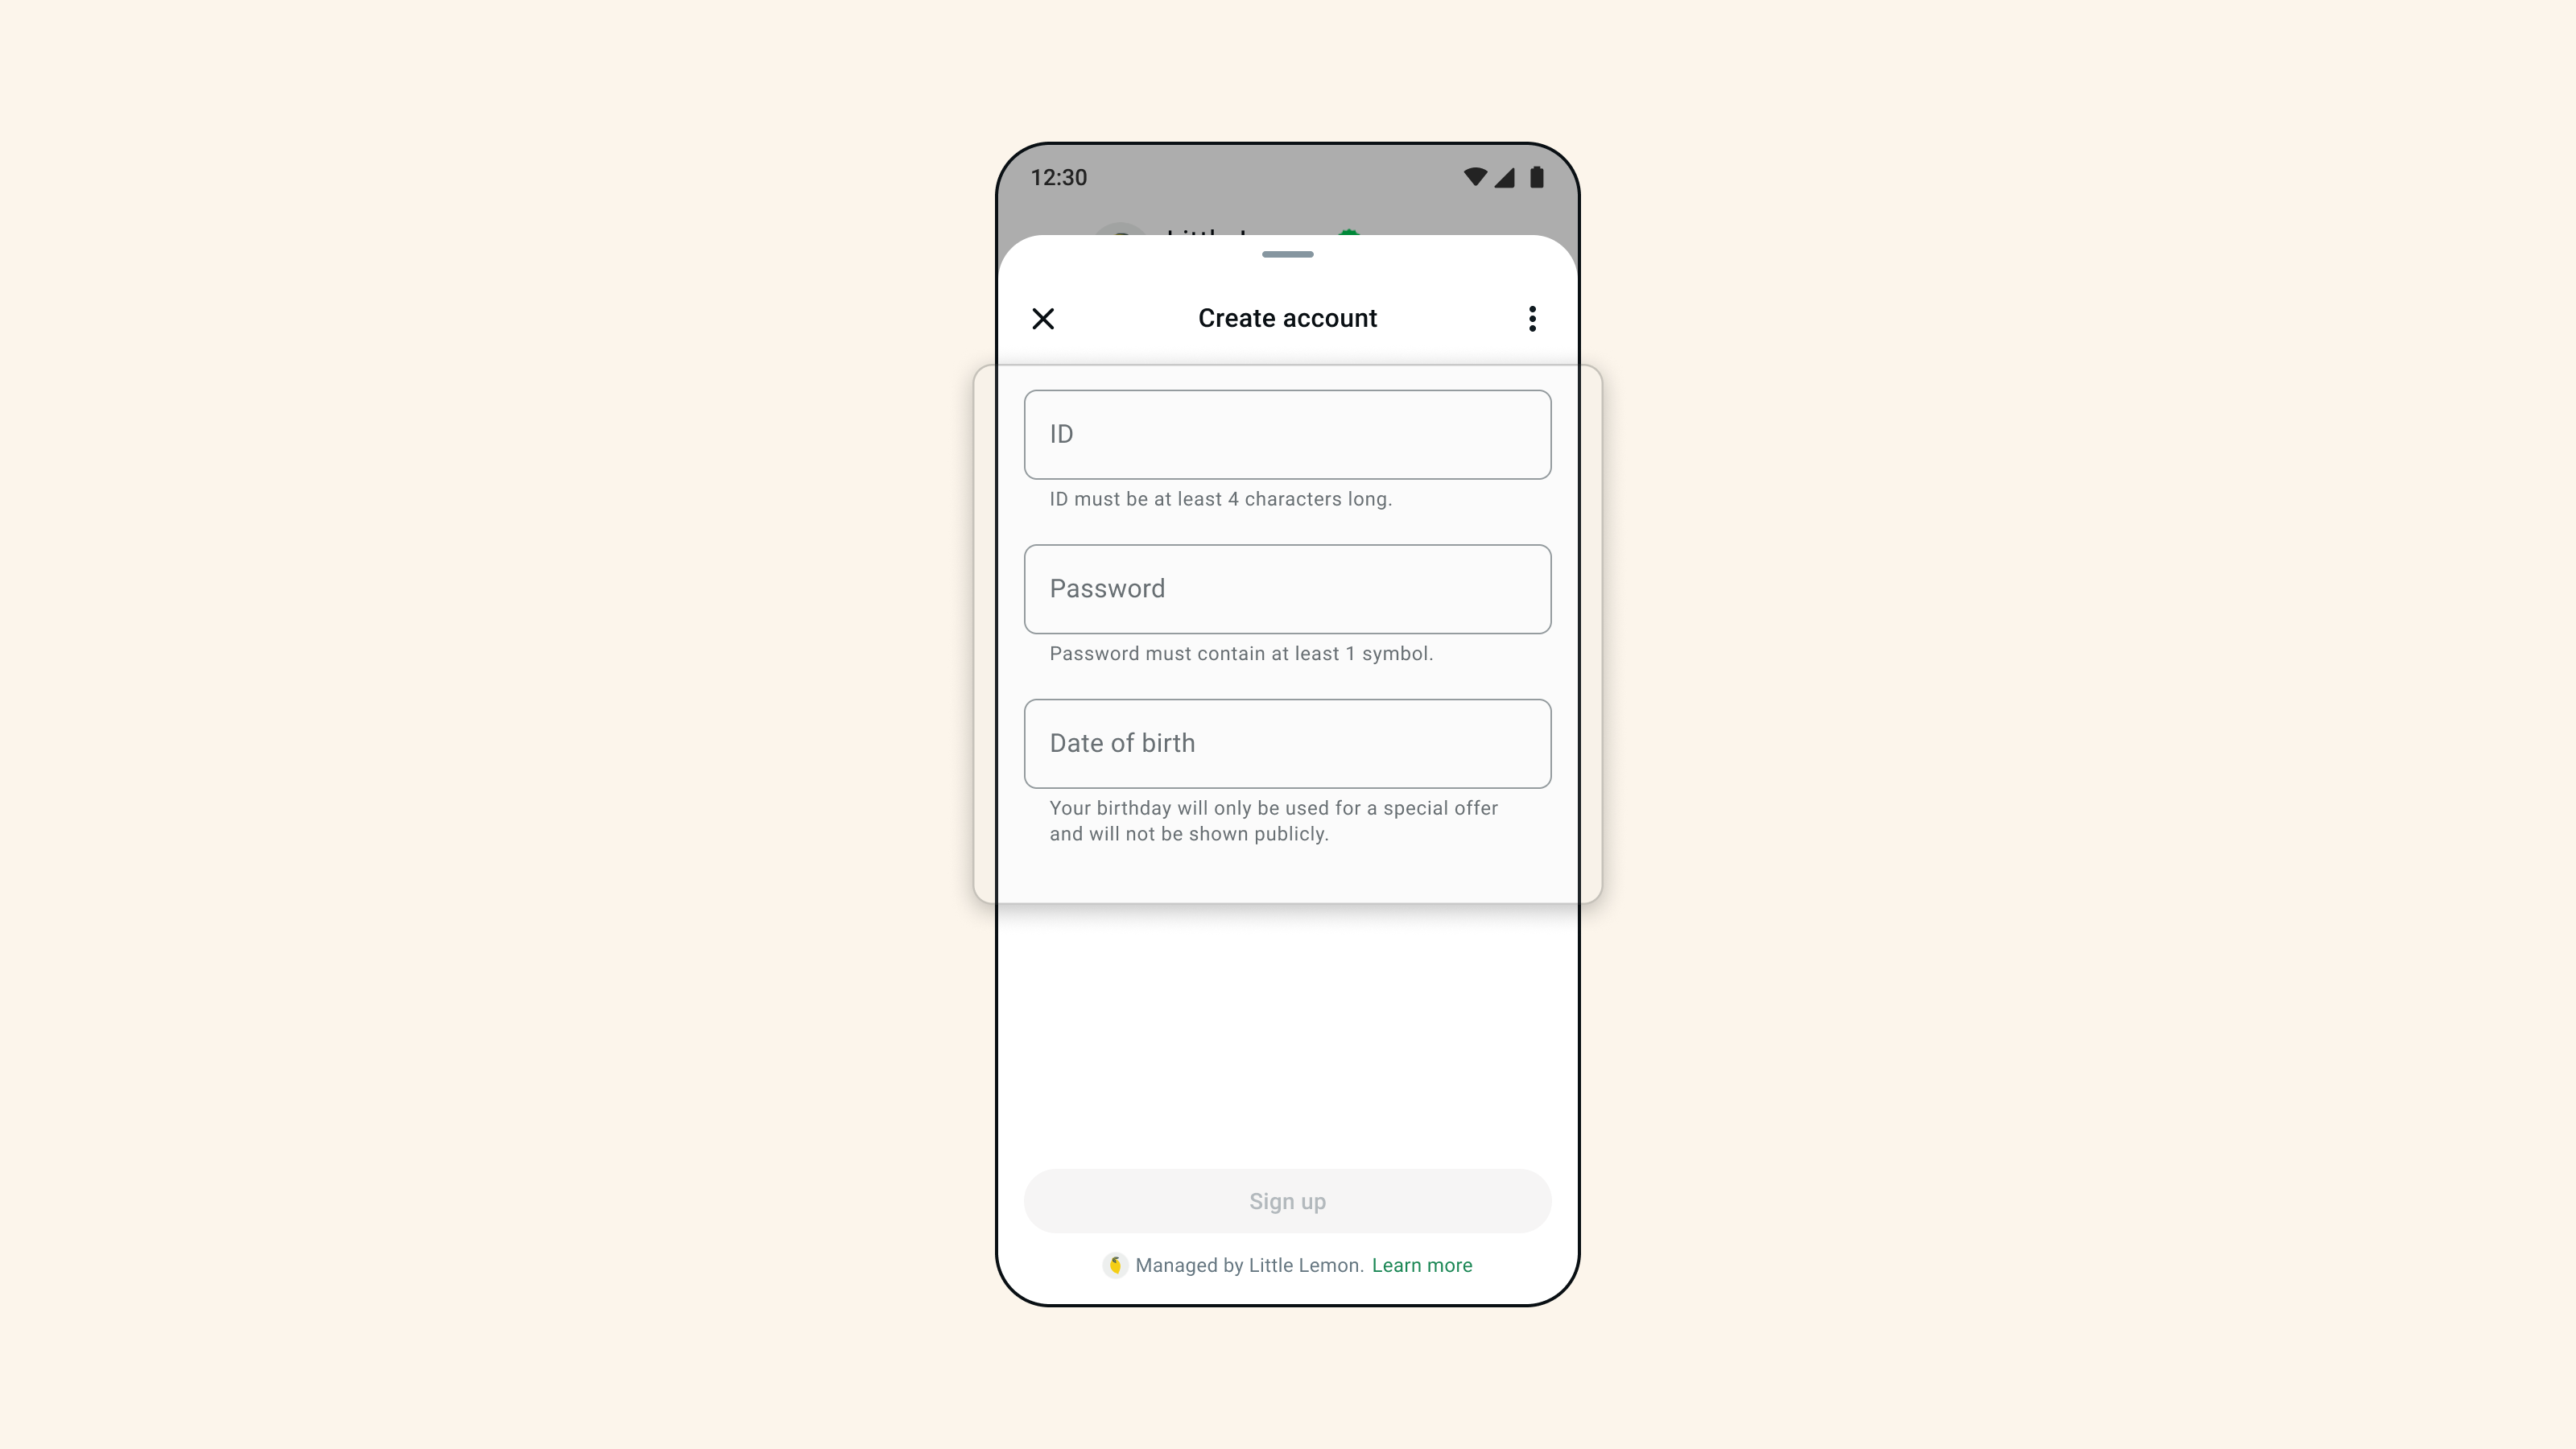
Help Text: Help text should provide clarity to customers, for example, the correct format for a phone number, entering a date, or an email address.
3. Forms and Input Data Quality
Tips for Effective Forms:
-
Use the Right Components: Using the correct components will ensure your users have a better experience and your data format is the best. For example, use a date picker for birth dates or a text input - email to request your customers’ email.
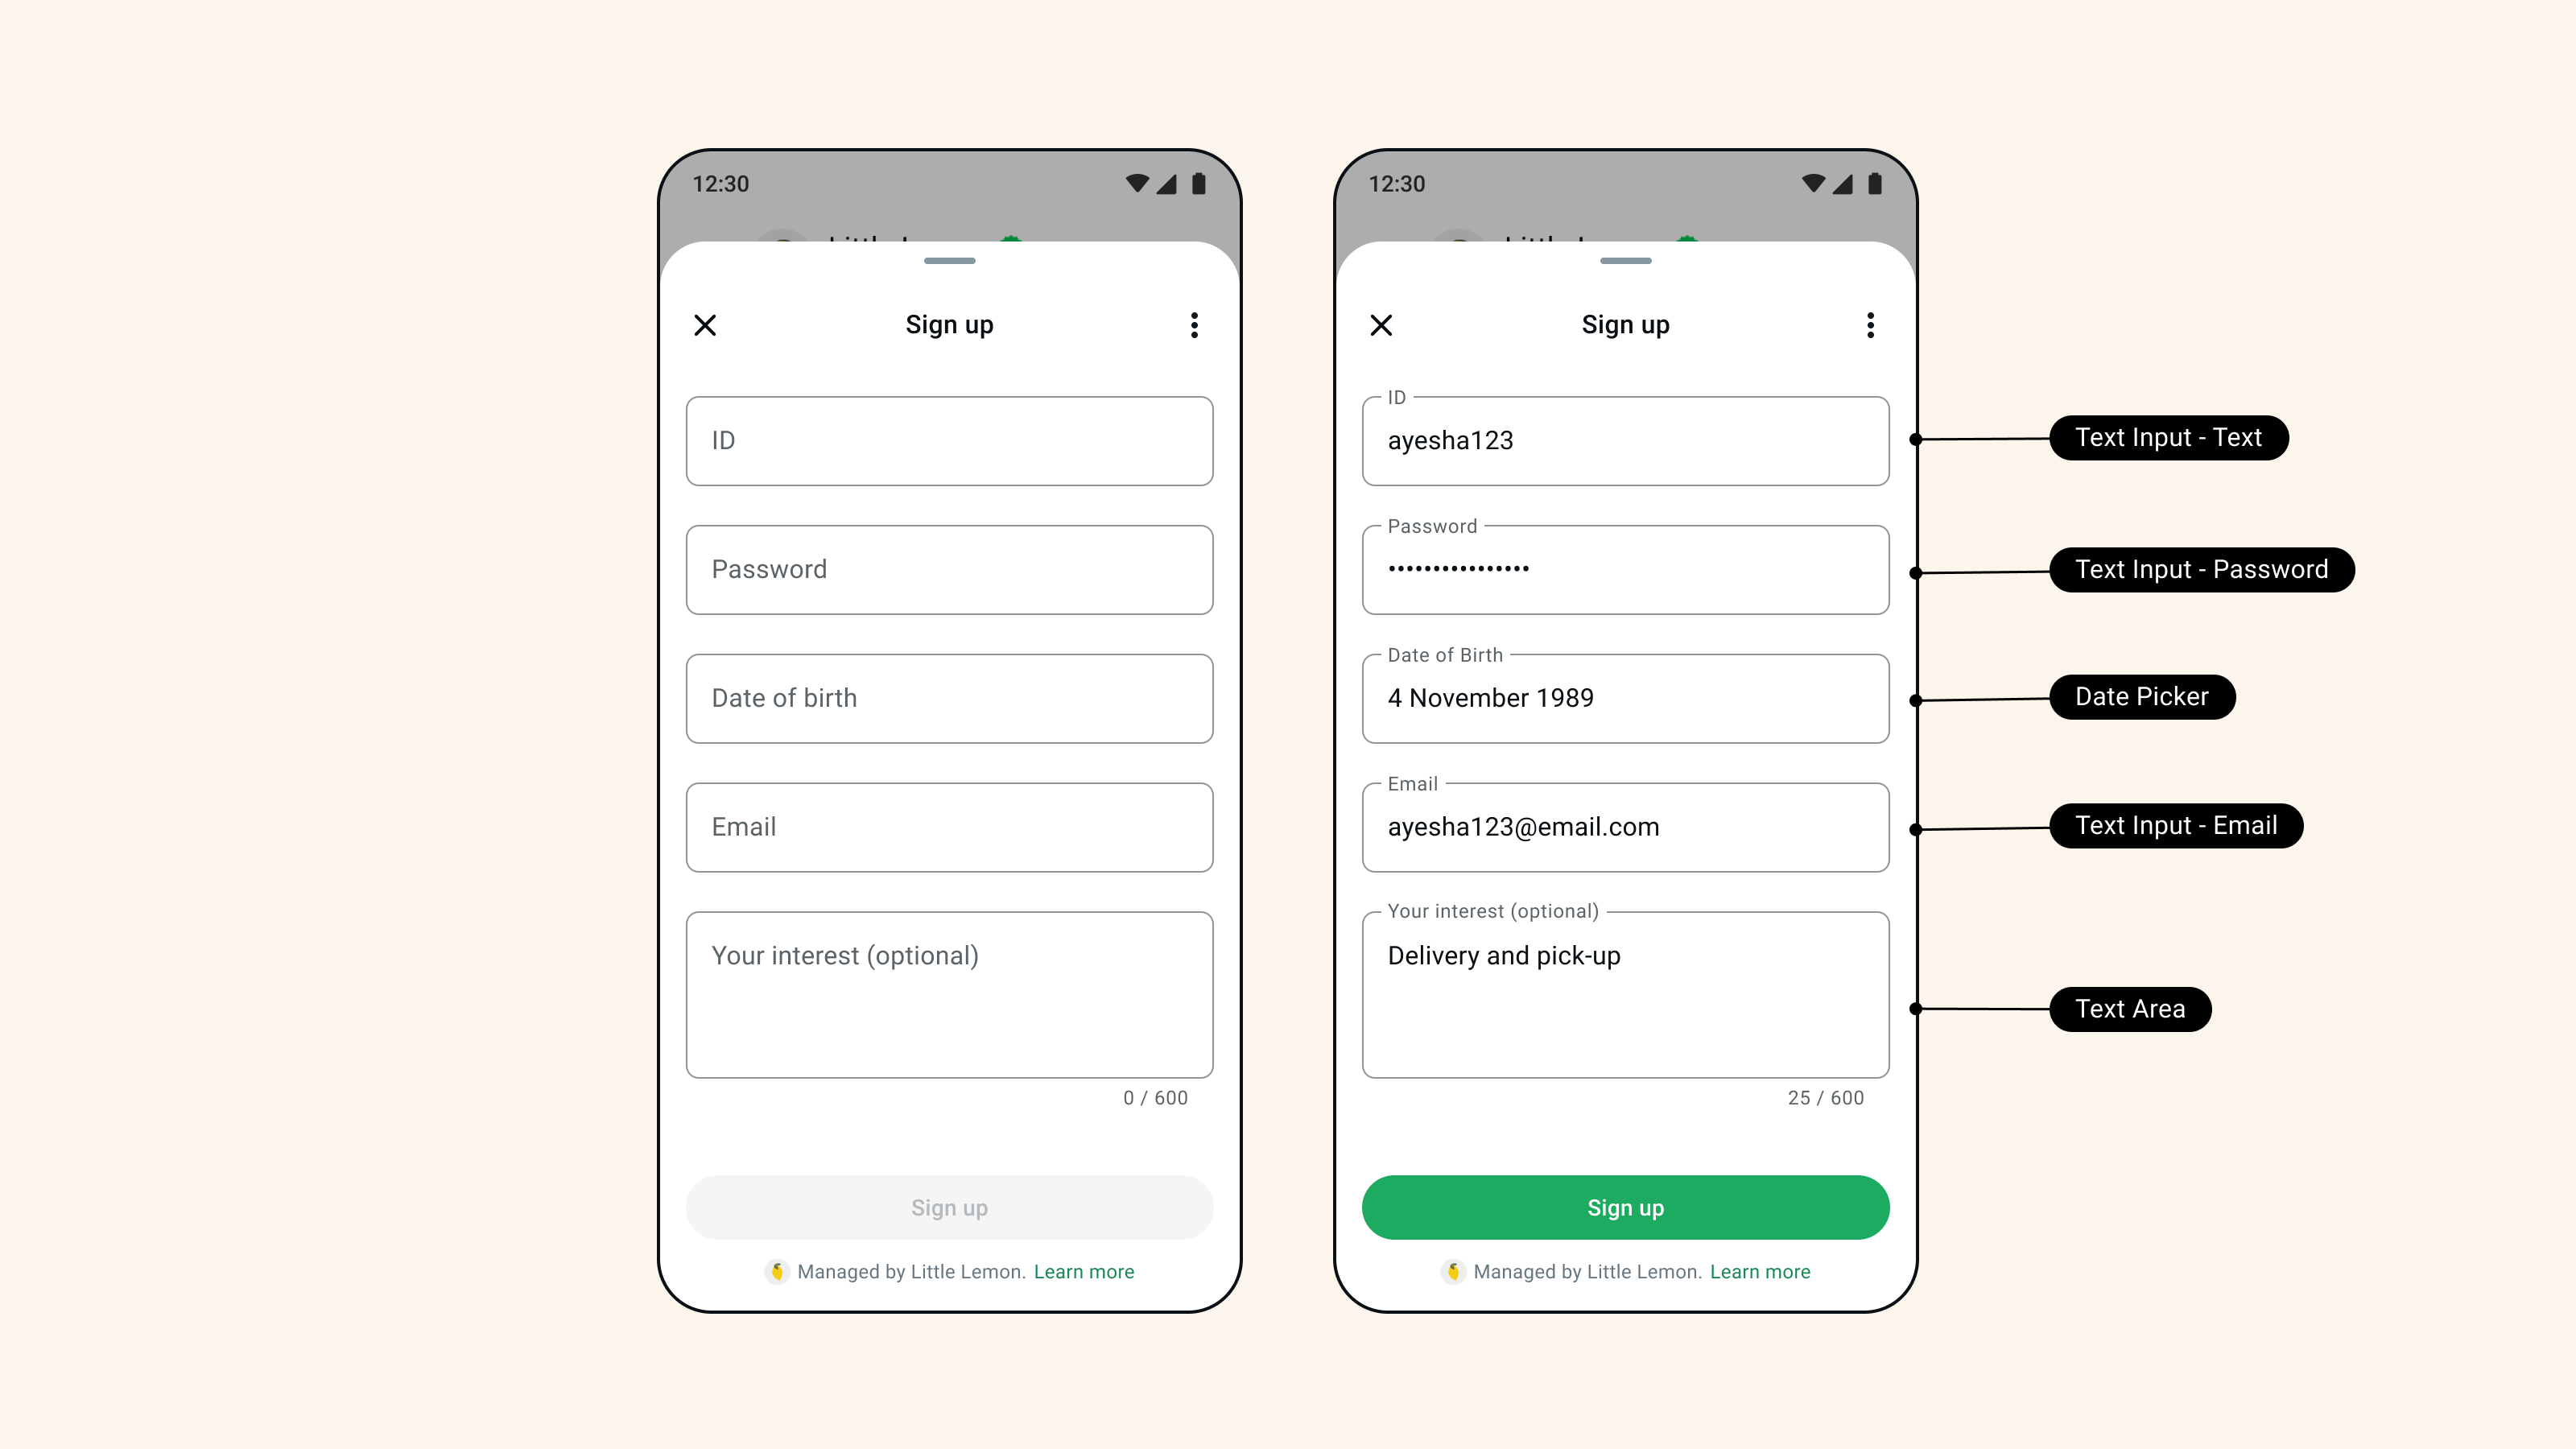
- Provide Clarity: Labels and questions should be self-explanatory, and form fields should be logically ordered (for example, first name before last name).
- Optional Forms: If a form is not essential to completing a task, make it optional.
4. Flow Navigation and Customer Guidance
Tips for Clear and Guided Navigation:
- Customers Want to Complete a Task: The CTA should go hand in hand with the message content. It should be brief and concise, indicating what task the customer can expect to complete when opening the flow.
- Set Expectations: Inform customers how long it will take to complete a task, such as “It should only take a few minutes”. Use concise and action-oriented screen titles (e.g., “Confirm registration”).
- Clarity in Initiation Flow: Customers decide to open a flow based on the clarity of initiation messages. The conversation should feel fluid and provide clear context and actions centered on the task.
- No Surprises: The first screen of the flow should reflect the CTA action. Any deviation from the task will result in a poor experience for the customer and could lead them to close the flow.
5. Opt-in and Consent
Considerations for Opt-in:
- Opt-in Clarity: It’s essential that the customer clearly understands what they’re consenting to when interacting with a flow. Provide a simple and direct explanation of the purpose of the flow and any information that will be collected.
-
Include a ‘Read More’: Include a ‘Read More’ button that links to relevant information, such as Terms and Conditions. This increases transparency and helps build trust with customers.
6. Flow Completion