> ## Documentation Index
> Fetch the complete documentation index at: https://help.treble.ai/llms.txt
> Use this file to discover all available pages before exploring further.

# Location Variable

> Learn how to configure variable location in your conversation flows. This will allow you to add location dynamically in your conversations.

## Send Location

In the Treble editor, you can send a location to a user. This will allow you to add location dynamically in your conversations.

Normally, you do it as follows:

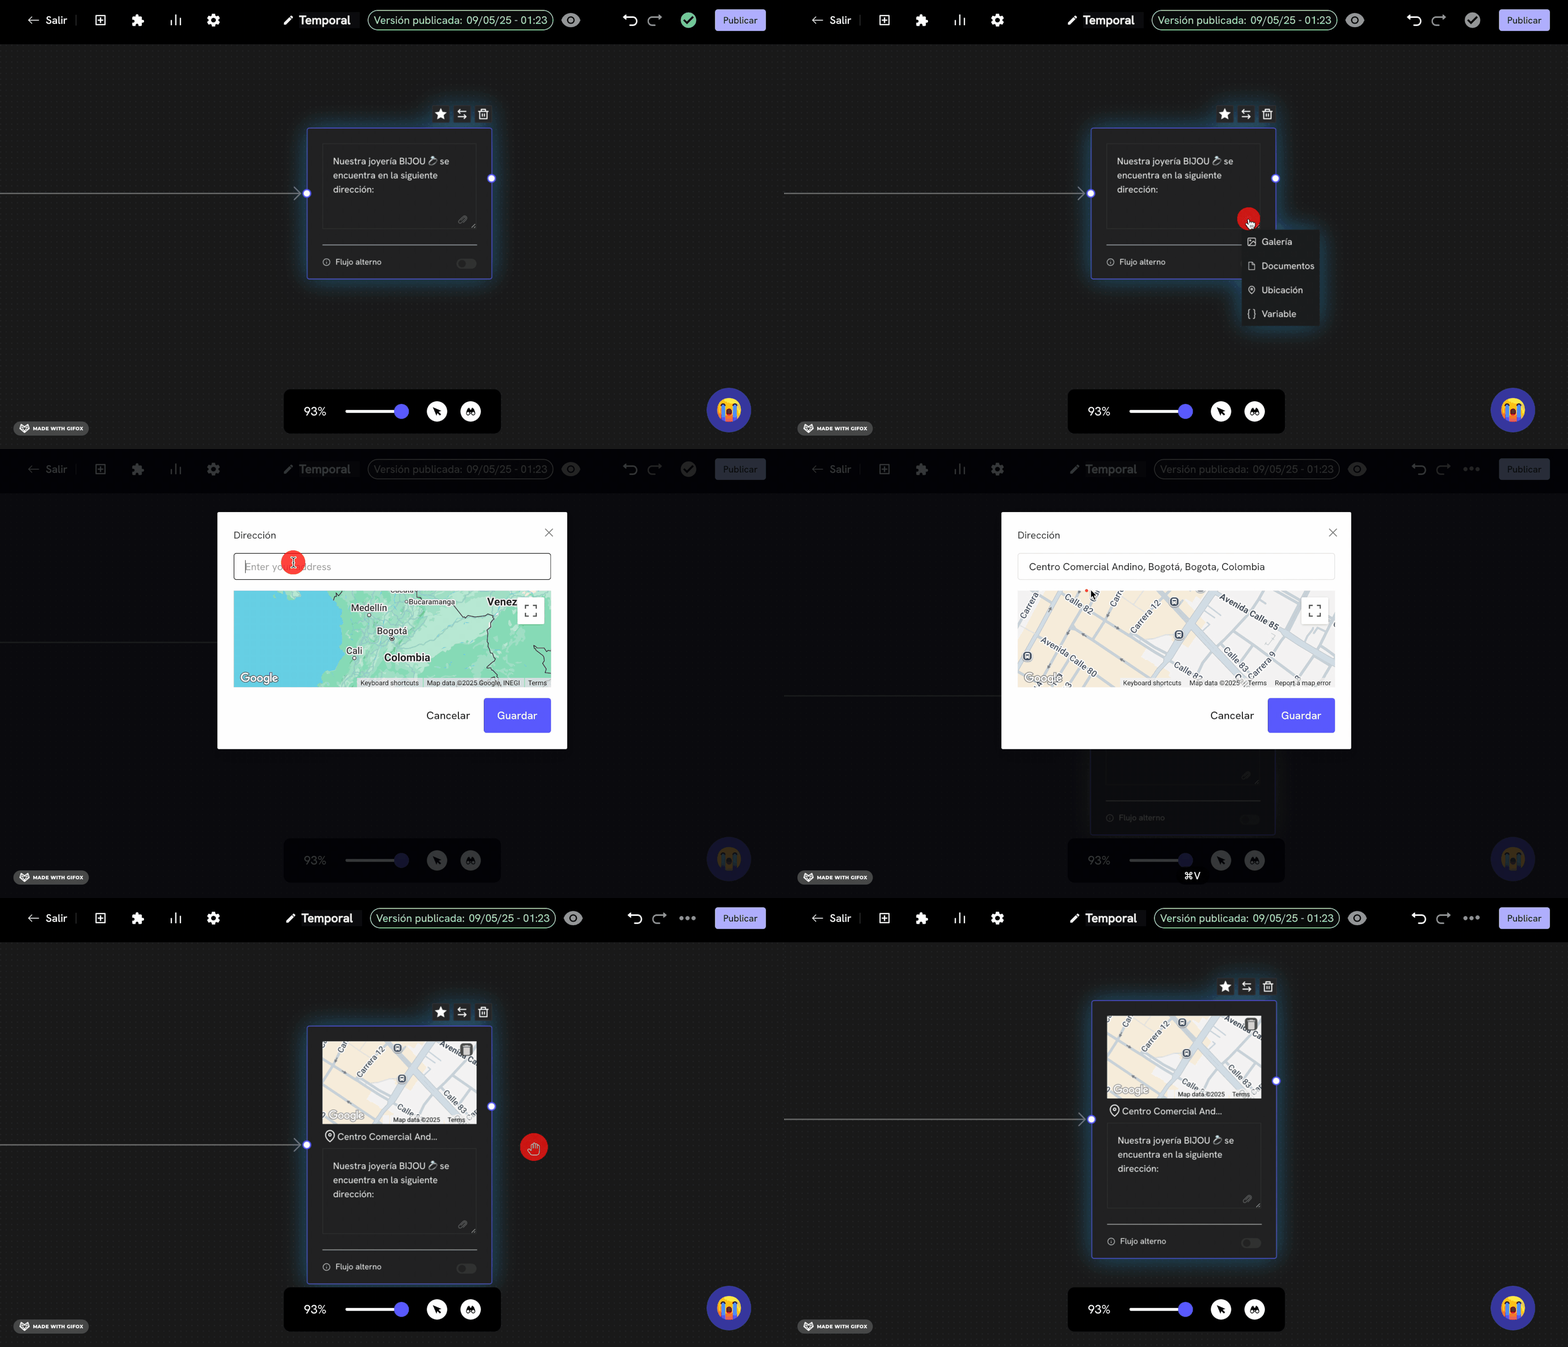
1. Go to the conversation node where you want to send the location.
2. Click on the attach button <Icon icon="paperclip" iconType="solid" />.
3. Choose the **Location <Icon icon="location-dot" iconType="solid" />** option.
4. A modal will appear where you can write the address of the location you want to send.

<img src="https://mintcdn.com/trebleai/fEXY_VeSPQYS96-P/images/location-2.gif?s=9cacf4189066fd4d458ecc5fa6353ad7" alt="Send location in the Treble editor" width="1700" height="975" data-path="images/location-2.gif" />

5. Done! Now, your users will receive the location you sent.

Now, let's see how you can make the location not a static content, but a dynamic one. For this, follow these steps:

1. Go to the conversation node where you want to attach the multimedia.
2. Click on the **Attach <Icon icon="paperclip" iconType="solid" />** button.
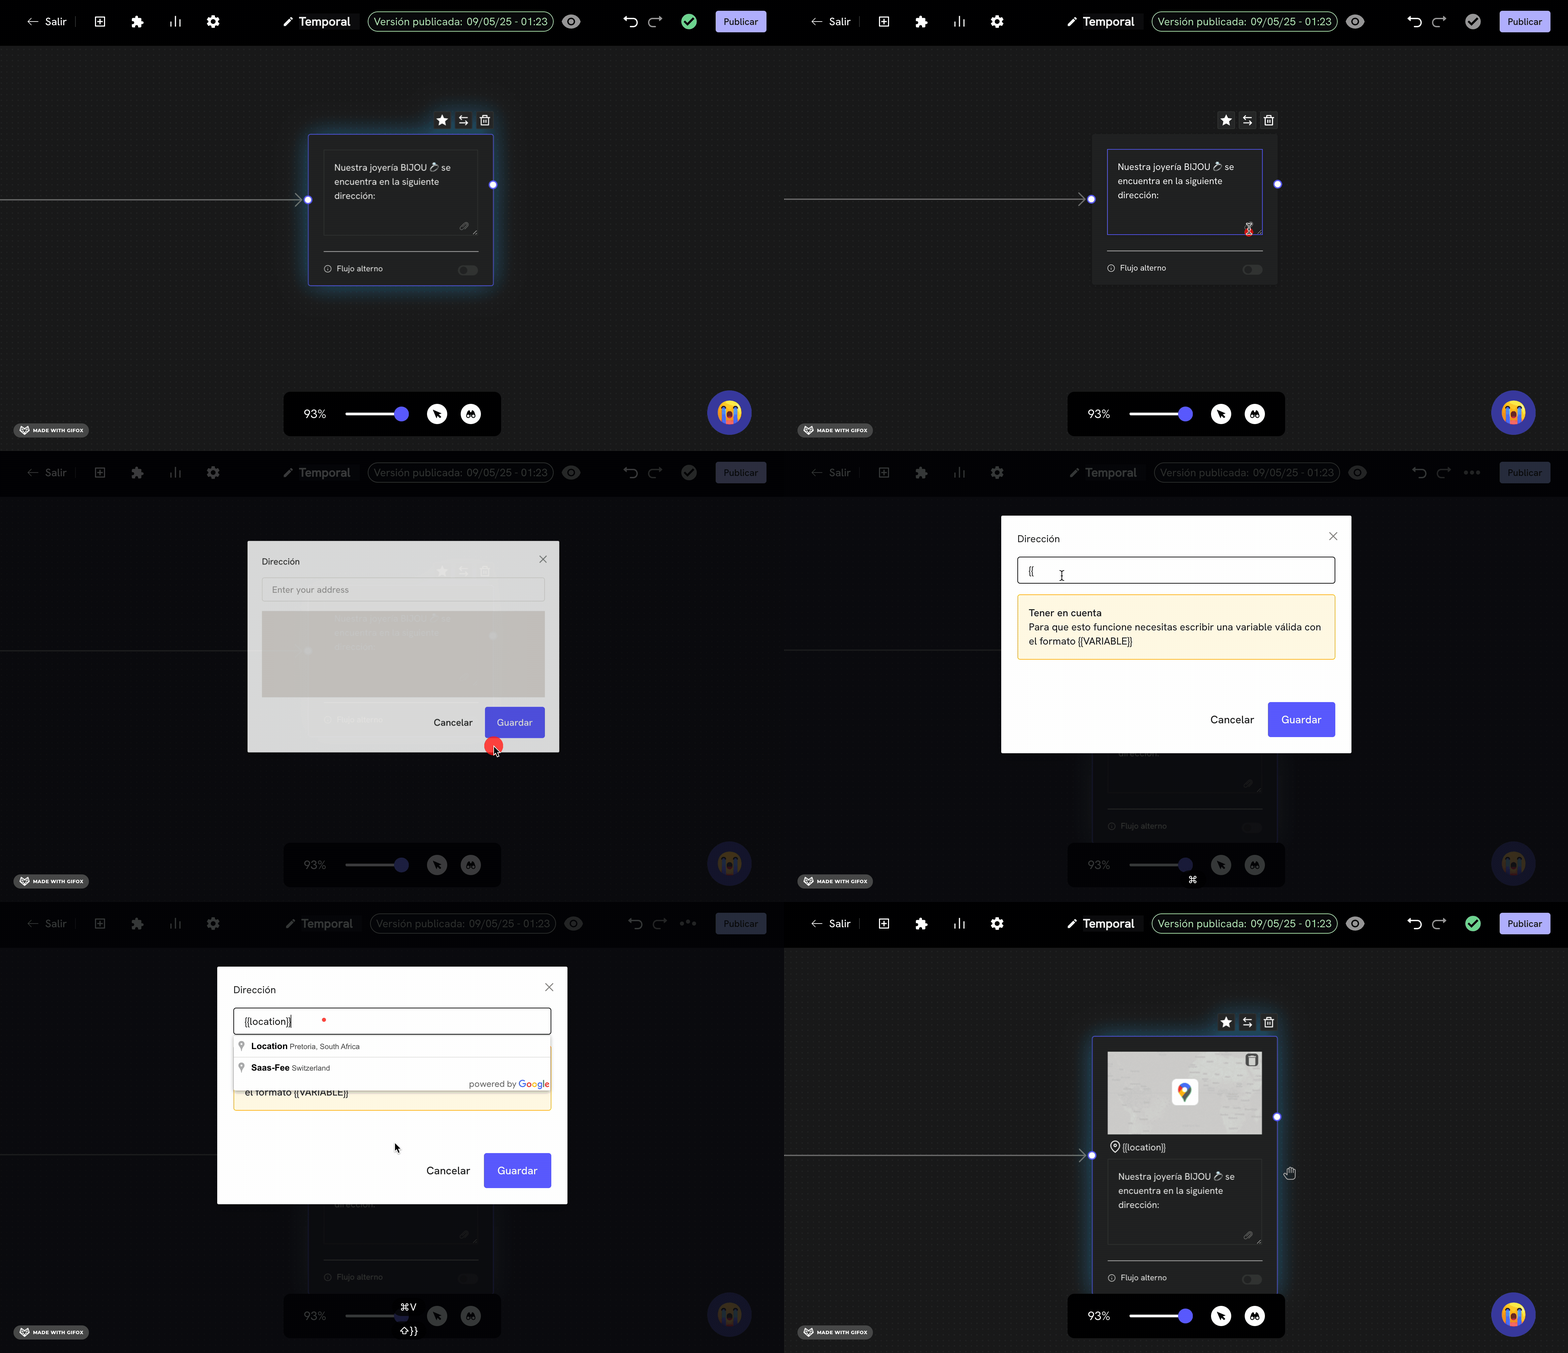
3. Choose the **Location <Icon icon="location-dot" iconType="solid" />** option.
4. Now, instead of writing the address of the location, you will write the name of the variable. In our example, we will call it `{{location}}`. This variable is a `user_session_key`.

<img src="https://mintcdn.com/trebleai/fEXY_VeSPQYS96-P/images/location-3.gif?s=220d781334f70301e42576b5bb48e2e4" alt="Send location in the Treble editor" width="2328" height="1340" data-path="images/location-3.gif" />

5. Done! Now, this variable (in our case `{{location}}`) will wait for the latitude and longitude of the location you want to send. The format of the variable is as follows:

```json theme={null}
{
    "user_session_keys": [
        {
            "key": "location",
            "value": '{"latitude": 47.123456, "longitude": -4.123456, "address": "[Address text]"}'
        }
    ]
}
```

<Note>
  Note that the value of the variable is JSON but is sent as a string.
</Note>

<Check>
  Done! Now you know how to send a location dynamically in your conversations.
</Check>

## Capture a user's location to send it to a webhook

Similarly, you can capture a user's location to send it to a webhook. For this, follow these steps:

<Steps>
  <Step title="Log in to Treble.ai">
    Log in to Treble.ai through the following URL: <a class="article-link" href="https://app.treble.ai"><p>[https://app.treble.ai](https://app.treble.ai)</p><Icon icon="arrow-up-right-from-square" iconType="solid" /></a>
  </Step>

  <Step title="Create a flow">
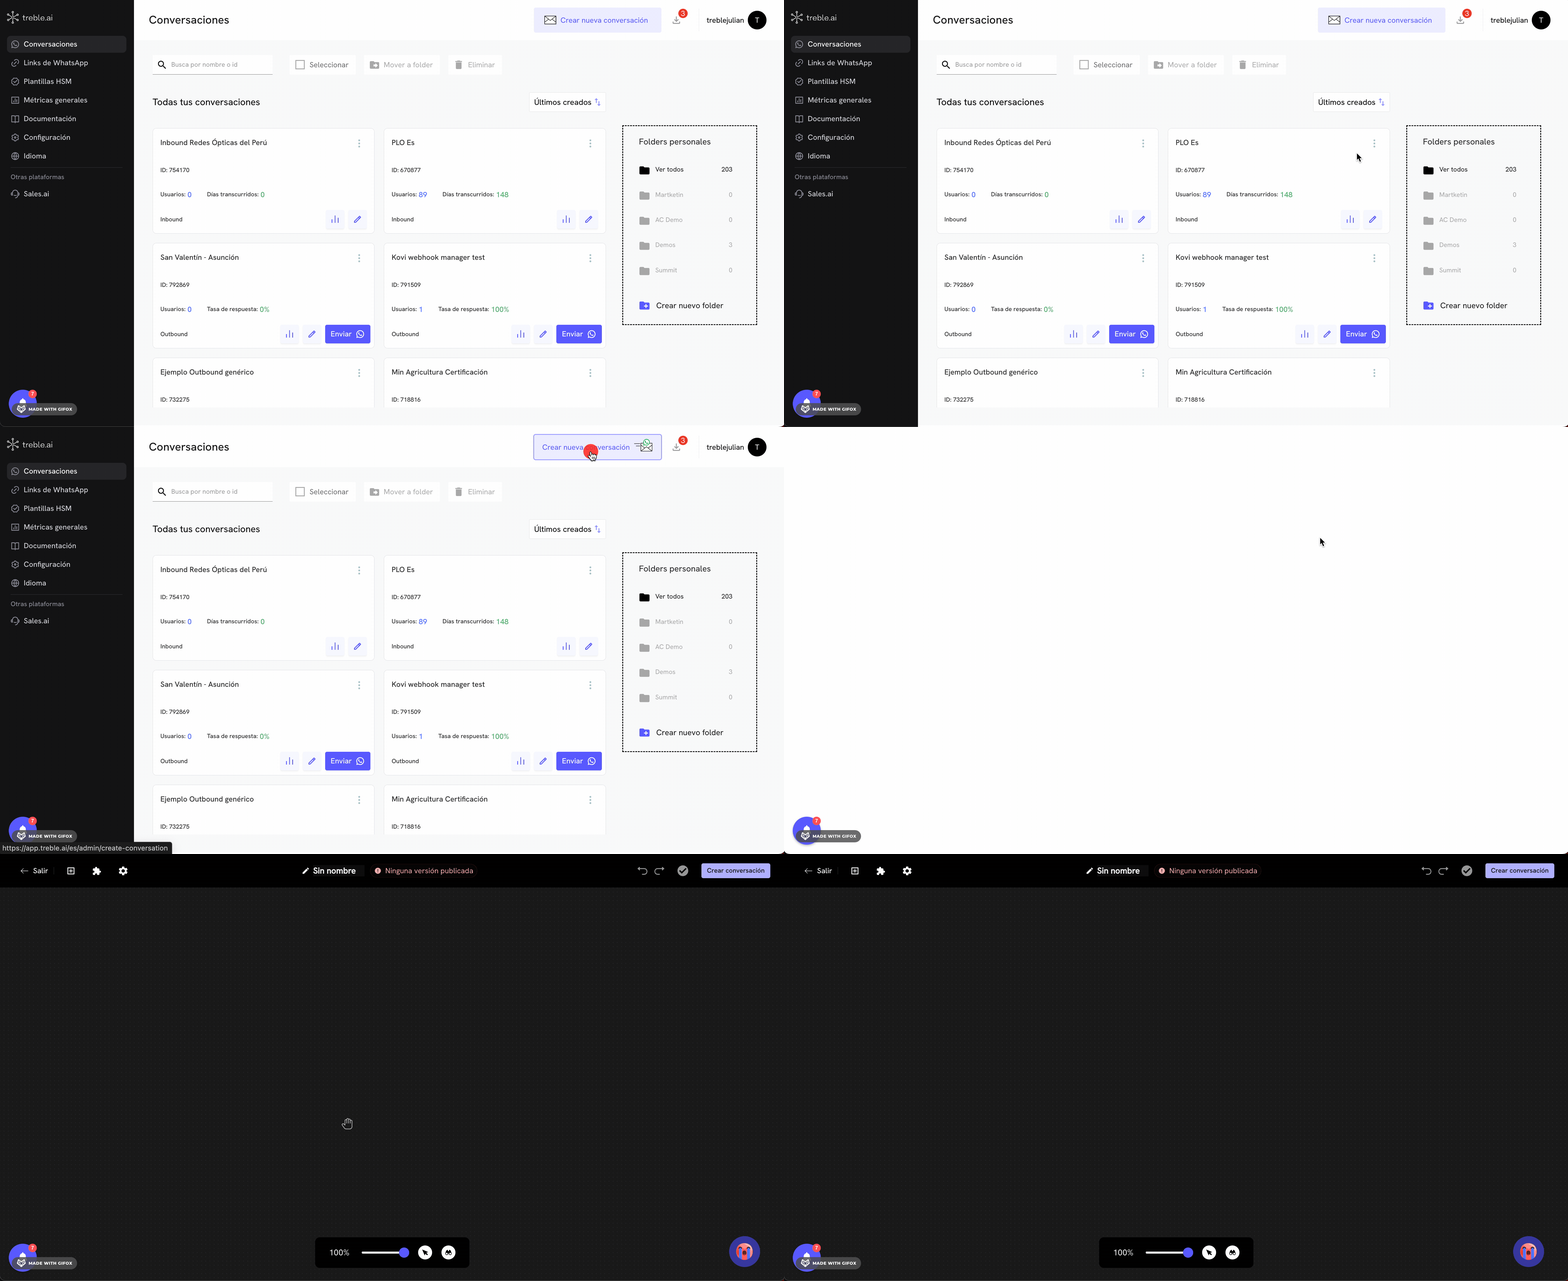
    Go to the "Conversations" section and click on the **"Create Conversation"** button. You can also configure a message read webhook in an existing flow. For this, go to the "Flows" section and click on the **"Edit" <Icon icon="pencil" iconType="solid" />** button of your flow.

    <img src="https://mintcdn.com/trebleai/aaCrgms9mLKayuxp/images/create-convo.gif?s=be4cd557da1bfa256303a5628ebc1768" alt="Create Conversation" width="2686" height="1466" data-path="images/create-convo.gif" />
  </Step>

  <Step title="Find the location capture node">
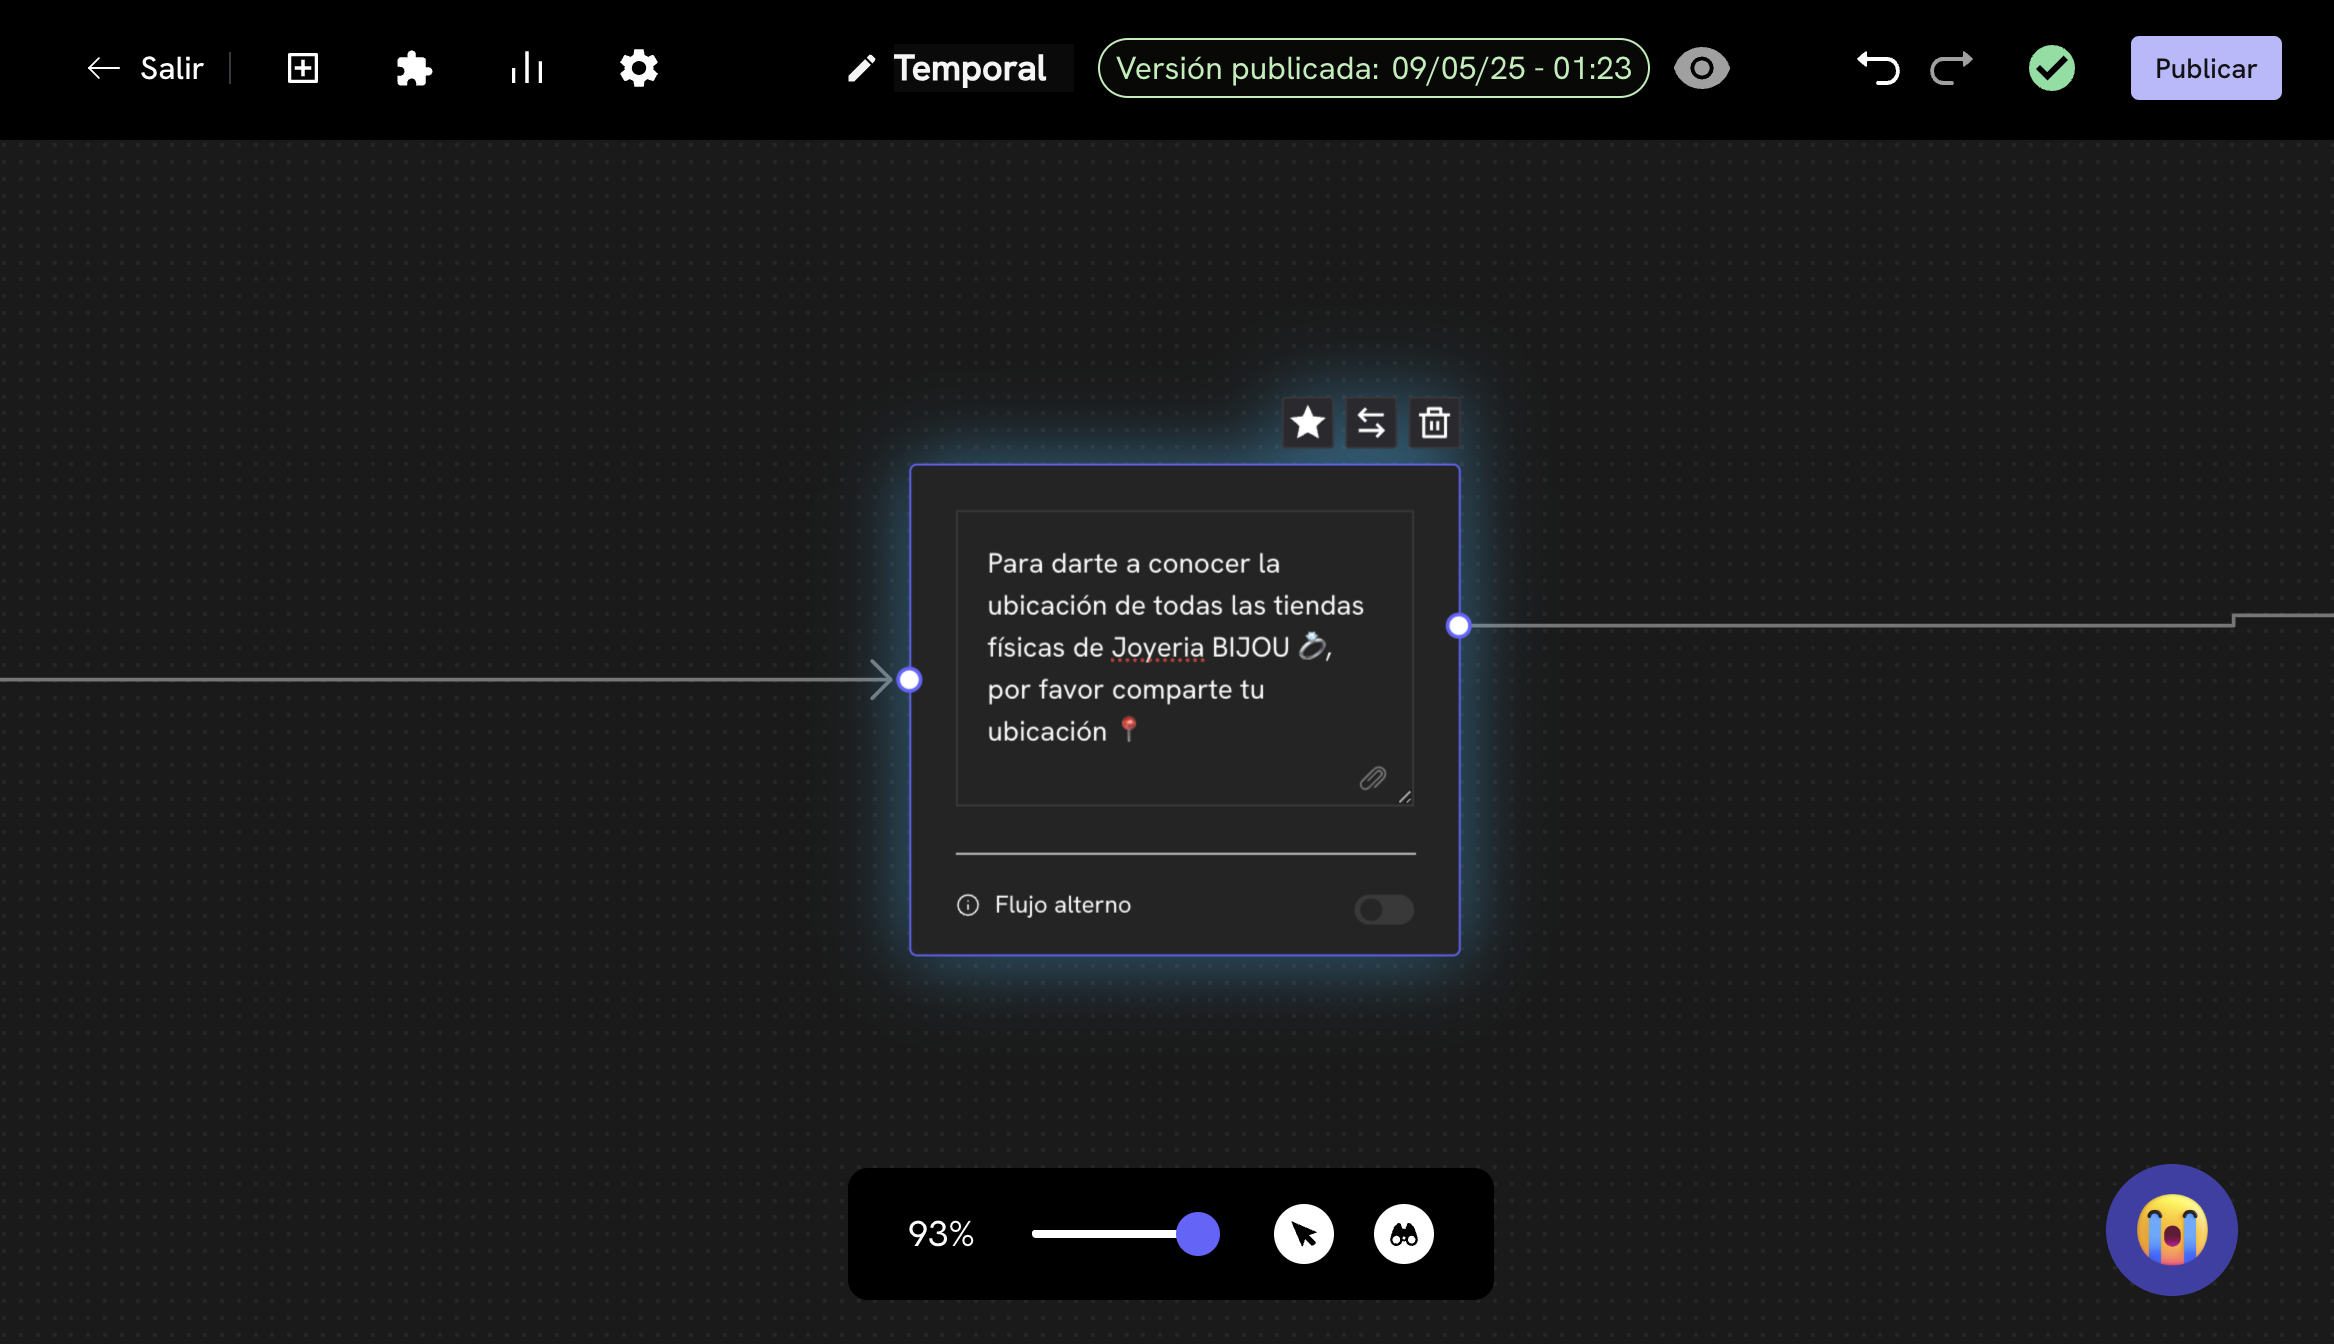
    In the flow, find or create a location capture node. This node is a **Simple Message Block** that will ask the user about their location.

    <img src="https://mintcdn.com/trebleai/fEXY_VeSPQYS96-P/images/location-4.png?fit=max&auto=format&n=fEXY_VeSPQYS96-P&q=85&s=8337220bbeceb50a4732c4a659b101bb" alt="Capture a user's location to send it to a webhook" width="2334" height="1344" data-path="images/location-4.png" />
  </Step>

  <Step title="Capture the location variable">
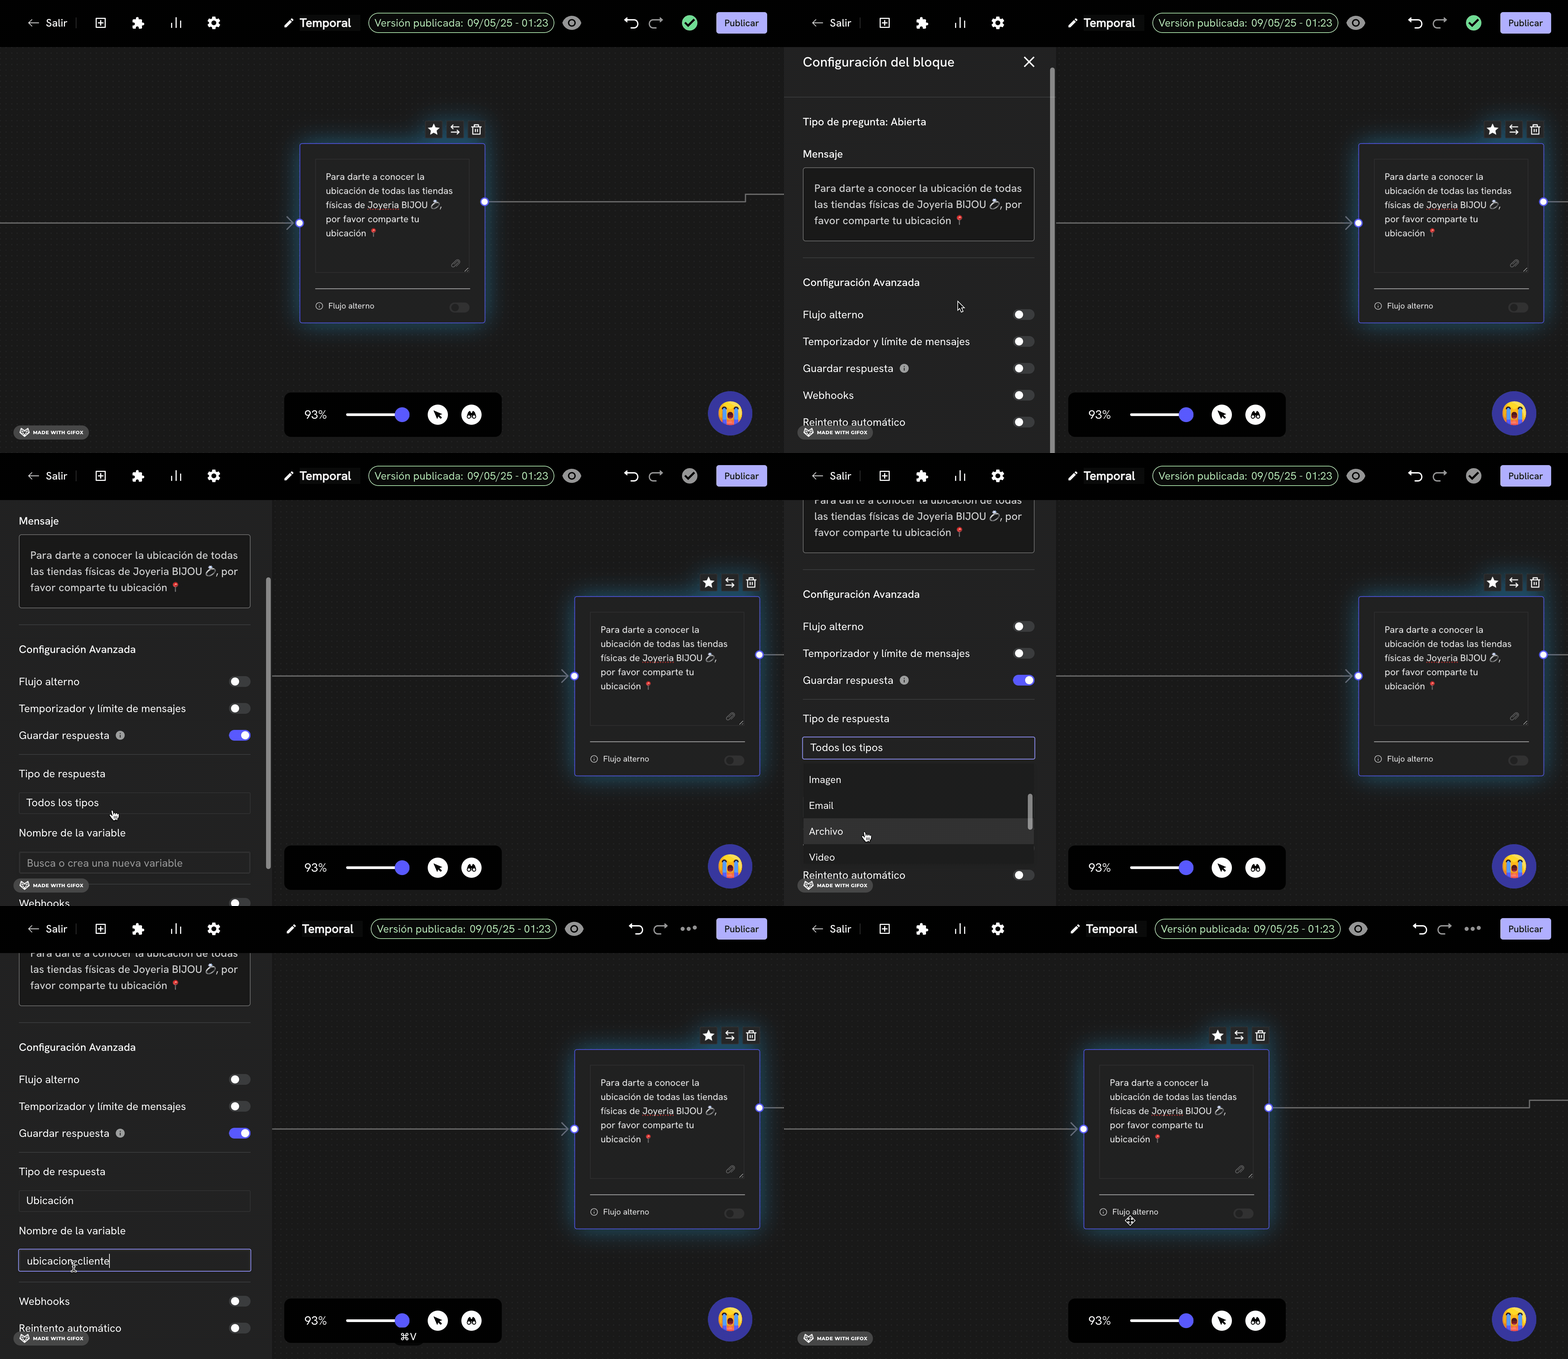
    Now, double-click on the message block, a panel will appear on the left. In this panel, scroll down to find the **Save Response** section. Activate the switch <Icon icon="toggle-on" iconType="solid" /> and configure the variable as follows:

    * **Response type**: `Location`
    * **Variable name**: Can be any name, in our example we will use `client_location`.

    <img src="https://mintcdn.com/trebleai/woBrUvSBPp-ldiW5/images/location-5.gif?s=f7b90189fec890bc6cd12214d0096f33" alt="Capture a user's location to send it to a webhook" width="2328" height="1348" data-path="images/location-5.gif" />
  </Step>

  <Step title="Activate webhook and add endpoint">
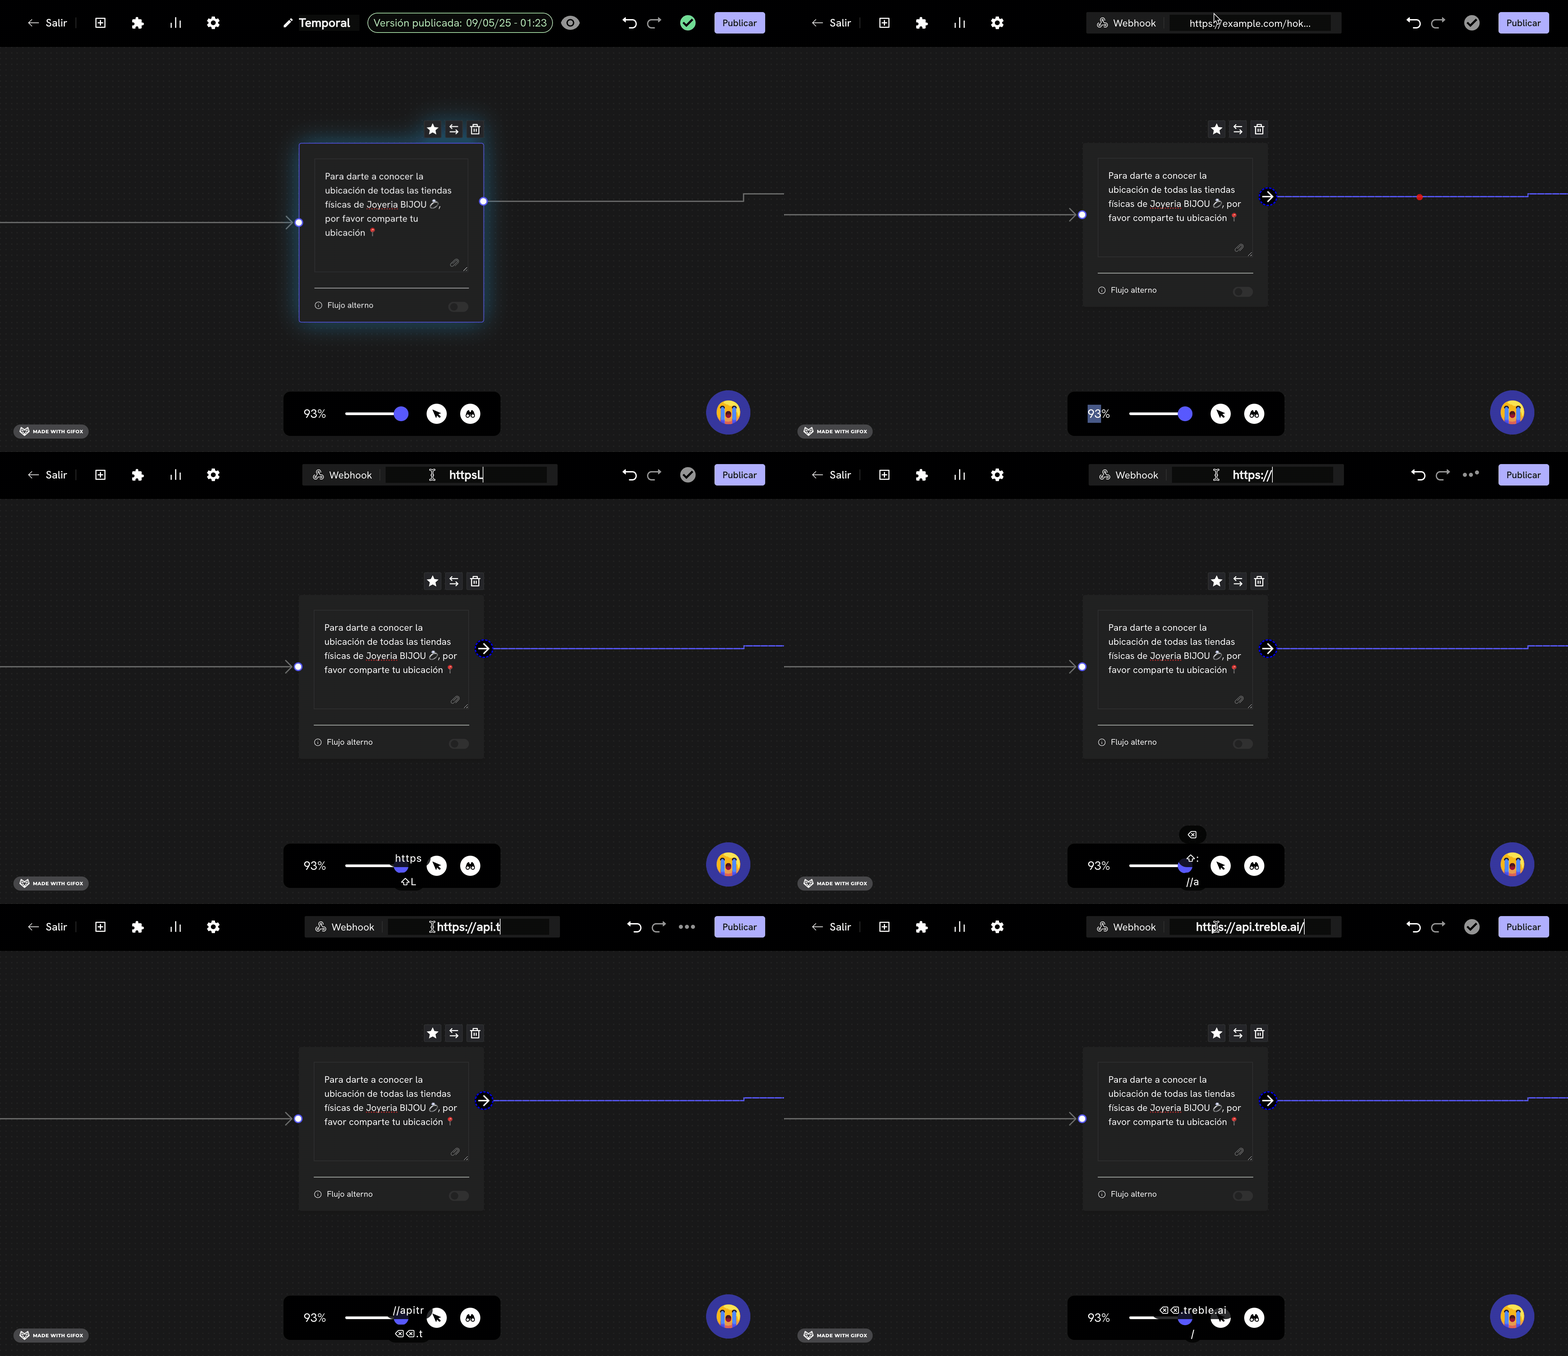
    Now, double-click on the path/arrow <Icon icon="arrow-right" iconType="solid" /> that comes out of the message block and connects to the next block. A text field will appear at the top. In this field, add the endpoint where you want the HTTP request to be sent when this message receives the user's response.

    <img src="https://mintcdn.com/trebleai/woBrUvSBPp-ldiW5/images/location-6.gif?s=3139b505e798b2a27df6680498afeadc" alt="Capture a user's location to send it to a webhook" width="2334" height="1348" data-path="images/location-6.gif" />
  </Step>

  <Step title="Save changes">
    If you are in a new flow, click on the **"Publish Conversation"** button to save the flow. If you are in an existing flow, click on the **"Save"** button to save the changes.

    <Check>
      Done! Now, when a client sends their location to the location capture node, the webhook will be triggered and will send an HTTP request to your endpoint configured in Treble with the client's location.
    </Check>

    Remember that the format of the location variable is as follows:

    ```json theme={null}
    {
        "user_session_keys": [{"key": "client_location", "value": '{"latitude": 47.123456, "longitude": -4.123456, "address": "[Address text]"}'}]
    }
    ```
  </Step>
</Steps>